
Crochet spiderweb accessory Pattern is one of the most creative and eye-catching projects for crochet lovers who enjoy making decorative and wearable handmade pieces.
One of the greatest advantages of this Crochet spiderweb accessory Pattern is its versatility. A finished spiderweb motif can become a hair clip, brooch, necklace pendant, bag charm, wall decoration, table accent, dreamcatcher, costume accessory, or even a decorative patch for hats, scarves, and tote bags.
Crochet enthusiasts also enjoy this project because it uses a relatively small amount of yarn while offering plenty of opportunities to practice stitch consistency. The openwork design creates a lightweight, elegant finish that looks complicated but is actually built from simple crochet stitches. Throughout this guide, you will learn the essential stitch abbreviations, detailed instructions, customization ideas, finishing techniques, and helpful tips to complete your own beautiful Crochet spiderweb accessory Pattern with confidence.
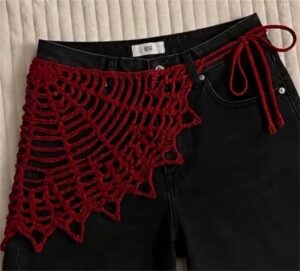
Materials and Crochet Stitch Guide
Before beginning your Crochet spiderweb accessory Pattern, gather all the necessary supplies. Using the correct materials helps achieve crisp stitch definition and makes the web easier to shape. Cotton yarn is highly recommended because it provides excellent structure and keeps the finished web flat after blocking.
Suggested materials include lightweight cotton yarn, a 2.5 mm to 3.5 mm crochet hook, scissors, a yarn needle for weaving in ends, stitch markers if needed, and blocking pins. Optional embellishments such as beads, pearls, ribbons, charms, or faux spiders can add a unique finishing touch.
The following stitch abbreviations will be used throughout this Crochet spiderweb accessory Pattern:
ch = chain, sl st = slip stitch, sc = single crochet, hdc = half double crochet, dc = double crochet, tr = treble crochet, sp = space, rep = repeat, rnd = round.
Start with a magic ring or chain 4 and join with a slip stitch to form a ring. Round 1: Ch 3 (counts as first dc), work 15 dc into the ring, join with sl st. Total: 16 dc.
Round 2: Ch 5, skip next dc, work sc into following dc. Repeat around to create 8 chain spaces. Join with sl st into beginning chain. This forms the first framework of the spiderweb.
Round 3: Sl st into first chain space, ch 6, sc into next chain space. Repeat around to gradually expand the web. Continue increasing the chain lengths in later rounds while keeping the spacing even to maintain a symmetrical appearance.
Step-by-Step Crochet Spiderweb Accessory Pattern
Round 4 begins by slip stitching into the nearest chain space. Chain 7, single crochet into the next chain space, and repeat around. The larger chain spaces start giving the web its distinctive geometric design. Always count your stitches carefully to prevent uneven spacing.
For Round 5, continue increasing each bridge by chaining 8 before attaching with a single crochet. Maintain gentle tension throughout the round. Consistent tension ensures that each web section remains balanced and prevents curling along the outer edges.
Round 6 follows the same concept but uses chain 9 between each anchor point. If desired, tiny picots may be added along the outer edge for additional texture. These decorative points give the web a more delicate and elegant appearance without making the pattern overly complicated.
After completing the final round, fasten off with a long yarn tail. Thread the tail through a yarn needle and weave it securely into nearby stitches. Take care not to distort the open spaces while hiding the ends.
Blocking is highly recommended for every Crochet spiderweb accessory Pattern. Lightly dampen the finished piece, pin each outer point evenly onto a blocking board or foam mat, and allow it to dry completely. Blocking transforms the appearance by opening the lacework and creating crisp, defined lines.
Once blocked, your crochet spiderweb can be attached to a hair clip, headband, necklace, backpack, purse, scarf, hat, costume, wreath, or decorative hoop. This simple finishing step turns the crochet motif into a practical and attractive accessory suitable for many occasions.
Creative Ideas for Customizing Your Crochet Spiderweb Accessory Pattern
Changing yarn colors dramatically transforms the final appearance of the Crochet spiderweb accessory Pattern. Traditional black creates a classic Halloween style, while white gives the web a delicate lace effect. Metallic silver, purple, emerald green, deep red, or gold can produce elegant seasonal decorations.
Different yarn weights also create unique results. Fine crochet thread produces intricate miniature accessories, while thicker cotton yarn creates larger decorative pieces suitable for wall art, table décor, or costume elements.
Beads may be added directly into the chains while crocheting. Small crystal beads imitate morning dew, while black beads can resemble tiny spiders resting on the web. Pearl accents provide a sophisticated vintage aesthetic.
Multiple spiderwebs can be layered together in different sizes. Place a smaller web over a larger one using contrasting colors to create depth and dimension. This technique works especially well for brooches, wall hangings, and decorative wreaths.
Consider adding crocheted spiders, bats, leaves, flowers, moons, stars, or tiny pumpkins to personalize your accessory. These embellishments complement the web beautifully and allow you to create seasonal or themed decorations without changing the main pattern.
Finally, experiment with stiffening techniques if you want the web to maintain a firm three-dimensional shape. Fabric stiffener or diluted craft glue can be applied carefully after blocking, especially for ornaments or hanging decorations that need additional support.
Tips for Perfect Results and Common Mistakes to Avoid
Maintaining consistent tension is one of the most important factors when making a successful Crochet spiderweb accessory Pattern. Uneven tension can cause some sections to become loose while others appear tight, making the web asymmetrical.
Always count every chain carefully before attaching it to the next anchor point. Missing even one chain may gradually distort the circular shape of the web. Taking a few extra seconds to count each repeat saves time later.
Blocking should never be skipped if you want a professional-looking finish. Even experienced crocheters rely on blocking to enhance lace projects because it improves stitch definition and overall symmetry.
Choose smooth yarn rather than fuzzy novelty fibers. Smooth cotton or mercerized cotton highlights the stitch pattern and allows the intricate web design to remain clearly visible from every angle.
Practice the basic stitches before starting if you are new to crochet. Since the project mainly uses chains, single crochet, double crochet, and slip stitches, becoming comfortable with these techniques makes the process much easier and more enjoyable.
Remember that every handmade project is unique. Small variations give your finished accessory character and demonstrate the beauty of handcrafted crochet. Focus on enjoying the creative process while gradually improving your technique with each new project.
FAQ
Is the Crochet spiderweb accessory Pattern suitable for beginners?
Yes. Beginners who already know basic crochet stitches such as chain, single crochet, double crochet, and slip stitch can successfully complete this project with patience.
What type of yarn works best?
Cotton yarn is generally the best option because it offers excellent stitch definition, holds its shape well, and blocks beautifully.
Can I make the spiderweb larger?
Absolutely. Simply continue adding additional rounds while gradually increasing the chain lengths and maintaining even spacing.
How long does this project usually take?
Most crocheters can complete a small spiderweb accessory within one to three hours, depending on experience and the level of decoration added.
Do I need to block the finished web?
Blocking is strongly recommended because it creates clean, symmetrical lines and enhances the delicate lace appearance of the spiderweb.
Can I wash the finished accessory?
Yes. If made with cotton yarn, hand washing in cool water followed by reshaping and air drying is generally the safest method.
What accessories can I make with this pattern?
You can create brooches, hair clips, necklaces, earrings, bookmarks, bag charms, wreath decorations, dreamcatchers, wall décor, costume accessories, and holiday ornaments.
Can I use different colors?
Definitely. Black is traditional, but white, silver, purple, orange, gold, red, and even gradient yarns create stunning variations suitable for different seasons and personal styles.
Conclusion
Creating a Crochet spiderweb accessory Pattern is a rewarding project that combines simple crochet techniques with an elegant lace-inspired design.
Throughout this guide, you learned the recommended materials, essential crochet stitch abbreviations, detailed step-by-step instructions, finishing methods, customization ideas, and practical tips to achieve professional-looking results. Whether you choose to make a decorative ornament, wearable accessory, or seasonal decoration, this versatile pattern offers endless creative possibilities while helping you strengthen your crochet skills.
We hope this tutorial inspires you to experiment with colors, textures, and embellishments to create a truly unique handmade piece. If you enjoyed this article, please leave your honest opinion, share your experience, and send your suggestions. Your feedback helps improve future crochet tutorials and inspires even more creative projects for fellow crochet enthusiasts.