
Fabric pumpkin trivet pattern is a beautiful and practical sewing project that combines seasonal autumn style with a useful handmade accessory for the kitchen or dining table.
One reason the Fabric pumpkin trivet pattern works so well as a seasonal sewing project is that the recognizable pumpkin shape can be created without extremely complicated pattern pieces.
In this detailed tutorial, you will learn how to draft and resize a simple pumpkin template, choose appropriate fabrics and insulating materials, cut the individual pieces, assemble the pumpkin body, create the characteristic curved sections, add the stem, layer the trivet, quilt the surface, and finish the outer edge neatly. The instructions can also be adapted to produce several coordinating sizes for an autumn table arrangement. Because a trivet may be exposed to heat, material selection deserves special attention, and decorative synthetic materials should not automatically be treated as heat resistant. By following each stage carefully, this Fabric pumpkin trivet pattern can become a polished handmade project that combines useful sewing techniques with a charming seasonal design.
Materials, Measurements, and Cutting the Fabric Pumpkin Pieces
Begin the Fabric pumpkin trivet pattern by gathering quilting cotton for the front and backing, cotton batting, an appropriate heat-resistant insulating layer if the finished piece will actually be used beneath warm cookware, coordinating cotton thread, fabric scissors or a rotary cutter, pins or sewing clips, a ruler, removable fabric marker, iron, and sewing machine. You will also need a small piece of brown, tan, or green cotton fabric for the pumpkin stem. If you are making the piece only for decorative purposes, ordinary batting can provide sufficient body, but a functional kitchen trivet should be constructed with materials specifically intended to handle the expected level of heat.
A useful finished size for a medium pumpkin trivet is approximately 9 to 11 inches wide and 8 to 10 inches tall, excluding the stem. These dimensions provide enough surface area for many serving pieces without making the pumpkin excessively large. You can easily adjust the pumpkin trivet sewing pattern by enlarging or reducing the template. When resizing, maintain the overall proportions so that the pumpkin remains wider through the middle and slightly narrower at the top and bottom.
To draft the template, fold a sheet of paper in half vertically and draw one side of a pumpkin silhouette. Begin near the upper center, curve outward toward the widest portion, and gradually bring the line inward toward the bottom. Cut along the line while the paper remains folded, then open it to reveal a symmetrical pumpkin. If the shape looks too circular, trim the upper and lower sections slightly to emphasize the characteristic pumpkin form.
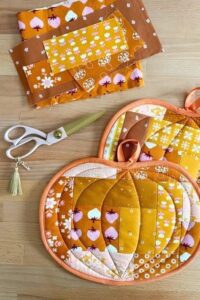
You can make the pumpkin front from one piece of fabric or create it from individual segments. For the simplest version, use the paper template to cut one complete pumpkin from the main fabric. Later, curved quilting lines will create the visual segments. For a more detailed patchwork pumpkin trivet, divide the paper template into approximately five vertical sections and add seam allowances along the newly created edges before cutting the fabric pieces.
When using separate sections, consider alternating prints or shades. A dark orange center with lighter orange side sections creates natural dimension, while combinations of plaid, gingham, floral, and solid cotton give the project a scrappy farmhouse appearance. Arrange all pieces on your table before sewing them together. This allows you to evaluate the overall balance and move prints around until the Fabric pumpkin trivet pattern has a pleasing arrangement.
Finally, cut one full pumpkin shape from the backing fabric and corresponding shapes from the batting and insulating material. Cut a stem approximately 2½ to 3½ inches long and around 1½ to 2 inches wide, adjusting these measurements to match your pumpkin. Keep all pieces organized before beginning assembly. Accurate cutting makes the following sewing stages much easier and helps the layers align cleanly.
Sewing the Pumpkin Sections, Stem, and Decorative Details
If you selected the patchwork construction method, begin by sewing the central pumpkin sections together. Place two neighboring pieces right sides together, carefully matching their curved edges. Pin or clip along the seam and sew using approximately a 1/4-inch seam allowance. Curved seams require patience, so guide the fabric gently instead of pulling it through the sewing machine.
Continue adding sections one at a time until the complete pumpkin front has been assembled. Press each seam carefully before adding the next section. Depending on the direction of the curves, you may need to make a few small clips in the seam allowance so the fabric can relax and lie flat. Do not cut through the stitching. Once all sections are joined, compare the assembled front with the original Fabric pumpkin trivet pattern template and trim minor irregularities if necessary.
If you are using a single fabric front instead, draw several gentle curved lines from the top indentation toward the bottom center. These lines should resemble the natural grooves of a pumpkin. Avoid making them perfectly straight because pumpkins typically have rounded sections. The lines can later be quilted through all layers, creating both decorative detail and practical stability.
Prepare the stem by folding the small fabric rectangle in half with right sides together. Sew along the long side, turn it right side out, and press it flat. Fold the raw lower edge if necessary and position the stem at the top center of the pumpkin. Depending on your assembly method, the stem can be basted to the front before the backing is attached. Make sure it points away from the pumpkin body so it will sit correctly after turning.
At this stage, you can also add decorative appliqué details if desired. A small green fabric leaf positioned near the stem can give the fabric pumpkin potholder or trivet additional character. If you add appliqué, secure the pieces thoroughly before assembling the final layers. Simple machine stitching around the leaf edge can provide both decoration and durability.
Press the completed pumpkin front gently, taking special care around any curved patchwork seams. Avoid excessive heat on insulating materials unless their care instructions specifically allow it. The front should lie reasonably flat before layering. Small variations are normal in handmade sewing, but careful pressing helps prevent wrinkles from becoming trapped inside the completed trivet.
Layering, Quilting, and Finishing the Pumpkin Trivet
The internal layers are particularly important when making a functional Fabric pumpkin trivet pattern. Arrange the front fabric, cotton batting, appropriate heat-resistant insulating layer, and backing according to the construction method suited to your chosen materials. If your insulating product has a specific orientation or layering requirement, follow those material instructions. The goal is to create an evenly padded surface without bulky folds or gaps.
One beginner-friendly construction method is the turn-and-topstitch technique. Position the batting and insulating layers behind the front, then place the backing fabric right sides together with the pumpkin front. Pin or clip around the entire perimeter, ensuring the stem remains safely positioned where it should be. Leave an opening approximately 3 to 4 inches wide along a relatively straight portion of the lower edge for turning.
Sew slowly around the pumpkin using an even seam allowance. Reduce your speed around the deepest curves and top indentation because these areas require greater precision. After stitching, trim bulky seam allowances and carefully clip the inward curves. Make small notches around outward curves where needed. Proper clipping helps the finished pumpkin-shaped fabric trivet develop smooth rounded edges after it is turned.
Turn the pumpkin right side out through the opening. Gently push the curves into shape using your fingers or a blunt turning tool. Do not force a sharp object against the seams because it could puncture the fabric. Fold the raw edges of the turning opening inward so they align with the sewn perimeter, then press the cotton exterior carefully if your chosen internal materials permit pressing.
Topstitch around the entire outer edge approximately 1/8 inch from the perimeter. This closes the turning opening while giving the pumpkin a crisp, finished appearance. A second line of stitching can be added for additional decorative detail. Use a slightly longer stitch length if the layered trivet feels thick beneath the presser foot, and sew slowly so the layers remain evenly positioned.
Next, quilt the pumpkin sections. Follow the patchwork seams or the curved guidelines you marked earlier, stitching from the upper portion toward the bottom. These quilting lines help secure the layers while emphasizing the pumpkin shape. The result is a softly dimensional Fabric pumpkin trivet pattern with visible sections that make the simple silhouette look much more detailed.
Customizing, Using, and Caring for Your Fabric Pumpkin Trivet
Color selection can dramatically change the personality of the finished project. Traditional orange quilting cotton creates an unmistakable autumn pumpkin, but cream, beige, sage green, mustard, burgundy, or brown can produce a more sophisticated seasonal palette. A fall fabric trivet made with several coordinating shades can blend naturally with farmhouse, rustic, traditional, or modern kitchen décor.
Patchwork offers even more creative possibilities. Instead of purchasing new fabric, collect scraps from previous projects and arrange them according to color value. Place darker fabrics toward the outer sections and lighter fabrics near the center to create depth, or reverse the arrangement for a different effect. Because the individual pumpkin segments are relatively small, this project is an excellent opportunity to use favorite scraps that are too small for larger sewing projects.
You can also experiment with quilting styles. Basic curved lines are ideal for beginners, while experienced sewists might add echo quilting inside each pumpkin segment. Decorative machine stitches can highlight the outer perimeter or stem. Keep the stitching reasonably balanced, however, because excessive quilting can make a small Fabric pumpkin trivet pattern feel visually crowded.
If the project is intended primarily for decoration, you can add buttons, embroidery, ribbons, fabric bows, or other embellishments. A small fabric loop can also be incorporated near the stem so the pumpkin can hang on a kitchen hook when not in use. Decorative versions can even be displayed on walls, cabinet handles, or seasonal arrangements. For an item intended to hold warm cookware, keep the working surface flat and avoid bulky decorative additions that could make a dish unstable.
Care depends on the materials used. Quilting cotton and cotton batting are generally practical choices for washable sewing projects, but always consider the requirements of the insulating layer as well. Spot cleaning may be appropriate for lightly used decorative pieces. If machine washing is suitable for all materials, use gentle handling and reshape the pumpkin while damp to preserve its silhouette.
For safety, remember that a handmade trivet is only as heat resistant as the materials and construction used to make it. Ordinary polyester batting, decorative foam, plastic-based embellishments, or unknown synthetic layers should not be assumed to protect a table from very hot cookware. If your Fabric pumpkin trivet pattern will be functional rather than purely decorative, choose materials specifically suitable for that purpose and avoid direct contact with open flames, stovetop burners, or other extreme heat sources.
FAQ About the Fabric Pumpkin Trivet Pattern
What is the best fabric for a Fabric pumpkin trivet pattern?
Quilting cotton is an excellent choice for the exterior because it is easy to sew, widely available, and offered in many autumn colors and prints. Cotton also handles pressing well and works beautifully for patchwork construction.
What size should a pumpkin trivet be?
A medium trivet can measure approximately 9 to 11 inches wide and 8 to 10 inches tall. You can make it larger or smaller depending on its intended use. Larger trivets provide more surface coverage, while smaller pumpkins work nicely as decorative accents.
Do I need special batting for a trivet?
If the item will be exposed to heat, material selection is important. Ordinary decorative batting alone should not automatically be considered adequate heat protection. Use an insulating layer designed for the intended application and follow the relevant material instructions.
Can beginners make this Fabric pumpkin trivet pattern?
Yes. Beginners can simplify the project by cutting the front from one complete piece of fabric instead of assembling curved patchwork sections. Quilting lines can then create the appearance of pumpkin segments without requiring curved piecing.
How do I create the pumpkin sections?
You have two main options. Divide the template into separate vertical pieces and sew them together, or cut one complete pumpkin shape and stitch curved quilting lines across the surface. Both methods create the segmented appearance associated with pumpkins.
Can I make this project from fabric scraps?
Absolutely. A scrap fabric pumpkin trivet is one of the most attractive versions of this project. Small orange, brown, cream, green, and autumn-print scraps can be combined into individual pumpkin segments.
How much fabric will I need?
The exact amount depends on your finished dimensions, but a single medium pumpkin requires relatively little fabric. Fat quarters or larger scraps may provide enough material for the front and backing, while very small scraps can be used for individual sections and the stem.
Should the stem contain batting?
It is optional. A small amount of batting can make the stem slightly thicker, but a simple folded cotton stem usually provides enough structure. Avoid making it excessively bulky because the top seam can become difficult to turn neatly.
Why are the edges of my pumpkin puckering?
Puckering can occur when curved seam allowances have not been clipped sufficiently or when the layers shift during sewing. Carefully clipping curves and using enough pins or clips can improve the finished shape.
Can I add a hanging loop?
Yes. A fabric or cotton tape loop can be sewn near the stem before the layers are assembled. Make sure it is securely stitched because the loop will support the entire trivet when hanging.
Can I use the same pattern as a pumpkin potholder?
The basic shape can be adapted, but a potholder has additional functional considerations because it may be handled differently and exposed to significant heat. Appropriate insulating materials, sufficient coverage, secure construction, and safe handling are essential for any heat-related kitchen accessory.
Can I make matching pumpkin decorations?
Yes. The same template can be resized to create coordinating table mats, decorative pumpkin shapes, mug rugs, or seasonal fabric ornaments. Decorative versions do not necessarily require the same internal construction as a functional heat-resistant trivet.
How can I make the pumpkin look more dimensional?
Use contrasting fabric values for the different sections and quilt along the curved segment lines. Slightly darker outer sections combined with a lighter center can visually emphasize the rounded pumpkin form.
What colors work besides orange?
Cream, white, sage green, olive, mustard, rust, burgundy, brown, and muted blue can all create attractive pumpkins. Choosing colors that coordinate with your existing décor is an easy way to personalize the Fabric pumpkin trivet pattern.
Conclusion
Creating a Fabric pumpkin trivet pattern is a rewarding way to combine practical sewing techniques with cozy seasonal style. Throughout this tutorial, you learned how to draft a symmetrical pumpkin template, determine suitable dimensions, select exterior and internal materials, cut the pumpkin pieces, and choose between a simple whole-fabric front or a more detailed patchwork construction. Careful preparation at these early stages makes the remaining sewing process much easier.
The Fabric pumpkin trivet pattern can be customized with traditional autumn orange, modern neutral fabrics, farmhouse prints, or colorful scraps from previous projects. Make one pumpkin as a seasonal kitchen accent or create several coordinating pieces in different sizes for a complete fall collection. If you plan to use the finished project around hot cookware, remember to choose appropriate heat-resistant materials and use the trivet only within the limitations of those materials.
I hope this tutorial inspires you to experiment with fabrics, quilting styles, and pumpkin shapes while creating something both attractive and useful. If you make your own Fabric pumpkin trivet pattern, leave your sincere opinion about the project and share your suggestions. Your ideas for different colors, construction methods, embellishments, and future sewing projects can inspire even more creative handmade designs.