
Crochet bat pattern projects are a fun way to bring handmade character to seasonal decorations, Halloween displays, keychains, garlands, appliqués, and small gifts.
This Crochet bat pattern is designed to provide a clear path from the first magic ring to the final finishing details.
Another advantage of making a crochet bat is its versatility. You can work the pattern with black yarn for a classic Halloween appearance, purple for a playful seasonal decoration, gray for a softer natural look, or even bright colors for a cheerful collection of miniature bats. The finished size will depend on yarn weight, hook size, and personal tension. Before beginning, read through the complete instructions, check the stitch abbreviations, and gather all materials. Consistent tension is particularly important because it helps the body stay firm and keeps the wings symmetrical.
Materials, Crochet Abbreviations, and Preparation
For this Crochet bat pattern, choose a smooth medium-weight or light worsted cotton or acrylic yarn. You will need approximately 30–50 yards for a small bat, although the exact amount depends on your gauge and desired size. Black, charcoal, dark purple, and deep gray are traditional choices. A small amount of contrasting yarn can be used for facial embroidery or decorative details.
Choose a crochet hook that produces a firm fabric with your selected yarn. For many medium-weight yarns, a 3.0 mm to 4.0 mm hook works well for amigurumi-style construction. You will also need polyester fiberfill, a yarn needle, scissors, stitch markers, and optional safety eyes. When creating the project for a very young child, embroidered eyes are generally a better choice than detachable decorative pieces.
The crochet abbreviations used throughout the pattern are: MR = magic ring, ch = chain, sc = single crochet, inc = increase, dec = decrease, sl st = slip stitch, st/sts = stitch/stitches, FO = fasten off, and R = round or row. An increase means working two single crochet stitches into the same stitch. A decrease combines two stitches into one.
The body is worked primarily in continuous rounds. Place a stitch marker into the first stitch of every round and move it upward as you work. This simple habit is especially useful when working with black yarn because individual stitches can become difficult to see. Count the stitches at the end of each round before continuing.
Gauge is not essential in the same way it would be for a fitted garment, but tension still matters. Your stitches should be tight enough that the stuffing does not show through the fabric. If noticeable gaps appear between stitches, try using a smaller crochet hook rather than dramatically tightening your hands while crocheting.
Before beginning the full crochet bat pattern, make a small sample with your selected yarn and hook. Check whether the fabric feels dense but still flexible. This quick preparation can prevent problems later, especially when shaping the head and body or attaching the wings.
Step-by-Step Crochet Bat Body, Head, and Ears
Begin the body with a magic ring. R1: 6 sc into MR [6]. R2: inc in each st around [12]. R3: (sc, inc) × 6 [18]. R4: (2 sc, inc) × 6 [24]. R5: (3 sc, inc) × 6 [30]. These gradual increases create the rounded upper portion of the bat without producing sharp corners.
Continue with R6–R9: sc in each st around [30]. These even rounds add height while maintaining the established circumference. If you want a longer bat, add one or two additional rounds here. For a compact, chubby crochet bat, keep the original number of rounds.
Now begin shaping the lower body. R10: (3 sc, dec) × 6 [24]. R11: sc around [24]. R12: (2 sc, dec) × 6 [18]. Start adding fiberfill at this point. Add stuffing gradually instead of pushing one large piece into the body because small amounts are easier to distribute evenly.
Continue with R13: (sc, dec) × 6 [12]. R14: dec × 6 [6]. Add the final amount of stuffing before closing the opening. Cut the yarn, leaving a tail. Thread the tail through the front loops of the remaining six stitches, pull gently to close, and weave the yarn securely into the body. This creates the basic oval form of the Crochet bat pattern.
To create the ears, make two identical pieces. Ch 4. Row 1: sc in second ch from hook, sc in next ch, 3 sc in final ch. Turn to work along the opposite side of the foundation chain and sc in the remaining 2 loops. FO, leaving a sewing tail. Pinch the narrow end slightly when attaching it so the ear develops a pointed shape.
Position the ears near the upper section of the body with a small space between them. Sew them securely using the yarn tails. Add the face below the ears. Embroider two small eyes with contrasting yarn, or attach suitable craft eyes before completely closing the body. A tiny embroidered mouth can give your crochet bat a friendly expression without overwhelming its features.
How to Crochet and Attach the Bat Wings
The wings are the most distinctive feature of a Crochet bat pattern, so take time to make them as symmetrical as possible. Make two wings. Begin with ch 10. Starting in the second chain from the hook, work sl st, sc, sc, 2 sc in next st, sc in next 2 sts, 2 sc in next st, sc in final 2 sts. This creates the foundation and starts forming the outer curve.
For the next row, ch 1 and turn. Work sc in the first 3 sts, ch 3, sl st in second ch from hook, sc in next ch, sc in next 2 sts, ch 4, sl st in second ch from hook, sc in next 2 ch, then continue sc across the remaining stitches. The chains create pointed extensions that imitate the angular structure of a bat wing.
On the following row, work carefully around the pointed sections. Ch 1, turn, sc toward the first point, work 2 sc near the tip, continue toward the center valley, sl st into the valley, then sc toward the second point. Place additional stitches around the outer edge only when necessary to prevent curling. The objective is a wing that lies reasonably flat while maintaining pronounced points.
Repeat the same sequence for the second wing. Lay both pieces beside one another before fastening off completely. Their overall size and number of points should be similar. Minor differences are completely normal in handmade crochet, but counting stitches and comparing the pieces while working will produce a more balanced finished crochet bat.
Position one wing on each side of the body. The upper edge should begin close to the shoulder area, while the lower portion can angle slightly downward. Pin the wings temporarily before sewing. This allows you to examine the silhouette and adjust their placement. Sew through both the wing edge and body stitches several times, keeping the attachment firm without pulling the body out of shape.
For more dramatic wings, add a simple surface line after attachment. Using matching or slightly lighter yarn, embroider two or three straight lines extending from the body toward the wing points. These lines can suggest the natural structure of bat wings and give the finished Crochet bat pattern additional texture without making the construction unnecessarily complicated.
Finishing, Customization, and Creative Uses
Once the main construction is complete, inspect every attachment point. Gently tug the ears and wings to make sure they are secure. Weave all remaining yarn tails through several stitches before trimming them. Proper finishing makes the crochet bat look cleaner and helps the project withstand regular handling.
You can transform the basic design into several different styles. For a classic Halloween bat, use black yarn with small orange or purple embroidered details. For a softer decorative version, use charcoal gray yarn and cream facial features. A colorful Crochet bat pattern worked in purple, green, orange, or even pastel shades can provide a playful alternative to traditional seasonal colors.
The pattern can also become a crochet bat appliqué by modifying the construction. Instead of stuffing a dimensional body, crochet a flat oval or circle and attach the wings to its sides. Flat bats can be sewn onto tote bags, blankets, fabric banners, hats, scarves, or other handmade decorations.
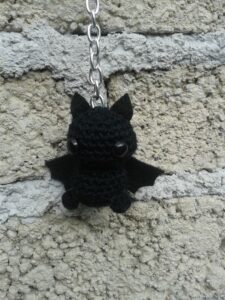
To make a keychain, crochet the bat using thinner yarn and a smaller hook. Add a reinforced chain loop at the top between the ears. Ch 8–12, sl st into the base of the chain, FO, and weave in securely. A key ring can then be attached to this crocheted loop. Make sure the loop is firmly anchored if the item will be used frequently.
You can also turn several bats into a seasonal garland. Make multiple versions of the Crochet bat pattern, changing colors or sizes if desired. Crochet a long chain and attach each bat at evenly spaced intervals. The result can be displayed as handmade seasonal décor on a wall, mantel, shelf, or other indoor decorative area.
Blocking may help if the wings curl after completion. Lightly dampen the wings, shape them on a suitable flat surface, and allow them to dry completely. Avoid excessive stretching because this can distort the stitches. Once everything is dry and secure, gently reshape the body and adjust the wings until the bat has the silhouette you prefer.
FAQ About the Crochet Bat Pattern
Is this Crochet bat pattern suitable for beginners?
Yes. This pattern is approachable for beginners who already know how to make a magic ring, single crochet, increase, decrease, chain, and slip stitch. The body uses straightforward amigurumi construction, while the wings provide an opportunity to practice working back and forth in rows.
What yarn is best for crocheting a bat?
Cotton and acrylic yarns both work well. Cotton usually produces crisp stitch definition and structured wings, while acrylic can create a slightly softer finished project. A smooth yarn is especially helpful when making your first crochet bat because it makes individual stitches easier to identify.
How much yarn do I need for one crochet bat?
A small bat generally requires only a modest amount of yarn, often around 30–50 yards depending on its size, yarn thickness, hook, tension, and wing design. This makes the project useful for leftover yarn from larger crochet projects.
Can I make the crochet bat larger?
Yes. The easiest method is to use thicker yarn and a larger crochet hook while following the same basic pattern. You can also add increase rounds to the body and extend the wing foundation chains, but those modifications require adjusting the stitch counts proportionally.
Why are my crochet bat wings curling?
Curling usually happens because of tight tension or because the edge does not contain enough stitches. Try relaxing your tension slightly or adding an occasional increase around curved areas. Gentle blocking after completion can also help the wings lie flatter.
Can I make the bat without safety eyes?
Absolutely. Embroidered facial details work very well and allow you to customize the expression. Small horizontal stitches can create sleepy eyes, while round embroidered eyes give the bat a more traditional amigurumi appearance.
How can I make pointed bat wings?
Use chains extending from the main wing and work back along those chains with slip stitches and single crochet. Returning to the main row creates valleys between the points. Alternating longer and shorter extensions helps produce the recognizable jagged outline associated with bat wings.
Can this pattern be used as Halloween decoration?
Yes. The finished Crochet bat pattern works particularly well for handmade Halloween décor. Individual bats can be displayed on shelves, incorporated into garlands, attached to decorative wreaths, or combined with crocheted pumpkins, ghosts, and other seasonal motifs.
How do I keep the body from showing stuffing?
Use a hook slightly smaller than the size normally recommended for your yarn and maintain consistent tension. The fabric should be dense enough that the fiberfill stays hidden between the stitches. Avoid overstuffing because excessive pressure can stretch the crochet fabric and create visible gaps.
How can I make both wings the same size?
Count every stitch carefully and write down any changes you make while crocheting the first wing. Before attaching either piece, place the two wings together and compare the outer edges, points, and foundation sections. Small handmade variations are normal, but careful counting greatly improves symmetry.
Can I use this Crochet bat pattern for a keychain?
Yes. Use thinner yarn if you want a smaller finished piece, reduce the hook size accordingly, and add a strong crocheted loop between the ears. Make sure all parts are securely sewn before using the bat as a frequently handled accessory.
How long does it take to crochet a small bat?
The time varies according to crochet experience and the amount of detail added. Once you are comfortable with the instructions, the basic body and wings can be completed relatively quickly. Embroidery, assembly, blocking, and decorative details may add additional crafting time.
Conclusion
This Crochet bat pattern combines simple amigurumi techniques with creative wing shaping to make a charming handmade project suitable for seasonal décor, appliqués, garlands, keychains, and gifts. Throughout this tutorial, you learned how to select suitable materials, understand the essential crochet abbreviations, build a rounded body with increases and decreases, crochet pointed ears, shape recognizable bat wings, assemble the individual pieces, and add personalized finishing details.
Whether you choose a traditional black bat, a playful purple version, or an entire collection in Halloween colors, this pattern offers plenty of room for creativity. You can also experiment with different sizes and turn the basic design into decorations or practical accessories. Each handmade version can develop its own personality while still following the same fundamental Crochet bat pattern techniques.
If you make this project, please leave your sincere opinion about the pattern and share your suggestions. What part of the crochet bat did you enjoy making most, and what would you change or add? Your ideas can inspire new color combinations, creative uses, and interesting variations of this fun crochet project.