
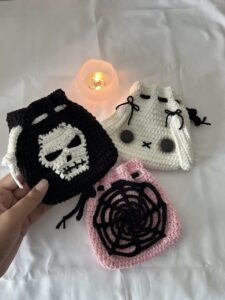
Spooky Halloween Pouches Pattern is a fun crochet project for anyone who enjoys combining seasonal decorations with practical handmade accessories.
The construction used in this Spooky Halloween Pouches Pattern focuses on simple crochet stitches and a sturdy pouch shape.
Before starting, remember that yarn thickness, hook size, and individual crochet tension can change the finished measurements. The instructions below are designed as an adaptable crochet Halloween pouch pattern, so checking your work as you progress is more useful than trying to force an exact measurement. For a medium pouch, approximately 4 to 5 inches (10 to 12.5 cm) wide and 5 to 6 inches (12.5 to 15 cm) tall, worsted-weight yarn and a 4 mm to 4.5 mm crochet hook are a practical combination. You can easily make the pouch larger by adding more increase rounds to the base and additional rounds to the body. Keep your stitches consistent, count each round carefully, and enjoy customizing the final details.
Crochet Materials, Stitch Key, and Starting the Pouch Base
For one Spooky Halloween Pouches Pattern, gather approximately 80 to 120 yards of worsted-weight yarn in your chosen main color, plus small quantities of contrasting yarn for decorations. You will also need a crochet hook suitable for your yarn, scissors, a yarn needle, stitch markers, and optional removable markers for positioning facial features. For a pumpkin pouch, orange can be the main color with green and black accents. A ghost version can use cream or white, while purple and black create a wonderfully dramatic seasonal combination.
Before crocheting, become familiar with the stitch abbreviations used throughout the pattern. In US crochet terminology, MR means magic ring, ch means chain, sl st means slip stitch, sc means single crochet, hdc means half double crochet, dc means double crochet, inc means increase by working two stitches into the same stitch, and st/sts means stitch or stitches. The primary stitch used for the body is single crochet because it creates a compact fabric that works especially well for a small storage pouch.
Begin Round 1 with a MR and work 6 sc into the ring. Pull the yarn tail gently to close the center. If you prefer not to use a magic ring, chain 2 and work 6 single crochet stitches into the second chain from the hook. Place a stitch marker in the first stitch so you can easily identify the beginning of each round. Unless otherwise noted, the base can be crocheted continuously in a spiral to reduce visible joining seams.
For Round 2, work 2 sc in each st around, giving you 12 stitches. In Round 3, repeat [sc in next st, inc in next st] six times for a total of 18 stitches. Round 4 is [sc in next 2 sts, inc] repeated six times, ending with 24 stitches. These evenly distributed increases create the flat circular foundation needed for the bottom of the Halloween crochet pouch.
Continue with Round 5 by working [sc in next 3 sts, inc] six times for 30 stitches. For Round 6, crochet [sc in next 4 sts, inc] six times for a total of 36 stitches. Check the base after completing this round. It should lie relatively flat without forming a bowl or developing excessive waves. Minor curling can usually be corrected with gentle shaping, but significant rippling may indicate that your tension is too loose.
If you want a larger pouch, continue the same increase sequence. Round 7 would be [sc in next 5 sts, inc] repeated six times for 42 stitches, while Round 8 would use [sc in next 6 sts, inc] six times for 48 stitches. Each additional increase round makes the finished pouch wider. Once you are satisfied with the diameter, stop increasing. This completes the foundation and prepares you to transform the flat circle into the upright body.
Crocheting the Body and Creating the Drawstring Opening
To begin shaping the sides, work one round of sc in BLO around, meaning single crochet in the back loop only. Working through just the back loop creates a subtle ridge where the base meets the side wall. This detail helps define the bottom and encourages the crochet fabric to turn upward naturally. Keep the same stitch count you had at the end of the final base round.
For the following rounds, return to crocheting through both loops and work 1 sc in each st around. Do not make any increases. Continue repeating this round until the pouch body measures approximately 3.5 to 4 inches (9 to 10 cm) from the bottom ridge. For a 36-stitch version, every body round should contain exactly 36 single crochet stitches. Using a stitch marker is especially helpful because accidental increases or decreases can gradually distort the shape.
For a striped Spooky Halloween Pouches Pattern, introduce contrasting yarn at the beginning of a new round. Black and orange stripes create a classic Halloween appearance, while purple and green can produce a playful monster-inspired version. When changing colors, complete the final yarn-over of the previous stitch with the new color. This produces a cleaner transition and prevents the new shade from appearing halfway through the next stitch.
Once the body reaches the desired height, create the eyelet round for the drawstring. A simple sequence for a 36-stitch pouch is [sc in next 2 sts, ch 1, skip 1 st] repeated around. The chain-one spaces form small openings through which the cord can later be woven. Keep the chains relaxed enough to accommodate the drawstring without stretching the surrounding crochet fabric.
After the eyelet round, work one or two rounds of sc around, placing one single crochet into each stitch and one single crochet into each chain space. This reinforces the upper edge and gives the pouch a clean finish. For a slightly more decorative border, the final round can alternate slip stitches and single crochet stitches, or you can use reverse single crochet if you are comfortable with that technique.
Finish the main body by cutting the yarn and pulling the tail through the final loop. Use a yarn needle to weave the tail securely through several stitches on the wrong side. Avoid cutting the yarn immediately next to the fabric because the tail may eventually loosen. At this stage, the basic crochet spooky pouch is complete, and the remaining steps focus on the drawstring and Halloween-themed decoration.
Adding Halloween Faces, Appliqués, and the Crochet Drawstring
To create the drawstring, chain approximately 70 to 90 stitches, depending on the circumference of your pouch and the length of cord you prefer. Beginning in the second chain from the hook, work sl st in each ch across. This creates a thin but sturdy crochet cord. Fasten off and weave in both ends, or leave short tails if you want to attach small decorative shapes to the cord ends.
Weave the finished cord in and out through the chain spaces of the eyelet round. Start near the center front and continue around the entire pouch until both ends emerge from nearby openings. Pull the ends gently to close the top. You can tie them into a bow or simple knot. If the pouch will be handled by young children, avoid adding loose beads or other small detachable decorations.
For a pumpkin version of the Spooky Halloween Pouches Pattern, embroider triangular eyes and a smiling mouth with black yarn. Use a yarn needle and short stitches rather than trying to create the entire shape with one long strand. A small green leaf can be crocheted by chaining 6, then working sl st, sc, hdc, dc, hdc along the chain before fastening off. Sew the leaf securely near the top edge without blocking the drawstring openings.
For a friendly ghost pouch, use white or cream as the main body color and embroider black oval eyes. A small curved mouth can be made with a few careful backstitches. If you prefer appliqué, crochet each eye by making a magic ring, working 6 single crochet stitches into it, joining, and fastening off. Sew the circles flat against the pouch using matching yarn and small, secure stitches.
A black cat variation can be created by crocheting the pouch in black, charcoal, or deep purple. For each ear, ch 5, then starting in the second chain from the hook work sc, hdc, dc, dc. Fasten off and make a second matching ear. Sew both pieces near the upper edge. Embroider simple eyes, whiskers, and a small nose with contrasting yarn. Keeping the features minimal often creates a cleaner and more recognizable design.
You can also turn the same pattern into a monster, bat, spider, or jack-o’-lantern pouch. The secret is keeping the basic construction unchanged and modifying only the surface details. This makes the Spooky Halloween Pouches Pattern particularly useful because one reliable pouch formula can produce many different seasonal characters. Before sewing any appliqué permanently, position all pieces with removable stitch markers and check the overall balance.
Finishing the Spooky Halloween Pouches Pattern and Customizing the Size
After completing the decorations, inspect the entire pouch for loose yarn ends. Weave every tail through several stitches on the inside and change direction at least once before trimming. Secure finishing is especially important around appliqués because these pieces may experience additional movement when the drawstring is opened and closed. Carefully shape the pouch with your hands so the base sits evenly.
If your finished Halloween crochet pouch feels slightly uneven, gentle blocking can improve its appearance. For fibers that tolerate moisture, lightly dampen the pouch and shape it around a clean cylindrical object of a suitable size. Allow it to dry completely before removing the form. Always consider the care requirements of the specific yarn you selected because different fibers respond differently to heat and moisture.
To make a mini pouch, stop increasing the base after 24 stitches and crochet fewer body rounds. A small version can work well for lightweight trinkets, wrapped treats, or decorative seasonal displays. For a larger pouch, increase the base to 42 or 48 stitches and continue the body until the desired height. The mathematical structure remains simple because each base round adds six evenly distributed stitches.
You can also adjust the texture without completely redesigning the project. Working the body in hdc instead of sc will make the pouch grow more quickly and produce a slightly softer texture. Alternating rounds of single crochet and back-loop-only single crochet creates subtle horizontal ridges. Beginners may prefer the original single crochet version because it makes counting stitches and positioning decorations easier.
For a patchwork-inspired appearance, use several leftover yarn colors and change shades every few rounds. This is a practical way to use small amounts of yarn while creating a unique seasonal accessory. Keep yarn weights reasonably similar so the fabric maintains consistent thickness. Orange, cream, mustard, charcoal, purple, olive green, and black can create an attractive autumn palette without requiring complicated colorwork.
When your Spooky Halloween Pouches Pattern is complete, the pouch can be used as seasonal décor, a small craft organizer, a gift holder, or a container for individually wrapped Halloween treats. Because the design is handmade and customizable, each pouch can have its own expression and personality. A group of different characters displayed together can create a charming crochet collection while giving you plenty of opportunities to practice the same core construction technique.
FAQ About the Spooky Halloween Pouches Pattern
Is the Spooky Halloween Pouches Pattern suitable for beginners?
Yes. The basic design primarily uses single crochet, increases, chains, and slip stitches, making it accessible to beginners who already understand fundamental crochet techniques. The decorative elements are optional, so new crocheters can begin with a simple embroidered face before attempting more detailed appliqués.
How much yarn do I need for one Halloween pouch?
A medium pouch generally requires approximately 80 to 120 yards of worsted-weight yarn, plus small amounts of contrasting yarn for facial features and decorations. The exact quantity depends on hook size, tension, yarn thickness, and the final dimensions.
What is the best yarn for crochet Halloween pouches?
Cotton and cotton-blend yarns are excellent choices because they provide good stitch definition and create a structured fabric. Acrylic can also work well, particularly when you want a softer and lightweight finished pouch.
How can I make the pouch larger?
Continue increasing the circular base before beginning the side walls. If the standard version stops at 36 stitches, add another increase round to reach 42 stitches or another to reach 48. After establishing the larger base, crochet the body without additional increases.
How can I make a smaller pouch?
Stop the base increases earlier. A 24-stitch or 30-stitch base creates a smaller diameter. Reduce the number of body rounds proportionally so the finished pouch remains balanced.
Why is my crochet base curling?
Curling can happen when there are too few increases, when the hook is too small for the yarn, or when the crocheter’s tension is very tight. Check your stitch counts carefully and consider using a slightly larger hook if the fabric feels unusually stiff.
Why is my circular base becoming wavy?
Excessive waves usually indicate too many increases or very loose tension. Confirm that you are adding only six stitches per increase round when following this pattern.
Can I add a fabric lining inside the pouch?
Yes. A simple fabric lining can be hand-sewn inside after the crochet portion is finished. It is optional, but it may be useful if you plan to store particularly small items that could potentially work their way through crochet stitches.
Can I use safety eyes for the Halloween characters?
Embroidered or securely crocheted facial details are a versatile option and avoid loose components. If the finished pouch may be accessible to very young children, small detachable embellishments should be avoided.
How do I keep the pouch standing upright?
Use a slightly smaller crochet hook for a denser fabric, choose structured cotton yarn, and keep your tension consistent. The back-loop-only transition round between the base and sides also helps create a defined bottom edge.
Can I use this pattern to create different Halloween characters?
Definitely. The same Spooky Halloween Pouches Pattern can become a pumpkin, ghost, monster, cat, bat-inspired pouch, or another seasonal design simply by changing the yarn colors and decorative elements.
How do I create a stronger drawstring?
Instead of using a plain chain, work slip stitches back across the entire chain. This creates a thicker cord that is less likely to stretch. You can also crochet an i-cord if you are familiar with that technique.
Can these pouches be washed?
That depends primarily on your yarn and embellishments. Check the yarn care instructions before washing. Securely embroidered decorations generally simplify care compared with glued or delicate embellishments.
How long does one pouch take to crochet?
Completion time varies according to experience, size, and the amount of decoration. The basic pouch is relatively small, while detailed appliqués and embroidery naturally add more working time.
What can I put inside the finished pouch?
These pouches can hold lightweight craft supplies, small accessories, individually wrapped treats, or decorative items. Avoid overloading them with heavy objects because crochet fabric can stretch under significant weight.
Conclusion
The Spooky Halloween Pouches Pattern combines straightforward crochet construction with plenty of opportunities for seasonal creativity. Throughout this tutorial, you learned how to begin with a magic ring, create a flat circular base using evenly spaced increases, build the pouch walls with single crochet, and add an eyelet round for a functional drawstring closure.
You also learned the essential crochet key used in the pattern, including MR, ch, sl st, sc, hdc, dc, inc, BLO, st, and sts. Understanding these abbreviations makes the project easier to follow and provides useful knowledge that can be applied to many other crochet patterns.
If you try this Spooky Halloween Pouches Pattern, please leave your sincere opinion and share your suggestions. Which Halloween character would you crochet first, and what colors or details would you add to personalize your pouch? Your creative ideas can inspire even more variations of this fun seasonal crochet project.