
Fish-shaped fabric organizer tutorial is a creative sewing project that turns simple pieces of fabric into a practical and decorative storage accessory.
One of the most appealing aspects of this fish-shaped fabric organizer tutorial is that it works beautifully with fabric scraps.
This tutorial focuses on a practical method that can be adapted according to the desired finished size. Instead of relying on one rigid commercial template, you will learn how to draw a balanced fish shape, prepare the fabric pieces, add interfacing, construct useful storage pockets, assemble the body, and finish the details neatly. The measurements provided below create a medium-sized organizer, but the pattern can easily be enlarged or reduced. Careful cutting and consistent seam allowances are more important than complicated sewing skills, making this fabric organizer sewing project approachable for confident beginners as well as experienced makers.
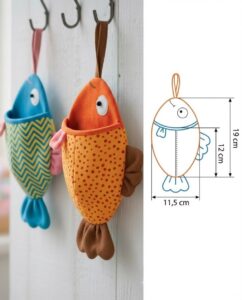
Materials, Measurements, and Preparing the Fish Pattern
For a medium organizer, begin with two rectangles of main fabric measuring approximately 16 x 10 inches (40.5 x 25.5 cm). You will also need two pieces of lining in the same size, two pieces of medium-weight fusible interfacing, and several smaller fabric pieces for the pockets and decorative elements. Cotton quilting fabric is an excellent choice because it is stable, easy to press, and available in countless prints. If your outer fabric is very lightweight, slightly firmer interfacing will help the fish-shaped fabric organizer hold its form.
To create the pattern, draw a fish approximately 14 inches (35.5 cm) from the nose to the end of the tail and about 8 inches (20 cm) at the widest section of the body. Start with a gently rounded head, widen the center of the body, and narrow the shape as it approaches the tail. Draw a simple V-shaped or rounded tail at the back. Avoid extremely narrow points because wider curves are much easier to turn neatly after sewing.
Add a 3/8-inch (1 cm) seam allowance around the entire fish if it is not already included in your template. Mark the top, bottom, center, and tail connection on the pattern. These small reference marks make it easier to align the layers later. If you want fins, draw separate fin templates measuring approximately 4 x 3 inches (10 x 7.5 cm), keeping the edges gently curved rather than sharply pointed.
For the storage area, prepare one large pocket approximately 10 x 6 inches (25.5 x 15 cm) and two smaller pocket pieces around 5 x 5 inches (12.5 x 12.5 cm). These dimensions are flexible and should be adjusted according to the size of your fish. The purpose of the pockets is to create useful compartments without covering the entire decorative shape of the organizer. Leaving part of the fish body visible helps maintain the playful appearance of the project.
Fuse the interfacing to the wrong side of both outer fabric pieces following the manufacturer’s instructions for your particular interfacing. Press rather than sliding the iron aggressively across the surface. A properly fused layer gives the fabric fish organizer enough stability to support pockets and small items. If you want a softer organizer, lightweight fleece can be substituted, although it will produce a puffier result.
Before beginning assembly, transfer all important markings to the fabric with a removable fabric marker or tailor’s chalk. Arrange the pieces on your work surface and check that you have two mirrored fish body pieces rather than two pieces facing exactly the same direction. This simple check prevents one of the most common mistakes in shaped sewing projects and makes the following construction steps much smoother.
Sewing the Pockets, Fins, and Decorative Fish Details
Begin with the pockets because they must normally be attached before the main fish body is assembled. Fold the upper edge of each pocket 1/4 inch (6 mm) toward the wrong side and press. Fold it over once more by approximately 1/2 inch (1.25 cm), press again, and stitch close to the folded edge. This creates a clean pocket opening without exposing raw fabric edges.
Press the remaining pocket edges toward the wrong side by approximately 1/4 inch (6 mm). Position the largest pocket on one outer fish piece, keeping it comfortably away from the seam allowance. Pin or clip it securely, then topstitch around the sides and bottom. Leave the upper edge open. Backstitch at both upper corners because these areas receive the most stress when objects are repeatedly placed inside the pocket.
Smaller pockets can be positioned over or beside the larger compartment. If you prefer divided storage, sew one wide pocket to the fish body and add one or two vertical stitching lines through the pocket. This creates individual sections for crochet hooks, small scissors, pencils, markers, clips, or similar craft tools. The DIY fabric organizer becomes much more functional when pocket dimensions are planned around the objects you actually intend to store.
Next, prepare the fins. Place two fin pieces right sides together and sew around the curved edges using approximately a 1/4-inch (6 mm) seam allowance, leaving the straight attachment edge open. Clip the curved seam allowance carefully without cutting through the stitching. Turn the fin right side out, shape the curves with a blunt turning tool, press it flat, and optionally topstitch approximately 1/8 inch (3 mm) from the edge.
The face can be as simple or decorative as you prefer. A small circle of felt securely stitched in place can create an eye, or the eye can be embroidered directly onto the fabric. Decorative stitching can also suggest scales, gills, or lines on the tail. When making an organizer intended for young children, securely sewn or embroidered details are generally preferable to loose buttons or small detachable embellishments.
Place any finished fins against the right side of the fish body with their raw attachment edges aligned with the raw edge of the body. The fins themselves should point inward toward the center of the fish so they will flip outward after the body is turned. Baste them in position within the seam allowance. At this stage, the main decorative elements and fabric organizer pockets should all be securely attached before the final body assembly begins.
Assembling and Sewing the Fish-Shaped Fabric Organizer
Place the two outer fish pieces right sides together, carefully matching the nose, belly, back, and tail. Pin around the perimeter, paying particular attention to curved areas. If you are using clips, place them more closely together around the tail and head. Consistent alignment is important because uneven layers can distort the fish silhouette once the project is turned.
Sew around the outer edge using a 3/8-inch (1 cm) seam allowance. Leave an opening of approximately 3 to 4 inches (7.5 to 10 cm) along a relatively straight section. Sew slowly around tight curves and stop occasionally with the needle lowered into the fabric so you can lift the presser foot and gently reposition the project. Slow, controlled stitching creates smoother curves than trying to force the fabric quickly through the machine.
Repeat the basic process for the lining if your construction method uses a separate lining unit. Alternatively, the lining pieces can be assembled together with the outer layers in a turning method. Whichever technique you choose, keep seam allowances consistent. The lining should fit smoothly inside the fish-shaped sewing organizer without creating bulky folds around the tail or nose.
After stitching, trim excess seam allowance around narrow areas and clip into inward curves. Make small notches around outward curves to remove bulk, but never cut through the actual seam. Pay special attention to the connection between the fish body and tail because this area usually contains the strongest curves. Proper clipping is one of the secrets to achieving a clean, professional-looking silhouette.
Turn the organizer right side out through the opening. Work gradually rather than pulling aggressively on the fabric. Use a blunt point turner, chopstick, or similar smooth tool to gently shape the nose and tail. Do not use scissors for this step because a sharp point can easily pierce the fabric or stitching. Once the entire project has been turned, carefully press the perimeter.
Fold the raw edges of the turning opening inward so they align with the finished seam. Close the opening with a ladder stitch by hand for an almost invisible finish, or stitch it closed by machine if you plan to topstitch the complete perimeter. A line of topstitching approximately 1/8 inch (3 mm) from the outer edge helps flatten the seams and gives the Fish-shaped fabric organizer tutorial project a crisp, polished appearance.
Finishing, Customizing, and Using Your Fabric Organizer
Once the basic construction is complete, inspect all seams and pockets. Trim any visible threads and reinforce pocket corners if necessary. Give the organizer a final press using a temperature appropriate for your fabrics. Pressing is particularly important around the curved head and tail because it helps establish the finished silhouette and removes small wrinkles created during the turning process.
If you want the organizer to hang on a wall, door, pegboard, or craft station, add a fabric loop near the upper edge. A practical loop can be made from a strip measuring approximately 2 x 6 inches (5 x 15 cm). Fold the long edges toward the center, fold the strip in half lengthwise, and topstitch along both long sides. Form it into a loop and secure it firmly to the organizer.
For additional structure, a layer of fusible fleece, foam stabilizer, or batting can be incorporated into the project. The ideal material depends on how the organizer will be used. A wall-mounted fish-shaped storage organizer generally benefits from firmer stabilization, while an organizer that will be folded or carried inside a bag may work better with lightweight interfacing.
Fabric selection offers countless opportunities for personalization. Ocean-inspired blues and greens create a traditional aquatic appearance, while bright orange, yellow, pink, and patterned scraps can make the fish whimsical and cheerful. Patchwork lovers can piece scraps together before cutting the main fish body. This technique transforms small leftover fabrics into a completely new surface design while reducing craft waste.
The same basic Fish-shaped fabric organizer tutorial can also be adapted to different purposes. Create smaller versions for hair accessories or sewing notions, medium versions for craft supplies, or an oversized version for lightweight toys and children’s room storage. When resizing the pattern, remember to resize the pockets proportionally so the finished design remains visually balanced.
Most importantly, do not worry about making every fish identical. Handmade projects naturally contain small differences, and these details give each piece its individual character. Once you understand how the pattern is constructed, you can experiment with different tails, fins, pocket arrangements, quilting lines, embroidery, or fabric combinations. The basic sewing method remains simple while offering plenty of room for creative interpretation.
FAQ About the Fish-Shaped Fabric Organizer Tutorial
What fabric is best for a fish-shaped fabric organizer?
Medium-weight cotton or quilting cotton is one of the easiest choices. It presses well, handles curved seams nicely, and works with fusible interfacing. Canvas can also be used for a firmer organizer, although bulky seams may require a stronger sewing-machine needle.
Is this project suitable for beginners?
Yes. A confident beginner who understands basic straight stitching and curved seams should be able to complete this fish-shaped fabric organizer tutorial. The most challenging areas are usually the curved tail and turning the finished body, but sewing slowly makes these steps much easier.
Do I need interfacing?
Interfacing is strongly recommended because it gives the organizer structure. Without it, lightweight cotton may collapse when objects are placed inside the pockets. Lightweight interfacing creates a flexible result, while medium-weight interfacing provides a more structured finish.
What seam allowance should I use?
A 3/8-inch (1 cm) seam allowance works well for the main fish body. Smaller decorative components such as fins can usually be sewn with approximately a 1/4-inch (6 mm) allowance. The most important rule is to remain consistent throughout construction.
Can I make the fish organizer larger?
Absolutely. The pattern can be enlarged proportionally to create a larger wall organizer. When enlarging the body, increase the pocket dimensions as well and consider using stronger interfacing or foam stabilizer to prevent the finished piece from sagging.
How can I add more storage compartments?
Create one large pocket and divide it with vertical stitching lines, or attach several individual pockets in different sizes. Consider what you want to store before deciding on the arrangement. Narrow sections work well for pens or craft tools, while wider pockets accommodate larger supplies.
Can fabric scraps be used for this project?
Yes, and this is an excellent scrap-friendly sewing project. Small pieces can be used for fins, tails, eyes, pocket accents, or patchwork sections. Larger remnants can form the main body and lining.
How do I make the curved seams look smoother?
Use plenty of pins or clips, sew slowly, and shorten the stitch length slightly around tight curves if necessary. After sewing, clip and notch the seam allowance before turning. Pressing the finished curves carefully will also improve their appearance.
Can I quilt the organizer?
Yes. If you add batting or fusible fleece, decorative quilting can provide both texture and additional stability. Quilt the outer fabric and stabilizer together before cutting or assembling the final body, depending on your preferred construction method.
Can I wash the finished fabric organizer?
Washability depends on the fabric, interfacing, batting, and embellishments you choose. If you expect frequent washing, prewash washable fabrics before cutting and choose washable stabilizers and securely stitched decorative elements.
How can I make the organizer look more professional?
Accurate cutting, careful pressing, consistent seam allowances, neat topstitching, and reinforced pocket corners make a significant difference. Taking extra time around the curves and tail will also help the finished DIY fish organizer maintain a clean shape.
What can I store inside a fish-shaped fabric organizer?
It can hold lightweight items such as sewing notions, crochet hooks, clips, ribbons, pencils, craft accessories, small toys, hair accessories, or other everyday supplies. Avoid filling hanging versions with excessively heavy objects unless the organizer has been reinforced appropriately.
Conclusion
This Fish-shaped fabric organizer tutorial shows how a few basic sewing materials can become a practical organizer with a fun handmade appearance. The process begins by creating a balanced fish template, cutting the outer fabric and lining, adding interfacing, and preparing pockets that suit the objects you want to organize. From there, the decorative fins and facial details bring the fish to life before the main body is carefully assembled.
The key techniques include accurate cutting, pressing pocket hems, reinforcing pocket corners, sewing smooth curved seams, clipping seam allowances, turning the project carefully, and finishing the perimeter with neat topstitching. These skills are useful far beyond this individual project and can be applied to many other fabric organizer sewing projects, bags, accessories, and decorative storage ideas.
If you make your own fish-shaped fabric organizer, leave your sincere opinion about the tutorial and share your suggestions. What fabrics, pocket arrangements, colors, or decorative details would you add to your version? Your ideas can inspire new variations and make this creative sewing project even more useful and enjoyable.