
Crochet spiderweb coaster pattern is a creative and eye-catching project for anyone who enjoys seasonal crochet, especially handmade decorations for Halloween.
A handmade Crochet spiderweb coaster pattern can be customized in many different ways without changing the basic construction.
The key to achieving a neat crochet spiderweb coaster is maintaining consistent tension and paying attention to the chain spaces that form the web. Unlike dense amigurumi projects, this pattern intentionally leaves open sections between the stitches. These gaps create the recognizable spiderweb structure while keeping the finished coaster lightweight. The pattern below explains the basic crochet abbreviations, suggested materials, round-by-round construction, shaping techniques, and finishing details. Read through the instructions before beginning so you can understand how each round expands and how the final decorative points are formed around the outer edge.
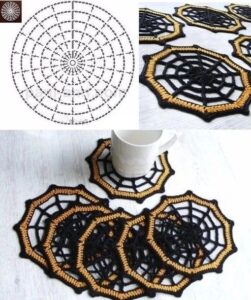
Materials, Crochet Abbreviations, and Pattern Preparation
For this Crochet spiderweb coaster pattern, cotton yarn is an excellent choice because it provides good stitch definition and creates a stable surface for cups, mugs, and glasses. A DK or light worsted-weight cotton yarn works especially well. Black is the classic choice for a Halloween spiderweb, but you can use white, gray, orange, purple, or any shade that matches your seasonal decor. You will also need an appropriate crochet hook, scissors, a yarn needle, and optional blocking pins.
The basic crochet abbreviations used in this pattern include MR for magic ring, ch for chain, sc for single crochet, sl st for slip stitch, hdc for half double crochet, and dc for double crochet. You may also see sp, meaning space, particularly when working into chain spaces created during previous rounds. Understanding these basic terms before starting will make the round-by-round instructions easier to follow.
A magic ring is used to create a tight center for the coaster. Instead of beginning with a large chain loop, the magic ring allows you to pull the center closed after working the first group of stitches. This creates a polished center and helps the web radiate evenly outward. If you prefer not to use a magic ring, you can chain four stitches, join with a slip stitch, and work the first round into the resulting loop.
For best results, keep your tension relaxed but consistent. If the chains are too tight, the coaster may curl upward instead of lying flat. If they are too loose, the web may lose its structure and become floppy. The ideal tension allows the open sections to remain clearly visible while still giving the finished spiderweb crochet coaster enough stability for everyday decorative use.
Gauge is flexible for this project because the final dimensions can vary slightly without affecting the design. However, if you want a medium coaster suitable for most mugs, aim for a finished diameter of approximately 4.5 to 6 inches, depending on yarn thickness and hook size. A 3 mm to 4 mm hook is often suitable for DK or light worsted cotton, but adjust according to your yarn and personal tension.
Before starting, prepare a stitch marker if you find it helpful, although this pattern may be worked in joined rounds rather than continuous rounds. Joined rounds help keep the spiderweb spokes aligned and make it easier to create symmetrical chain spaces. At the end of each round, join carefully with a slip stitch and make sure you begin the next round in the correct position.
Crocheting the Center and Building the Spiderweb Structure
Begin your Crochet spiderweb coaster pattern with a magic ring. Round 1: ch 3, which counts as the first double crochet, then work 11 dc into the magic ring. Pull the ring closed and join with a sl st to the top of the beginning ch-3. You should have 12 stitch positions around the center. These stitches will become the foundation for the web spokes.
Round 2: ch 4, which counts as 1 dc plus ch 1. Work 1 dc in the next stitch, ch 1, and repeat around. Join with a sl st to the third chain of the beginning chain. At the end of the round, you should have 12 double crochet stitches separated by 12 chain-1 spaces. These openings begin creating the airy structure of the crochet spiderweb pattern.
Round 3: sl st into the first chain space. Ch 3, then work 1 dc in the same chain space, ch 2, and work 2 dc in the next chain space. Continue around with 2 dc, ch 2 in every chain space. Join with a sl st. This round expands the coaster while increasing the space between the spokes, giving the web a more visible radial appearance.
For Round 4, move into the first chain-2 space with a slip stitch. Ch 3, work 1 dc in the same space, ch 3, then place 2 dc in the next chain-2 space. Repeat this sequence around. The chain sections are now becoming longer, and the open areas between each solid spoke should be clearly visible. Lay the piece flat after completing the round to check that it is expanding evenly.
In Round 5, continue the same general construction while increasing the chain length. Sl st into the first chain space, ch 3, work 1 dc in the same space, ch 4, and place 2 dc in the next chain space. Repeat around and join. At this point, the coaster should resemble a small circular web with strong radial lines and open spaces between them.
If your coaster begins to cup upward, the chain spaces may be too short for your personal tension. Add one extra chain to each open section. If the edge becomes overly wavy, reduce the number of chains. Small adjustments are acceptable because crochet tension varies from person to person. The goal is to maintain the recognizable spiderweb coaster pattern while keeping the fabric flat.
Creating the Outer Web, Decorative Points, and Final Shape
The outer section of the Crochet spiderweb coaster pattern gives the design its distinctive Halloween appearance. For the next round, move into the first chain space and ch 1. Work 1 sc into the space, then ch 5 and place 1 sc into the next chain space. Repeat around. These longer chain loops create a delicate outer ring while connecting each spoke of the web.
For an even more dramatic effect, add another round of web loops. Slip stitch into the first chain-5 space, ch 1, and work 1 sc into the space. Ch 6, then place 1 sc into the next chain-5 space. Continue around. This optional round makes the coaster slightly larger and gives the open web pattern more definition.
To create pointed outer details, work into each chain loop as follows: 1 sc, 1 hdc, 1 dc, ch 2, sl st into the second chain from the hook, 1 dc, 1 hdc, 1 sc. Repeat this sequence in each chain loop. The small chain-2 picot in the center forms a subtle point, giving the outer edge a decorative shape that complements the spiderweb theme.
If you prefer a simpler coaster, skip the pointed edging and finish with a round of single crochet worked evenly into the outer chain loops. This creates a cleaner circular edge while preserving the web structure inside. Both versions work well, so choose the finish that best matches your preferred Halloween crochet decor style.
As you work the outer rounds, periodically place the coaster on a flat surface. The edge should remain smooth without curling or forming excessive ruffles. If necessary, gently stretch the chain spaces into shape using your fingers. Cotton yarn responds particularly well to light blocking after the project is complete.
Fasten off the yarn after the final round and leave a tail long enough to weave securely through several stitches. Use a yarn needle to hide the tail along the back of the coaster. Trim any excess yarn carefully. Your basic crochet spiderweb coaster is now complete and ready for optional blocking and decorative customization.
Blocking, Finishing, Color Ideas, and Creative Variations
Blocking can dramatically improve the finished appearance of a Crochet spiderweb coaster pattern because it helps open the chain spaces and emphasizes the geometric structure of the web. Lightly dampen the coaster, gently stretch it into a symmetrical circle, and position each outer point evenly. Allow it to dry completely before removing any pins or moving the piece.
Cotton yarn is particularly suitable for blocking because it generally holds its shape well after drying. Avoid stretching too aggressively, as this can distort the stitches and make the coaster larger than intended. The goal is simply to straighten the spokes, open the chain spaces, and make the outer edge more even.
Traditional black yarn creates a strong Halloween aesthetic, but there are many creative color combinations to explore. A white spiderweb crochet coaster can create a delicate ghostly effect, while silver-gray yarn gives the impression of an old web. Orange and purple are excellent choices for colorful Halloween table settings, and dark green can produce a more mysterious seasonal look.
You can also use two colors in the same coaster. Work the center rounds in black and switch to purple for the outer loops, or make the center white and the edging black. Color changes are easiest at the beginning of a new round. Fasten off the old color securely and join the new yarn before continuing.
For a coordinated handmade set, make four or six coasters using the same pattern. You can keep every coaster identical or create a mixed collection using different Halloween colors. A matching set can be used for seasonal gatherings, coffee tables, decorative trays, or handmade gift packages.
You can even add a tiny crocheted spider as an optional decoration. Create a very small black circle and add short embroidered or crocheted legs, then sew it lightly onto one section of the web. Keep any added decoration relatively flat if you plan to place cups directly on the coaster. For purely decorative versions, you can experiment more freely with raised details.
FAQ About the Crochet Spiderweb Coaster Pattern
Is the Crochet spiderweb coaster pattern suitable for beginners?
Yes, it can be a good project for confident beginners. The pattern mainly uses chains, single crochet, double crochet, slip stitches, and simple joined rounds. The most important skill is learning to recognize and work into chain spaces.
What yarn is best for crochet coasters?
Cotton yarn is one of the most practical choices because it has good stitch definition, absorbs small amounts of moisture, and generally creates a stable fabric. For this Crochet spiderweb coaster pattern, cotton also helps the web structure remain clearly visible.
How large should a crochet spiderweb coaster be?
A diameter of approximately 4.5 to 6 inches works well for most mugs and glasses. The exact size will depend on your yarn weight, hook size, tension, and the number of rounds you complete.
Why is my spiderweb coaster curling?
Curling usually means the outer rounds do not have enough space to expand. Your chain sections may be too short or your tension may be too tight. Try adding one chain to each open section or using a slightly larger hook.
Why is my coaster becoming wavy?
A wavy edge generally means there is too much fabric or too much chain length in the outer rounds. Reduce the number of chains between spokes or use a slightly smaller hook.
Can I make the spiderweb coaster larger?
Yes. Continue adding additional rounds using longer chain spaces between the web spokes. Increase the chain lengths gradually so the coaster continues to lie flat.
Can I use acrylic yarn instead of cotton?
Yes, acrylic can be used for decorative coasters. However, cotton is often preferred for functional coaster projects because of its stability and absorbency. Always consider how the finished item will be used.
How can I make the web look more defined?
Use a smooth yarn with strong stitch definition and block the coaster after finishing. Dark solid colors can make the web structure easy to see, while careful blocking helps straighten the spokes and open the chain spaces.
Can I use this pattern outside of Halloween?
Absolutely. A white or cream crochet spiderweb coaster can look elegant and lace-like rather than specifically Halloween-themed. Gray, blue, or neutral shades can also transform the design into year-round decorative crochet.
How many coasters can I make from one skein of yarn?
Because each coaster uses a relatively small amount of yarn, you can usually make several pieces from one standard skein. The exact number depends on yarn weight, skein size, hook size, and the finished coaster diameter.
Conclusion
The Crochet spiderweb coaster pattern is a simple but visually interesting project that combines basic crochet techniques with an unmistakable spiderweb design. Throughout this tutorial, you learned how to begin with a magic ring, create the central foundation, build radial web spokes, expand the open chain spaces, and finish the outer edge with decorative loops or pointed details.You also learned how important consistent tension is when working an open crochet spiderweb pattern. Proper chain length allows the coaster to remain flat while maintaining the airy structure that makes the web recognizable. Small adjustments to chain counts can help you adapt the project to different yarns and individual crochet styles.
Finishing techniques such as weaving in the ends and blocking can make a significant difference in the final appearance. Blocking helps straighten the spokes, open the chain spaces, and define the outer points, giving the finished spiderweb crochet coaster a cleaner and more professional handmade look.Once you understand the basic construction, you can experiment with different colors, sizes, borders, and decorative additions. Black creates a classic Halloween look, while white, gray, purple, orange, or multicolored yarn can completely change the personality of the project. You can also make matching sets for seasonal table decorations or handmade gifts.
This Crochet spiderweb coaster pattern is a useful project for practicing chains, joined rounds, working into chain spaces, and decorative edging while creating something practical at the same time. It is also a great way to use small amounts of leftover yarn and explore creative seasonal crochet without committing to a large project.If you make this Crochet spiderweb coaster pattern, leave your sincere opinion about the tutorial and share your suggestions. Tell us which colors you chose, whether you added the pointed border, and what changes you would make to personalize your spiderweb coaster. Your ideas can help inspire new versions and creative variations of this fun crochet project.