
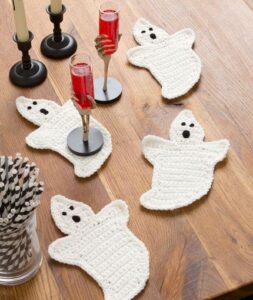
Crochet Ghost Coaster Pattern is a charming Halloween crochet project that combines a playful ghost shape with a practical handmade accessory for your table.
Another advantage of this Crochet Ghost Coaster Pattern is that it requires only a modest amount of yarn. White is the classic choice because it immediately creates the appearance of a traditional ghost, while black yarn can be used to embroider the eyes and mouth. However, the design can easily be personalized with cream, light gray, lavender, pale green, orange, or even pastel shades.
The construction is approachable because the ghost can be worked primarily as a flat crochet piece rather than a stuffed three-dimensional character. The pattern begins by shaping the rounded head, expands into the body, and finishes with a slightly wavy lower section that suggests a floating ghost. Facial details are then embroidered onto the surface. Throughout this tutorial, you will learn the meaning of the crochet abbreviations, how to control increases, how to keep the coaster flat, how to create the ghost’s lower curves, and how to finish the edges neatly. Read through the complete Crochet Ghost Coaster Pattern before beginning, especially if you are new to shaping flat crochet pieces.
Materials, Crochet Stitch Key, and Preparation
For this Crochet Ghost Coaster Pattern, cotton yarn in DK or light worsted weight is an excellent starting point. You will need approximately 15–25 grams of white or another main color, plus a small amount of black yarn or embroidery thread for the face. Gather a crochet hook suitable for your chosen yarn, scissors, a yarn needle, stitch markers, and optional blocking supplies. A hook between approximately 3 mm and 4 mm often works well, although your yarn label and personal tension should guide the final choice.
The main crochet abbreviations are ch for chain, sc for single crochet, hdc for half double crochet, dc for double crochet, sl st for slip stitch, inc for increase, and dec for decrease. An increase means placing two stitches into the same stitch, while a decrease combines two stitches into one. These simple techniques allow you to change the width of the ghost gradually.
This pattern can begin with a foundation chain rather than a magic ring because the coaster is worked as a flat shape. The rounded top is created by crocheting around both sides of the foundation chain, similar to the beginning of an oval. This construction helps create a smooth head without requiring several separate pieces to be sewn together later.
Before beginning, remember that tension is important in crochet coaster patterns. Your stitches should be firm enough to create a stable fabric but not so tight that the coaster curls. Cotton can feel slightly stiff on a small hook, so relax your hands and avoid pulling every loop excessively tight.
Gauge is not essential, but the finished ghost should be large enough to comfortably support the base of a standard mug. Depending on yarn and hook size, aim for approximately 5 to 6 inches in height and 4 to 5 inches across the widest section. If your ghost is smaller than desired, you can add another border round later.
Keep a stitch marker nearby even though the main body is not traditional continuous-round amigurumi. Marking the center of the top and the sides of the body can help you place increases symmetrically. Symmetry is especially useful when making multiple crochet ghost coasters for a matching set.
Crocheting the Ghost Head and Main Body
Begin the Crochet Ghost Coaster Pattern by chaining 9 with your main color. Starting in the second chain from the hook, work 1 sc in each of the next 7 chains. Place 3 sc in the final chain. Rotate the work so you can crochet along the unused loops on the opposite side of the foundation chain.
Work 1 sc into each of the next 6 available loops, then place 2 sc into the final loop. Join with a sl st if you prefer joined rounds. You should now have a narrow oval foundation. This oval forms the top section of the ghost and will expand over the next few rounds.
For the next round, ch 1 and work 1 sc in the first stitches until you reach the curved end. Place increases evenly across the three stitches forming the curve, then continue along the opposite side. Increase similarly around the other curved end. The objective is to enlarge the oval while keeping the fabric completely flat.
Continue for another round using single crochet increases around the rounded ends while working one sc in the straighter sections. Instead of concentrating all increases in one position, distribute them across the curves. This produces a smoother ghost head and prevents noticeable corners from forming.
Once the top measures approximately 3½ to 4 inches across, stop increasing around the upper curve and begin extending the lower portion. Work back and forth across approximately two-thirds of the stitches rather than continuing around the entire oval. Chain 1 and turn at the end of each row. These straight rows begin forming the body underneath the rounded head.
Continue working 1 sc in each stitch for approximately 5–7 rows, depending on the desired length. If you want the ghost to become slightly wider toward the bottom, place one increase near each outer edge every second or third row. This gradual expansion gives the crochet ghost shape a soft flowing silhouette rather than a rigid rectangle.
Creating the Ghost’s Wavy Bottom and Facial Details
The lower edge is one of the most recognizable elements of the Crochet Ghost Coaster Pattern. Instead of finishing the body with a straight row, create several gentle curves. Begin the final shaping row with a slip stitch, then work 1 sc, 1 hdc, 2 dc in the next stitch, 1 hdc, and 1 sc across a small section. This combination creates a rounded downward bump.
Repeat similar groups across the bottom edge to create approximately three soft waves. You can adjust the exact number of stitches depending on the width of your coaster. The important thing is to distribute the curves evenly. If the last wave becomes too narrow, undo a few stitches and redistribute the previous sections.
At the spaces between the waves, use slip stitches or single crochet stitches to pull the fabric slightly upward. This contrast between taller double crochet stitches and shorter slip stitches creates the flowing bottom silhouette associated with a floating ghost. Keep the shaping subtle so the coaster still provides a reasonably flat surface.
After finishing the lower edge, you can work a simple single crochet border around the outer perimeter. Use one sc in each stitch along straight areas and place additional stitches where necessary around curves. Along the sides of rows, space the stitches evenly rather than forcing too many into one area.
Now create the face using black embroidery thread or thin black yarn. Position two small oval eyes in the upper half of the ghost. Use several vertical stitches for each eye, keeping both shapes approximately the same size. For a friendly expression, place the eyes slightly farther apart and keep the features simple.
Add a small mouth below the eyes. A tiny embroidered oval creates a surprised ghost expression, while a short curved line produces a cheerful appearance. Keep the embroidery relatively flat because raised knots or thick details may interfere with cups placed on the ghost crochet coaster. Weave all embroidery ends securely into the back.
Finishing, Blocking, Color Variations, and Creative Ideas
Once the crochet and embroidery are finished, examine the Crochet Ghost Coaster Pattern from the front and back. Weave every loose yarn tail through several nearby stitches using a yarn needle. Change direction once or twice while weaving to help secure the ends, then carefully trim the excess yarn.
Blocking is particularly useful if the coaster curls slightly around the head or lower waves. Lightly dampen the finished piece and gently shape it on a flat surface. Smooth the head into a rounded shape, straighten the body, and arrange the bottom waves so they are evenly spaced. Allow the coaster to dry completely before using it.
For the traditional version, combine a white body with black facial embroidery. This simple color palette makes the ghost immediately recognizable and works well with orange, purple, and black Halloween decorations. Off-white or cream yarn can create a softer vintage-inspired version of the Crochet Ghost Coaster Pattern.
For something more colorful, try lavender, pale orange, mint green, gray, or pastel pink ghosts. You can also make each coaster in a different color while keeping the facial embroidery consistent. A coordinated collection of four or six pieces makes a playful Halloween crochet coaster set for seasonal gatherings.
Another variation is adding a narrow contrasting border. After completing the ghost in white, join purple, orange, or black yarn and work a careful round of slip stitches or single crochet around the perimeter. Keep the border relatively thin so it does not overpower the ghost silhouette.
When creating several coasters, make one complete sample first and record any adjustments you made to the stitch counts or number of rows. Crochet tension varies, so your personal version may need slightly different shaping. Using the first finished coaster as a reference will help the rest of your crochet ghost coaster set remain consistent.
FAQ About the Crochet Ghost Coaster Pattern
Is the Crochet Ghost Coaster Pattern beginner-friendly?
Yes. The project is suitable for beginners who already understand chains and single crochet. Some basic increases, shaping, and working around a foundation chain are required, but each technique can be practiced gradually as you complete the coaster.
What yarn should I use for a crochet ghost coaster?
Cotton yarn is a practical choice for functional coasters because it provides clear stitches, good structure, and useful absorbency. DK and light worsted-weight cotton are both suitable for this project.
How much yarn does one ghost coaster require?
A single coaster generally requires only a small amount of yarn. Approximately 15–25 grams of the main color should be sufficient for many versions, although actual yarn consumption depends on yarn weight, hook size, tension, and finished dimensions.
What size should the finished ghost coaster be?
A useful target is approximately 5–6 inches tall and 4–5 inches wide. However, there is no mandatory finished size. The important factor is making the center area large enough to comfortably accommodate the base of your preferred mug or glass.
Why is my crochet ghost curling?
Curling often occurs when tension is too tight or when there are not enough increases around curved sections. Try relaxing your tension, using a slightly larger hook, or adding an additional increase where the fabric pulls inward.
Why is the edge becoming wavy?
Excessive waviness usually indicates too many stitches or increases. If the fabric begins ruffling noticeably, remove some increases or reduce the number of border stitches.
Can I use acrylic yarn for this Crochet Ghost Coaster Pattern?
Acrylic can work for decorative versions, but cotton is generally more practical for functional coasters. Always consider the yarn manufacturer’s care and heat recommendations and avoid placing extremely hot cookware on decorative crochet pieces unless the materials are specifically appropriate for that purpose.
How can I make the ghost larger?
Add additional body rows and increase the width gradually along both sides. You can also use thicker yarn with a correspondingly larger hook. Maintain the proportions between the rounded head, body, and lower waves.
Can I make the ghost without embroidery?
Yes. You can crochet small flat circles for the eyes and sew them securely to the body. However, embroidery usually produces a flatter surface, which is useful when the piece will function as a coaster.
How do I make all my ghost coasters the same size?
Use the same yarn, hook, tension, stitch counts, and number of rows for each piece. Keep the first completed coaster nearby as a visual reference while making the others.
Can I change the ghost’s facial expression?
Absolutely. This is one of the easiest ways to personalize the Crochet Ghost Coaster Pattern. Try surprised mouths, tiny smiles, sleepy eyes, or different eye shapes while keeping the embroidery flat and securely attached.
Can this pattern be used for projects other than coasters?
Yes. The same flat ghost shape can become an appliqué, garland element, decorative patch, or seasonal ornament. You can also make larger versions by adjusting the stitch counts and number of rows.
Conclusion
The Crochet Ghost Coaster Pattern offers a fun way to combine useful crochet techniques with a playful Halloween design. Throughout this tutorial, you learned how to create the rounded foundation of the ghost, expand the head evenly, transition into the body, and shape the bottom into several gentle floating curves.You also learned the basic stitch key used throughout the project, including ch, sc, hdc, dc, sl st, inc, and dec. Understanding these abbreviations makes the pattern easier to follow and provides useful skills that can be applied to many other crochet projects.
Creating a flat, balanced coaster depends heavily on tension and thoughtful shaping. By distributing increases around the curved sections and avoiding excessive stitches along the border, you can create a crochet ghost coaster that lies neatly on the table while maintaining its recognizable silhouette.The finishing process is equally important. Simple facial embroidery gives each ghost personality without creating excessive thickness, while light blocking helps define the head, body, and decorative lower waves. Securely weaving in every yarn end also gives the project a cleaner and more durable finish.
Once you understand the basic Crochet Ghost Coaster Pattern, there are many opportunities for customization. You can experiment with white, cream, gray, lavender, orange, green, or pastel yarn, change the facial expressions, add a contrasting border, or make an entire collection of ghosts for a coordinated Halloween table setting.If you make your own Crochet Ghost Coaster Pattern, please leave your sincere opinion about the tutorial and share your suggestions. Tell us which color you would choose, what expression you would give your little ghost, and what variations you would like to try. Creative feedback and new ideas can inspire even more fun versions of this simple Halloween crochet project.