
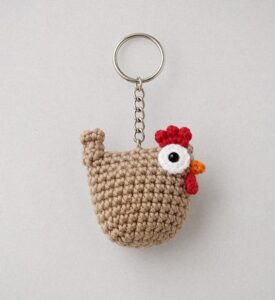
Crochet chicken keychain pattern is a delightful small crochet project that turns a few basic stitches and small amounts of yarn into a charming handmade chicken accessory.
Another reason to enjoy this Crochet chicken keychain pattern is the amount of creative freedom it provides. A traditional chicken can be made with white or cream yarn, a red comb, a yellow or orange beak, and small black facial details.
The key to achieving a neat result is keeping the stitches firm and consistent. Since the chicken body will be lightly stuffed, a slightly smaller crochet hook than you might normally use with the chosen yarn can help prevent gaps between stitches. The pattern below explains the main crochet abbreviations, materials, body construction, wings, comb, beak, tail, assembly, and keychain attachment. The stitch counts are designed as a practical starting point and can be adapted if you prefer a larger or smaller chicken. Before beginning your Crochet chicken keychain pattern, read through all the instructions and prepare the required colors so that you can work smoothly from one component to the next.
Materials, Crochet Stitch Key, and Preparation
For this Crochet chicken keychain pattern, choose DK or light worsted-weight cotton or acrylic yarn. Cotton creates crisp stitch definition and a firm little chicken, while acrylic can produce a softer result. You will need approximately 15–25 grams of the main body color, plus small amounts of red, yellow or orange, and any contrasting colors you want for the wings or tail. You will also need polyester fiberfill, a yarn needle, scissors, a stitch marker, embroidery thread, and a key ring or suitable keychain attachment.
The crochet abbreviations used throughout the pattern are MR for magic ring, ch for chain, sc for single crochet, inc for increase, dec for decrease, sl st for slip stitch, hdc for half double crochet, and dc for double crochet. Most of the chicken body is made using single crochet because this stitch creates the dense fabric commonly used in small amigurumi projects.
An increase (inc) means placing two single crochet stitches into the same stitch. Increases are used to expand the chicken body gradually. A decrease (dec) means combining two stitches into one. An invisible decrease is particularly useful for this project because it creates a cleaner surface when shaping the top and lower sections of the body.
Most rounds are worked continuously in a spiral rather than being joined at the end. Place a stitch marker into the first stitch of every round and move it upward as you work. This simple habit prevents losing track of the beginning of a round and makes it much easier to verify the stitch count.
For a compact crochet chicken keychain, a hook between approximately 2.5 mm and 3.5 mm is a useful starting range for many DK and light worsted yarns. The exact hook size depends on your yarn and tension. If stuffing can be seen through the stitches, try using a smaller hook or slightly firmer tension.
The finished chicken can measure approximately 3 to 4 inches tall before the keychain hardware is added, depending on the materials used. Keep the body relatively small so the finished accessory remains lightweight and comfortable to carry. If you want a decorative ornament instead of a keychain, you can use thicker yarn and increase the overall size.
Crocheting the Chicken Body and Shaping the Main Form
Begin the body of the Crochet chicken keychain pattern with your main yarn color. Round 1: work 6 sc into a MR (6). Pull the ring firmly closed. Round 2: inc in every stitch around (12). Round 3: repeat (1 sc, inc) 6 times (18). These first rounds create a flat circular base that will gradually become the rounded lower section of the chicken.
Continue with Round 4: (2 sc, inc) × 6 (24). Round 5: (3 sc, inc) × 6 (30). At this point, the piece should resemble a small flat circle. Check that it is not becoming excessively wavy. Consistent increases and even tension are important for creating a balanced shape.
For Rounds 6–10, work 1 sc in every stitch around (30). These rounds add height without increasing the circumference and begin transforming the circle into a three-dimensional body. The shape should gradually resemble a small rounded cup. Continue moving the stitch marker at the beginning of each round.
Now begin narrowing the upper portion. Round 11: (3 sc, dec) × 6 (24). Round 12: sc around (24). Round 13: (2 sc, dec) × 6 (18). Start adding small amounts of polyester fiberfill. Use your fingers or the blunt end of a suitable crochet tool to distribute the stuffing evenly around the sides.
Continue with Round 14: sc around (18). Round 15: (1 sc, dec) × 6 (12). Add the remaining stuffing before the opening becomes too small. The chicken should feel firm enough to hold its shape but not so tightly stuffed that the stitches stretch apart.
Finish with Round 16: dec around (6). Fasten off, leaving a yarn tail. Thread the tail through the front loops of the remaining stitches and gently pull the opening closed. Secure the yarn and weave it into the body. You now have the main foundation for your crochet chicken amigurumi keychain.
Making the Wings, Comb, Beak, Tail, and Face
The wings add shape and personality to the Crochet chicken keychain pattern. Make two identical pieces. Begin with Round 1: 6 sc in MR (6). Round 2: inc around (12). Round 3: (1 sc, inc) × 6 (18). Fold the small circle approximately in half and gently shape it into a wing. You can leave it flat or add a short row of slip stitches along the folded edge.
For a more feathered wing, work a decorative final section using 1 sc, 1 hdc, 2 dc, 1 hdc, 1 sc across selected stitches before fastening off. This creates a soft curved edge. Leave a long yarn tail on each wing for sewing. Position the wings symmetrically on the sides of the chicken body before attaching them permanently.
The red comb is made as a small decorative strip. With red yarn, ch 7. Starting in the second chain from the hook, work a combination such as sl st, sc, hdc, dc, hdc, sc. Alternatively, create three small bumps by working groups of taller stitches into consecutive chains. The exact comb shape can be adjusted depending on the personality you want your chicken to have.
For the beak, use yellow or orange yarn. Ch 3, then work 1 sc in the second chain from the hook and 1 hdc in the final chain. Fasten off with enough yarn for sewing. Fold the tiny piece slightly to form a triangular beak and position it on the front of the body.
The tail can be made using three short chains attached together. Join the main or contrasting yarn at the back of the chicken. Make ch 5, sl st back toward the body, then ch 6, sl st back, followed by ch 5, sl st back. These three narrow sections create simple tail feathers. You can also crochet separate tiny feather shapes and sew them individually onto the body.
Finish the face with embroidered eyes using black thread or thin yarn. Place the eyes symmetrically above and slightly to either side of the beak. Small embroidered stitches keep the surface relatively smooth. You can also add tiny eyebrows, rosy embroidered cheeks, or short feather details, but avoid overcrowding the face because the compact scale is part of the charm of the Crochet chicken keychain pattern.
Assembly, Keychain Attachment, Finishing, and Creative Variations
Before sewing the smaller pieces permanently, arrange everything on the body. Place the comb along the top, center the beak on the face, position one wing on each side, and check the tail from both the front and back. Taking a few minutes to adjust the placement can significantly improve the symmetry of your crochet chicken keychain.
Sew the comb securely along the top of the body using red yarn. Make several small stitches through the base of the comb without flattening the decorative bumps. Attach the beak to the center of the face and then sew the wings to the sides. The wings can be attached completely flat or only along their upper edges so they project slightly outward.
Secure the tail at the back and weave all yarn ends inside the body. Check every component by gently pulling it. Since a keychain may experience more movement than a decorative amigurumi displayed on a shelf, secure stitching is especially important. Reinforce any attachment that feels loose.
To add the keychain hardware, create a strong yarn loop at the top of the chicken behind the comb. Pass the yarn through several body stitches rather than attaching it only to the comb. Feed the loop through a key ring or other suitable attachment and secure it firmly. The body itself should support the weight of the Crochet chicken keychain pattern.
Color variations can completely transform the project. Use white with a bright red comb for a classic farm chicken, brown and cream for a rustic style, black and gray for a dramatic version, or pastel colors for a softer decorative look. You can even use variegated yarn for the body while keeping the comb and beak in traditional colors.
For an entire handmade collection, make several chickens with different wing colors and facial expressions. Add tiny embroidered flowers, hearts, dots, or feather marks to personalize each one. Keep decorative additions securely attached and appropriate for the intended use. Once you understand the basic Crochet chicken keychain pattern, small modifications make it easy to create many unique variations.
FAQ About the Crochet Chicken Keychain Pattern
Is the Crochet chicken keychain pattern suitable for beginners?
Yes, it is suitable for confident beginners who understand basic crochet stitches. The project uses a magic ring, single crochet, increases, decreases, and simple assembly. If you are new to amigurumi, working slowly and counting every round will make the process easier.
What is the best yarn for a crochet chicken keychain?
Cotton and acrylic yarn are both suitable. Cotton provides excellent stitch definition and creates a firmer body, while acrylic often produces a softer texture. DK or light worsted yarn works well when you want a small finished keychain.
How much yarn do I need?
The project uses relatively little yarn. Approximately 15–25 grams of the main color is generally enough for a small chicken, along with scraps of red, yellow, orange, black, or contrasting shades for the details.
How large should the finished chicken be?
With DK or light worsted yarn, the chicken may measure approximately 3 to 4 inches tall before adding the keychain hardware. The final dimensions depend on hook size, yarn thickness, tension, and any modifications you make.
Why can I see stuffing between my stitches?
Visible stuffing usually means your stitches are too loose or the hook is too large for the yarn. Try a slightly smaller crochet hook and maintain consistent tension. Overstuffing can also stretch the stitches and create visible gaps.
How firmly should I stuff the chicken?
The body should be firm enough to maintain its rounded shape but still slightly flexible. Add stuffing gradually rather than inserting one large amount. This makes it easier to distribute the filling evenly.
Can I make the chicken without a keychain attachment?
Absolutely. Simply omit the top loop and hardware. The same crochet chicken pattern can become a small ornament, bag decoration, seasonal display piece, or miniature amigurumi.
Can I make a larger version of the chicken?
Yes. The simplest option is to use thicker yarn and a larger hook. You can also add more increase rounds to the body, but remember that the remaining stitch counts and smaller components will need to be adjusted proportionally.
How do I keep the wings symmetrical?
Use exactly the same yarn, hook, stitch count, and tension for both wings. Make both pieces before sewing either one to the body. Place them temporarily on opposite sides and compare their positions from the front before attaching them.
Can I use safety eyes?
Small safety eyes can be used for decorative pieces intended for appropriate users, but embroidered facial features are an excellent alternative and keep the design simple. Consider the intended use and age of the recipient when choosing small components.
How can I make the keychain attachment stronger?
Anchor the hanging loop through several stitches in the main body instead of relying on a small decorative component such as the comb. Reinforce the attachment with several passes of strong yarn and test it gently before regular use.
Can I make different breeds or styles of chickens with this pattern?
Yes. Changing the body, wing, comb, and tail colors can suggest many different chicken styles. White, brown, cream, black, gray, speckled, and multicolored versions can all be created from the same basic Crochet chicken keychain pattern.
Conclusion
The Crochet chicken keychain pattern is a small but rewarding project that combines fundamental amigurumi techniques with plenty of opportunities for creative personalization. Throughout this tutorial, you learned how to begin with a magic ring, expand the body with increases, work even rounds to create height, and use decreases to shape and close the chicken.You also learned how to make the smaller components that give the character its recognizable appearance. The wings add volume to the sides, the red comb defines the top of the head, the small beak creates the face, and the tail feathers complete the chicken silhouette.
Careful assembly plays an important role in creating a polished crochet chicken keychain. Checking the position of each component before sewing helps keep the design symmetrical, while secure stitching ensures that the small parts remain attached during regular handling.The tutorial also covered stuffing, facial embroidery, yarn selection, keychain attachment, and finishing techniques. Consistent tension and careful stitch counting are particularly useful when working on such a small project because even minor differences can noticeably change the final shape.
Once you become comfortable with the basic Crochet chicken keychain pattern, you can create many variations. Experiment with traditional farm-inspired colors, colorful scraps, pastel yarns, contrasting wings, embroidered feather details, and different facial expressions. Each little chicken can have its own personality while following the same fundamental construction.If you make this Crochet chicken keychain pattern, please leave your sincere opinion about the tutorial and share your suggestions. Tell us which colors you would choose for your chicken, how you would personalize the wings or face, and what variations you would enjoy making next. Your creative ideas and feedback can inspire even more handmade versions of this fun little crochet project.