
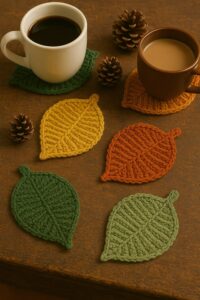
Crocheted leaf coaster pattern is a charming way to combine practical home décor with the relaxing art of crochet. Inspired by the natural shape and delicate veins of real leaves, this project creates a handmade coaster that can protect tables while adding warmth and texture to your space.
One of the most enjoyable aspects of a crochet leaf coaster is that no two leaves have to look exactly alike. You can change the yarn weight, hook size, color, edging, and even the length of the stem to create your own collection.
This tutorial explains the complete process in an easy-to-follow format, including a crochet stitch key, recommended materials, construction details, shaping instructions, finishing techniques, and ideas for customization. The pattern works primarily by building the leaf around a foundation chain and using different stitch heights to produce the characteristic pointed oval shape. Decorative surface stitching can then suggest the central vein and smaller leaf veins. Before beginning, read through the entire crocheted leaf coaster pattern so you understand how the shaping develops. Keeping an even tension throughout the project will help the coaster remain balanced, flat, and attractive when finished.
Materials, Crochet Stitch Key, and Preparation
For this crocheted leaf coaster pattern, choose a medium-weight cotton yarn for a sturdy and practical result. Approximately 20–30 yards of yarn should be enough for one average-sized coaster, although the exact amount depends on your tension, yarn thickness, and desired dimensions. You will also need a crochet hook that works comfortably with your chosen yarn, usually somewhere around 3.5 mm to 4.5 mm for medium cotton. Keep scissors and a yarn needle nearby for finishing the project.
The main crochet stitch key used throughout the pattern is simple. CH means chain, SL ST means slip stitch, SC means single crochet, HDC means half double crochet, DC means double crochet, TR means treble crochet, ST means stitch, and STS means stitches. INC refers to an increase, which means working additional stitches into the same stitch or space. Understanding these abbreviations before beginning makes the written pattern much easier to follow.
The chain stitch (CH) creates the foundation of the leaf. Rather than making a circular coaster, this project begins with a straight foundation chain. Crochet stitches are worked along one side of the chain, around the end, and back along the opposite side. This construction method naturally creates an elongated oval that can easily be shaped into a recognizable leaf.
The different stitch heights are what give the crochet leaf pattern its organic outline. Short single crochet stitches are placed near the narrow ends, while half double, double, and treble crochet stitches gradually create additional width through the center. Returning to shorter stitches toward the opposite end allows the fabric to taper again. This gradual transition is one of the most important techniques in the project.
For a medium coaster, begin with CH 18. This foundation should be approximately the length you want for the central body of the leaf, excluding the optional stem. If your chain feels unusually tight, consider making the foundation chain with a hook slightly larger than the one used for the rest of the coaster. A flexible foundation helps prevent the finished leaf from curling excessively.
Before continuing, examine the chain and make sure it is not twisted. You will crochet along both sides of this foundation, so identifying the individual chain loops is useful. Beginners may find it helpful to place a stitch marker near the first stitch. Once the foundation is prepared, you are ready to begin shaping the main body of the handmade crochet coaster.
Step-by-Step Crocheted Leaf Coaster Pattern
Begin in the second chain from the hook. Work 1 SC, followed by 1 HDC in the next chain. Work 1 DC into each of the next 3 chains, then 1 TR into each of the next 7 chains. Continue with 1 DC in each of the next 3 chains, 1 HDC in the following chain, and 1 SC in the final chain. This sequence creates a gradual transition from the narrow leaf tip toward its fuller middle and back again.
At the final chain, work CH 2 to create a small pointed turning space. Do not turn the work as you would for a normal crochet row. Instead, rotate the foundation slightly and begin crocheting along the unused loops on the opposite side of the original chain. This technique forms the second half of the leaf and allows both sides to mirror each other.
Working along the opposite side, begin with 1 SC in the first available chain loop. Continue with 1 HDC, followed by 1 DC in each of the next 3 spaces. Work 1 TR into each of the next 7 spaces, then gradually reduce the stitch height by working 1 DC in each of the next 3 spaces, 1 HDC, and finally 1 SC near the starting point. Join with a SL ST.
At this stage, the basic crochet leaf coaster should already be visible. The center will be broader because of the treble crochet stitches, while both ends should appear narrower. If the coaster curls slightly, gently flatten it with your fingers rather than immediately changing the pattern. Minor curling can often be corrected during blocking after the project is complete.
To create a more defined edge, work another round around the entire leaf using SC stitches. Work approximately one single crochet into each stitch, but add an increase where necessary around the widest curves. At the pointed end, work SC, CH 2, SC into the chain space to preserve the sharp leaf tip. Continue evenly around the opposite side and join with a slip stitch.
For a slightly larger crocheted leaf coaster pattern, another edging round can be added. Work single crochet around the perimeter again, using occasional increases along the rounded sections so the fabric stays flat. Avoid adding too many stitches because excessive increases can make the edge ripple. When you reach the tip, repeat SC, CH 2, SC to maintain the recognizable leaf point.
Adding the Stem, Leaf Veins, and Professional Finishing
A small stem makes the finished project look more distinctly like a leaf. After completing the border, position your hook at the base of the coaster and CH 7. Starting in the second chain from the hook, work SL ST back through each chain until you reach the body of the leaf. Secure the stem with another slip stitch. You can make the stem shorter or longer depending on the style you prefer.
The central vein can be created using surface crochet or simple embroidery. Thread a yarn needle with a contrasting or coordinating color and make a straight stitched line from the base toward the pointed tip. Another option is to use surface SL ST crochet directly over the central foundation line. This detail gives the crochet leaf coaster more visual depth without making the project unnecessarily complicated.
Smaller veins can branch outward from the central line. Using a yarn needle, make several diagonal stitches extending toward each side of the leaf. Keep these decorative lines relatively loose so they do not pull the coaster out of shape. Three or four small veins on each side are usually enough to suggest natural leaf structure without overcrowding the design.
Once all decorative work is finished, weave the yarn tails securely into the back of the coaster using a yarn needle. Move the yarn through several stitches in one direction and then return through nearby stitches before trimming the excess. Properly secured ends are particularly important for crochet coasters because these items may be handled and washed frequently.
Blocking can significantly improve the final appearance. Lightly dampen the finished leaf, arrange it on a flat surface, and gently shape the sides and pointed tip. Allow it to dry completely before moving it. Always follow the care recommendations for your chosen yarn. Cotton projects generally respond particularly well to gentle blocking because the process helps define stitches and flatten minor irregularities.
After blocking, check that the coaster rests evenly on the table. A well-finished crocheted leaf coaster pattern should have a clear pointed tip, balanced sides, a slightly defined stem, and an attractive central vein. Handmade crochet does not need to be perfectly symmetrical to look beautiful. Small variations can actually enhance the natural character of a leaf-inspired design.
Customizing Your Crochet Leaf Coasters and Creating a Complete Set
Color is one of the easiest ways to personalize this crocheted leaf coaster pattern. For an autumn collection, consider rust, mustard, burgundy, brown, burnt orange, and olive green. For spring or summer decorating, fresh greens, cream, yellow, or pastel shades can create a lighter appearance. Neutral shades are another attractive option for minimalist or farmhouse-inspired interiors.
You can also create a crochet coaster set by making four or six leaves in coordinating colors. Instead of making every coaster identical, use several shades from the same color family. For example, a green collection could include sage, forest green, olive, mint, and moss. This approach creates variety while maintaining a cohesive handmade appearance.
Yarn thickness changes both the size and texture of the finished leaf. A thinner cotton yarn combined with a smaller hook creates a delicate coaster with fine stitch definition. A thicker yarn produces a larger and more textured result. Whenever you change yarn weight, adjust the hook size accordingly and check that the fabric is dense enough to function comfortably as a coaster.
The leaf shape itself can also be modified. To create a longer leaf, add several chains to the foundation and extend the central section of taller stitches. For a wider leaf, add increases around the middle sections of the border. For a smaller decorative leaf, reduce the starting chain and shorten each stitch sequence proportionally. These modifications make the basic crochet leaf pattern surprisingly versatile.
If you plan to use the project regularly beneath mugs and glasses, prioritize practicality when choosing embellishments. Flat embroidery and surface crochet are generally more suitable than bulky decorations because they allow the cup to sit securely. Cotton yarn is often preferred for functional handmade coasters because it is absorbent, durable, and usually easy to care for when handled according to the yarn manufacturer’s instructions.
Making several versions is also an excellent way to improve crochet skills. The first leaf helps you understand the construction, while later leaves allow you to refine tension, shaping, and finishing. Because the project is relatively small, it provides useful practice without requiring a large amount of yarn or time. Soon, the crocheted leaf coaster pattern can become an easy project you can adapt whenever you want a quick handmade decoration.
Frequently Asked Questions About the Crocheted Leaf Coaster Pattern
What yarn is best for a crocheted leaf coaster pattern?
Cotton yarn is an excellent choice because it offers good stitch definition, durability, and absorbency. A medium-weight cotton works especially well for a sturdy everyday coaster. Always check the yarn label for washing and care instructions.
What crochet hook size should I use?
A hook between approximately 3.5 mm and 4.5 mm works well with many medium-weight cotton yarns. However, yarn thickness and individual tension vary, so choose a hook that creates a firm fabric without making the stitches excessively tight.
Is this crochet leaf coaster suitable for beginners?
Yes. A confident beginner who understands chains, single crochet, half double crochet, double crochet, treble crochet, and slip stitches should be able to complete the project. The most important new skill may be crocheting along both sides of a foundation chain.
Why is my crochet leaf curling?
Curling can occur when the foundation chain is too tight, the hook is too small, or there are not enough increases around curved areas. Mild curling is common during construction and can often be improved through gentle blocking.
How can I make the coaster larger?
Increase the number of foundation chains and extend the section containing the taller stitches. You can also add another border round. Make increases gradually around the curves so the coaster remains flat.
How do I make a sharper leaf tip?
Using SC, CH 2, SC in the turning space helps create a defined point. You can gently shape this area during blocking for an even sharper appearance.
Can I make the leaf without a stem?
Absolutely. The stem is decorative rather than structural. Simply finish and fasten off after completing the border if you prefer a cleaner, more compact leaf shape.
How many coasters should I make for a set?
Four or six is a practical number for a typical crochet coaster set, but there is no fixed rule. You can create as many as needed for your household or decorating plans.
Can leftover yarn be used for this project?
Yes. This is an excellent scrap-yarn project because one coaster requires a relatively small quantity of yarn. Make sure you have enough of your main color to complete the body and border before starting.
How can I keep all my leaves the same size?
Use the same yarn, hook, foundation-chain count, stitch sequence, and tension for every coaster. Counting your stitches carefully will also help create a consistent set.
Should crochet coasters be blocked?
Blocking is not absolutely required, but it can greatly improve the appearance of a leaf-shaped coaster. It helps flatten the fabric, define the pointed tip, and create a more balanced outline.
Can different colors be used for the veins?
Yes. Contrasting yarn makes the veins more visible, while matching yarn creates a subtle textured effect. Both approaches work well, so the choice depends on the look you want to achieve.
Conclusion
The crocheted leaf coaster pattern is a practical and creative project that turns basic crochet stitches into beautiful nature-inspired home décor. Throughout this tutorial, you learned how to select appropriate yarn and a hook, understand the essential crochet stitch key, build the leaf around a foundation chain, use different stitch heights to shape the body, create a pointed edge, and add an optional stem.
You also learned how surface crochet or embroidery can create realistic leaf veins, how careful finishing improves durability, and how blocking can help the coaster lie flatter. Once you understand the basic construction, changing colors, yarn thickness, dimensions, and decorative details allows you to create many variations from the same crochet leaf pattern.
Whether you make one leaf for practice or an entire handmade crochet coaster set, this small project provides a satisfying opportunity to develop shaping and finishing skills while creating something useful. Experiment with seasonal palettes, coordinate the leaves with your home décor, and use leftover yarn to make each version unique.If you try this crocheted leaf coaster pattern, please leave your sincere opinion about the project. Share which colors you chose, what worked best for you, and any suggestions you have for improving or customizing the pattern. Your ideas and experiences can inspire new variations and help other crochet enthusiasts enjoy this simple handmade project too.