
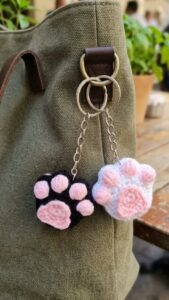
Crochet paw print keychain pattern is a charming and practical crochet project that transforms a small amount of yarn into a handmade accessory filled with personality.
One of the best features of this crochet paw print keychain pattern is how easily it can be customized. You can create a classic black-and-white paw, use brown and beige for a warm natural appearance, choose pastel shades for a softer style, or combine bright colors for a playful accessory.
Throughout this tutorial, you will learn how to crochet the main paw pad, create the smaller toe pads, assemble the motif, reinforce it for everyday use, and attach the finished paw to a keychain ring. The instructions use standard US crochet terminology and include a clear crochet stitch key so that each abbreviation is easy to understand. Stitch counts and approximate measurements are also included to help you maintain the intended shape. By following the steps carefully, you can create a neat crochet paw keychain that looks attractive from both a decorative and practical point of view.
Materials, Crochet Stitch Key, and Preparation
Before beginning your Crochet paw print keychain pattern, gather approximately 15–25 yards (14–23 meters) of DK or light worsted-weight yarn. You will need a main color for the paw and, if desired, a contrasting color for the background or edging. A 3.0 mm to 3.5 mm crochet hook usually works well with this yarn weight. Using a slightly smaller hook than you might normally choose helps produce tight stitches and prevents the finished keychain from becoming too floppy.
You will also need a yarn needle, small scissors, stitch marker, and metal keychain ring or lobster clasp. If you want a thicker keychain, you can crochet two complete paw motifs and join them together. A tiny amount of polyester stuffing can be inserted between the layers, although stuffing is optional. For a flatter design, simply sew the two layers together without filling them.
The crochet stitch key for this pattern is: MR = magic ring, ch = chain, sl st = slip stitch, sc = single crochet, hdc = half double crochet, dc = double crochet, inc = increase by working two stitches into the same stitch, and st/sts = stitch/stitches. The pattern is written using US crochet terms. Knowing these abbreviations before starting will make the instructions much easier to follow.
Gauge is not extremely important for a small crochet keychain pattern, but consistent tension matters. As a general reference, approximately 5–6 single crochet stitches should measure about 1 inch (2.5 cm), depending on your yarn and hook combination. The completed paw motif will normally measure approximately 2.5–3.5 inches (6.5–9 cm), making it large enough to be visible without becoming inconvenient on a set of keys.
Before crocheting, decide whether you want a single-layer or double-layer paw. The single-layer version is faster and lighter, while the double-layer version is sturdier and provides a more polished finish. For an accessory that will be handled every day, the double-layer construction is particularly useful because the additional thickness helps the motif maintain its shape.
Finally, make a small test circle with your chosen yarn. If the stitches have large visible gaps, switch to a smaller hook. If the fabric feels extremely stiff and the hook is difficult to insert, increase the hook size slightly. Finding comfortable tension before beginning the actual Crochet paw print keychain pattern can significantly improve the final appearance.
Step-by-Step Crochet Paw Pad and Toe Pattern
Begin the main paw pad with an MR. Work 6 sc into the magic ring and gently pull the yarn tail to close the center. Join with a sl st to the first single crochet if you prefer joined rounds. You should have 6 sts at the end of Round 1. Keep the center reasonably tight because this section will become the middle of the paw pad.
For Round 2, work inc in each st around, placing 2 single crochet stitches into every stitch from the previous round. You will finish with 12 sts. For Round 3, repeat (1 sc, inc) six times around for a total of 18 sts. These increases create a small circular base that will later be shaped into the wider central pad.
To give the pad a slightly oval appearance, work the next round with different stitch heights. Crochet 2 sc, 3 hdc, 6 dc, 3 hdc, 4 sc around the circle, adjusting the placement slightly if necessary to match your stitch position. The taller dc stitches create additional height on one side, helping the circle develop the rounded shape commonly associated with the large central section of a paw print.
For the final main-pad round, work sc around, adding an occasional inc around the widest section if your piece begins curling inward. Aim for approximately 20–22 stitches around the outer edge. Finish with a sl st, cut the yarn while leaving a sewing tail of approximately 8 inches (20 cm), and pull the tail through the final loop. Gently shape the piece with your fingers.
Now crochet four toe pads. For each toe, begin with an MR and work 5 sc into the ring. Pull the center closed. In the next round, work inc in each st around for 10 sts. Finish with a sl st and leave a sewing tail. Each small circle should measure approximately 0.5–0.75 inch (1.3–2 cm), depending on your yarn and tension.
Repeat the toe instructions until you have four small crochet pads. Arrange them above the main pad before sewing anything permanently. Place the two middle toes slightly higher and position the outer toes a little lower or angled outward. This small adjustment gives the finished crochet paw print a more natural silhouette and makes the motif immediately recognizable.
Assembling and Finishing the Crochet Paw Keychain
Lay the main pad on a flat surface and arrange all four toes until you are satisfied with their positions. A useful arrangement is to leave approximately 1/8–1/4 inch (3–6 mm) between the central pad and each toe. However, the exact spacing depends on the finished size of your crochet pieces. Take a moment to compare both sides and make sure the paw looks visually balanced.
Thread one toe’s yarn tail onto your yarn needle and sew it securely to the main structure. Use small stitches through the back loops whenever possible so the joins remain discreet. Repeat this process for all four toes. After attaching each piece, gently pull the motif into shape rather than tightening the sewing thread excessively, which could cause unwanted puckering.
For a stronger crochet paw keychain, create a second complete paw motif using the same instructions. Place the two pieces with their wrong sides facing each other. Join them by working sc around the perimeter or by sewing them together with a yarn needle. When crocheting around complicated areas between the toes, use sl st where necessary to keep the outline neat.
If you want a slightly padded paw, stop before completely closing the two layers and insert a very small amount of polyester filling. Avoid overstuffing because the purpose is simply to add body rather than create a fully three-dimensional amigurumi piece. Spread the stuffing evenly with your fingers, then finish closing the remaining opening.
To attach the keychain hardware, ch 8–12 from the upper center of the finished paw. Pass this chain through the metal keyring, then join the end back to the paw with a secure sl st. For additional durability, work sl st back across the chain or crochet a second row of sc around it. This creates a stronger hanging loop capable of handling regular movement.
Finish by weaving every loose yarn end securely through several stitches on the back or inside of the piece. Trim only after confirming that the tails cannot easily pull free. Shape the paw with your hands and check that all four toes remain securely attached. Your finished Crochet paw print keychain pattern should now produce a compact, sturdy, and attractive accessory suitable for keys, bags, or gifts.
Customization Ideas, Troubleshooting, and Care Tips
Color is one of the easiest ways to personalize this crochet paw print keychain pattern. Black, brown, cream, gray, and white create classic animal-inspired combinations, while pink, purple, turquoise, yellow, and other bright shades produce a more playful result. You can also make the central pad one color and the four toes another color for stronger visual contrast.
Another option is adding a contrasting border around the finished paw. After assembling the motif, attach a second yarn color and work sl st or sc carefully around the outside. A contrasting edge can make the paw shape more visible, especially when the main yarn color is light. Keep the border stitches loose enough to prevent the motif from curling.
If your paw becomes wavy, you may have added too many increases. When the main pad curls into a cup shape, there may be too few increases or your tension may be unusually tight. Small crochet projects respond noticeably to tension changes, so try to maintain the same yarn tension throughout every round of your crochet keychain.
Uneven toe pads are another common challenge. Because these pieces contain very few stitches, even a small tension difference can noticeably change their dimensions. Crochet all four toes during the same crafting session when possible and count every stitch carefully. If one pad looks significantly different, remaking that tiny piece will usually produce a better result than trying to reshape it through sewing.
For additional decoration, you can embroider a small initial on the central paw pad, add simple surface crochet, or create several paws in different colors as a matching set. When making keychains as gifts, selecting colors that remind you of the recipient’s pet can make the project feel more personal without requiring complicated modifications to the original Crochet paw print keychain pattern.
To clean the finished accessory, gently hand wash it in cool or lukewarm water using a mild detergent suitable for the yarn fiber. Avoid aggressive twisting or wringing because this can distort the small toe pieces. Press out excess water gently with a towel, reshape the paw, and allow it to dry flat. Always follow the care recommendations provided for the specific yarn you selected.
Frequently Asked Questions About the Crochet Paw Print Keychain Pattern
Is this Crochet paw print keychain pattern suitable for beginners?
Yes. The pattern primarily uses basic stitches such as chain, slip stitch, single crochet, half double crochet, and double crochet. Beginners who are comfortable working a magic ring and simple increases should be able to complete it successfully. The assembly also provides useful practice in sewing small crochet pieces together.
How much yarn do I need for one crochet paw keychain?
Approximately 15–25 yards (14–23 meters) should be sufficient for most versions. The exact quantity depends on yarn thickness, hook size, tension, whether you add a border, and whether you make a single-layer or double-layer keychain.
What yarn is best for a crochet paw print?
Cotton and cotton-blend yarns are excellent choices because they provide good stitch definition and help the small motif maintain its shape. Acrylic yarn is another practical option and is widely available. DK or light worsted-weight yarn creates a convenient keychain size.
What hook size should I use?
A 3.0 mm to 3.5 mm crochet hook works well with many DK and light worsted yarns. However, yarn thickness and personal tension vary. Choose a hook that creates dense, even stitches without making the fabric unnecessarily difficult to work.
How big should the finished crochet paw keychain be?
Using the recommended yarn and hook, the completed motif will generally measure approximately 2.5–3.5 inches (6.5–9 cm). You can create a smaller paw by choosing thinner yarn and a smaller hook or make a larger version with thicker yarn.
Can I make the keychain without stuffing?
Absolutely. Stuffing is optional. A flat double-layer paw is durable and lightweight, making it particularly suitable for keys. A tiny amount of stuffing simply creates a softer, slightly dimensional appearance.
Why is my crochet paw curling?
Curling often happens when the tension is too tight or when there are not enough increases in a round. Try loosening your tension slightly or adding one or two evenly distributed increases around the widest part of the main paw pad.
Can I use this paw motif for something other than a keychain?
Yes. The same crochet paw print can become a bag charm, backpack decoration, appliqué, ornament, zipper pull, gift embellishment, or decorative element for another handmade crochet project. Simply change or omit the hanging loop according to your intended use.
How can I make the keychain more durable?
Use tight stitches, weave yarn ends through several different directions, reinforce the joining points between the toes and main pad, and make the hanging loop thicker. A double-layer construction also gives the finished accessory more structure for regular use.
Can I change the number or size of the toe pads?
Yes. The pattern can be customized. However, four toes generally create the familiar paw-print appearance. To make larger toes, add another increase round carefully. To make smaller toes, use fewer stitches or thinner yarn while maintaining consistent proportions.
Why do my four toe pads look different sizes?
Small differences usually come from changes in tension or accidentally adding or missing stitches. Count the stitches after every round and try to maintain consistent tension. Because each toe takes very little yarn, it is usually easy to remake an uneven piece.
Can I make several paw keychains from leftover yarn?
Yes. This is an excellent scrap yarn crochet project because each keychain requires only a small quantity of yarn. Keeping leftover DK or light worsted yarn from other projects can provide enough material to create multiple color combinations.
Conclusion
The Crochet paw print keychain pattern is a small project that combines basic crochet techniques with plenty of opportunities for personalization. Throughout this tutorial, you learned how to select suitable yarn and hook sizes, understand the crochet stitch key, crochet the central paw pad, make four individual toe pads, position the pieces correctly, assemble the motif, and attach secure keychain hardware.
You also learned how to create either a flat or lightly stuffed version, reinforce the hanging loop, troubleshoot curling and uneven stitches, choose creative color combinations, and care for the finished piece. Once you understand the basic construction, the same crochet paw print pattern can easily be adapted into appliqués, ornaments, backpack charms, zipper decorations, and thoughtful handmade gifts.
Most importantly, feel free to make the pattern your own. Experiment with yarn colors, borders, sizes, and decorative details until you create a paw keychain that reflects your personal crochet style. If you make this project, please leave your sincere opinion about the pattern and share any suggestions you have for improving it. Your ideas, experiences, and creative variations can inspire even more possibilities for this fun Crochet paw print keychain pattern.