
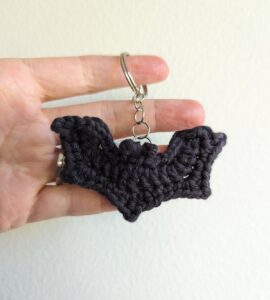
Crochet bat keychain pattern is a fun and compact crochet project that turns a small amount of yarn into a charming handmade accessory.
This Crochet bat keychain pattern is designed around common crochet techniques, including the magic ring, single crochet, increases, decreases, chains, slip stitches, and basic shaping.
Throughout this tutorial, you will learn how to choose suitable materials, understand the crochet stitch abbreviations, crochet and shape the bat’s head and body, create two pointed ears, form the characteristic wings, assemble all the components, and securely attach keychain hardware. You will also find practical customization ideas and troubleshooting tips to help achieve a balanced result. The goal is to make this crochet bat keychain approachable while still providing enough detail to create a polished handmade accessory. Count your stitches carefully, maintain firm tension, and remember that small differences between handmade pieces are completely normal and can give each little bat its own character.
Materials, Crochet Stitch Key, and Preparation
To begin the Crochet bat keychain pattern, choose approximately 25 to 35 yards (23 to 32 meters) of DK or light worsted-weight yarn. Black is the traditional choice, but charcoal gray, deep purple, brown, orange, burgundy, or even pastel colors can create interesting variations. Cotton yarn offers excellent stitch definition, while acrylic yarn creates a softer texture and is also easy to work with.
Use a 3.0 mm crochet hook or a hook approximately 0.5 to 1 mm smaller than the size normally recommended for your yarn. A smaller hook creates tighter stitches, which is particularly important if you decide to lightly stuff the bat. You will also need a yarn needle, scissors, stitch marker, small quantity of polyester fiberfill, and a keychain ring or lobster clasp.
The crochet stitch key used throughout the project is: MR = magic ring, ch = chain, sl st = slip stitch, sc = single crochet, hdc = half double crochet, dc = double crochet, inc = increase, dec = decrease, st = stitch, and sts = stitches. The instructions use standard US crochet terminology. An inc means working two single crochet stitches into one stitch, while a dec combines two stitches into one.
If you want facial details, prepare a small amount of contrasting yarn or embroidery thread. Tiny embroidered eyes are a practical choice for a keychain because they remain firmly attached. If the finished bat is intended purely as a decorative accessory for an adult, small craft eyes may also be used according to your preference. For items intended for young children, embroidered facial features are generally the simpler choice because there are no detachable eye components.
Before starting, make a small test circle using your chosen yarn and hook. The stitches should sit closely together without making it difficult to insert the hook. If large gaps appear between stitches, reduce your hook size slightly. If your hands become uncomfortable because the stitches are extremely tight, move up one hook size.
For the best results, keep a stitch marker at the beginning of each round. The head and body are worked in continuous rounds, meaning you will not join each round with a slip stitch unless specifically instructed. Carefully counting the stitches is particularly important in this amigurumi bat keychain, because even one missed increase or decrease can noticeably alter the shape of such a small project.
Crocheting the Bat Head, Body, and Pointed Ears
Begin the head with an MR and work 6 sc into the ring. Pull the yarn tail firmly to close the center. For Round 2, work inc in each st around, giving you 12 sts. For Round 3, repeat (1 sc, inc) six times around for a total of 18 sts. These evenly distributed increases form the rounded upper section of the bat’s head.
For Rounds 4 through 6, work 1 sc in each st around (18 sts). The piece will begin developing into a small cup shape. If you plan to embroider the eyes, you can add them after a few more rounds when the head is easier to handle. Position the eyes approximately 4 to 5 stitches apart around the front of the head.
For Round 7, repeat (1 sc, dec) six times around, reducing the stitch count to 12 sts. Add a small amount of polyester filling at this stage. The head should feel softly rounded rather than extremely firm. For Round 8, work 1 sc in each st around (12 sts). This narrow section naturally begins transitioning from the head into the body.
For Round 9, repeat (1 sc, inc) six times to return to 18 sts. Work 18 sc around for Rounds 10 and 11. For Round 12, repeat (1 sc, dec) six times to create 12 sts. Add another small amount of stuffing to the body, distributing it evenly with your fingers so the bat remains symmetrical.
For Round 13, work 6 dec around, leaving 6 sts. Cut the yarn while leaving a long tail, thread it through a yarn needle, and pass the needle through the front loops of the remaining stitches. Pull gently to close the opening and weave the yarn tail securely inside. The completed head and body should have a compact, slightly elongated shape.
To make each pointed ear, ch 4. Beginning in the second chain from the hook, work sl st, sc, hdc. Fasten off and leave a sewing tail. Repeat for the second ear. Position the ears approximately 3 to 4 stitches apart at the top of the head, angling them slightly outward. Sew the base of each ear securely to the head, taking care to maintain symmetry.
Creating the Crochet Bat Wings and Assembling the Keychain
The wings are the most distinctive part of this Crochet bat keychain pattern. Begin the first wing by making ch 7. Starting in the second chain from the hook, work sl st, sc, hdc, dc, dc, hdc. This creates a gradual increase in stitch height that helps establish the first triangular section of the wing.
Turn the piece and ch 1. Work sc in the first 2 sts, ch 3, sl st into the second ch from the hook, sc in the next ch, sc in the next 2 sts, ch 3, sl st in the second ch from the hook, sc in the next ch, then continue with single crochet stitches toward the base. These small chain points begin forming the characteristic scalloped lower edge of a bat wing.
For additional width, work another row along the upper portion using a combination of sc, hdc, and dc stitches. Keep the outermost section slightly pointed while maintaining a straighter inner edge where the wing will attach to the body. The exact tension of this row can influence the final wing angle, so work comfortably rather than pulling the yarn too tightly.
Fasten off while leaving a sewing tail approximately 8 to 10 inches (20 to 25 cm) long. Make the second wing using the same stitch sequence. Before attaching anything, place both wings beside the body and compare them carefully. Minor differences can often be corrected during sewing by adjusting the angle or gently shaping the crochet fabric.
Position one wing on each side of the upper body, approximately where the head transitions into the torso. Use the long yarn tails to sew the inner edges securely to the body. Make several small stitches along each attachment point rather than relying on a single stitch. The wings should extend outward and slightly upward or downward according to your preferred bat silhouette.
For the keychain loop, attach yarn securely at the center between the two ears and ch 8 to 12. Pass this chain through your metal keychain ring, then return to the base and join with a sl st. Work a second row of slip stitches along the chain if you want additional strength. Fasten off and weave the yarn ends deeply into the head so the hanging loop remains secure during everyday use.
Finishing Details, Customization, and Troubleshooting Tips
Facial details can dramatically change the personality of your crochet bat keychain. Use a small amount of contrasting yarn to embroider two tiny eyes, a short mouth, or miniature fang details. For a cute expression, position the eyes relatively close together. For a more traditional Halloween-inspired bat, use narrow embroidered eyes and slightly more angular wing positioning.
Color combinations provide another simple way to customize the Crochet bat keychain pattern. Traditional black creates a recognizable silhouette, while purple and black offer a Halloween feel. Gray and cream can produce a softer woodland-inspired bat, and pastel pink, lavender, mint, or blue can transform the project into a playful accessory. The inner ear area can also be embroidered with a contrasting shade.
If your bat body develops visible gaps, the hook may be too large for your yarn or your tension may be too loose. Try using a smaller hook for the next version. Do not attempt to solve large gaps by adding excessive stuffing, because overstuffing usually makes the spaces between stitches more noticeable. A tightly crocheted fabric is the best foundation for a neat amigurumi keychain.
Uneven wings are another common issue. Because the wings use several stitch heights and chain points, differences in tension can affect their shape. Count every stitch carefully and compare the second wing with the first while crocheting. Lightly dampening and shaping cotton wings can also help improve symmetry, provided the yarn’s care instructions allow it.
If the keychain loop stretches after use, reinforce it by crocheting over the original chain or by sewing several additional stitches through the loop and the top of the head. Metal hardware adds concentrated pressure to a very small section of yarn, so reinforcing this area is worthwhile. Avoid attaching the ring through only one exposed strand of crochet.
To keep the finished bat looking neat, gently hand wash it in cool or lukewarm water when necessary. Avoid aggressive twisting, especially around the wings and keychain loop. Press excess moisture into a clean towel, reshape the ears and wings with your fingers, and allow the bat to dry naturally. Proper care will help your handmade Crochet bat keychain pattern maintain its shape.
Frequently Asked Questions About the Crochet Bat Keychain Pattern
Is the Crochet bat keychain pattern suitable for beginners?
Yes, particularly for adventurous beginners who already understand basic crochet stitches. The project uses single crochet, increases, decreases, chains, slip stitches, half double crochet, and double crochet. The wing shaping requires a little concentration, but the small size means you can easily remake a section if necessary.
How much yarn is needed for one crochet bat keychain?
Approximately 25 to 35 yards (23 to 32 meters) of yarn should be enough for most versions. This makes the project an excellent option for using leftover yarn from larger crochet projects.
What yarn works best for a crochet bat?
DK or light worsted-weight cotton and acrylic yarns are both suitable. Cotton provides crisp stitch definition, which is helpful for the pointed ears and wings. Acrylic creates a softer texture and is also widely available.
What crochet hook size should I use?
A 3.0 mm hook is a good starting point with DK or light worsted yarn. However, your personal tension matters more than the exact number. The stitches should be tight enough that stuffing does not show through the fabric.
How large is the finished bat keychain?
The finished bat should measure approximately 3.5 to 4.5 inches (9 to 11.5 cm) across the wings, depending on yarn thickness, hook size, and tension. Using thinner yarn will create a smaller keychain, while thicker yarn will increase the dimensions.
Do I have to stuff the crochet bat?
No. You can make a flatter version by using very little stuffing or omitting it completely. However, a small amount of fiberfill gives the head and body a pleasant rounded shape.
Can I make the wings larger?
Yes. Add more foundation chains or an additional shaping row to create larger wings. Keep in mind that oversized wings may require stronger attachment stitches so they do not pull away from the body.
Why are my bat wings curling?
Curling may occur when the stitches are too tight or when the wing has insufficient space along the outer edge. Relax your tension slightly and gently shape the wing after finishing. Cotton yarn can often be carefully blocked to improve the shape.
How can I make both wings the same size?
Count the chains and stitches carefully and use the exact same hook for both pieces. It can also help to crochet the second wing immediately after completing the first while the stitch sequence and tension are fresh in your mind.
Can this crochet bat be made without keychain hardware?
Absolutely. Simply omit the hanging loop and metal ring. The finished bat can then become a small ornament, backpack decoration, appliqué, seasonal decoration, or embellishment for another handmade project.
Can I make a larger bat using the same pattern?
Yes. One of the easiest methods is to use thicker yarn with an appropriately larger hook. The proportions will remain similar while the entire project increases in size. You may need more stuffing and stronger joining stitches.
How can I make the keychain more durable?
Use firm crochet tension, weave all yarn ends through several stitches, sew the wings securely along multiple attachment points, and reinforce the chain holding the keyring. These small finishing details are especially important for an accessory that will be handled frequently.
Can I use different colors for the wings and body?
Yes. Contrasting wings can create an interesting design. For example, you could combine a black body with purple wings, a gray body with black wings, or a pastel body with darker coordinating details.
Is this project only suitable for Halloween?
Not at all. Although bats are popular during Halloween, the Crochet bat keychain pattern can be adapted for year-round use. Neutral woodland colors create a nature-inspired accessory, while bright or pastel colors produce a cute contemporary style.
Conclusion
The Crochet bat keychain pattern is a small but detailed project that offers an enjoyable opportunity to practice several important crochet techniques. Throughout this tutorial, you learned how to select suitable yarn and hook sizes, understand the crochet stitch key, work the head and body in continuous rounds, use increases and decreases for shaping, and add the right amount of stuffing.You also learned how to create pointed ears, crochet the distinctive bat wings, position the pieces symmetrically, securely sew the components together, and create a reinforced loop for the metal keychain ring. Careful stitch counting and consistent tension are particularly important because small variations are more noticeable on miniature crochet projects.
The pattern can also be personalized in many ways. Changing yarn colors, facial expressions, wing dimensions, embroidery details, and finished size can produce completely different versions from the same basic crochet bat pattern. You can make a traditional Halloween bat in black and purple or choose cheerful colors for an accessory suitable for any season.
Once you have completed your first bat, consider experimenting with different combinations and making several versions. Small crochet projects like this are useful for practicing shaping techniques while turning leftover yarn into something decorative and functional. If you try this Crochet bat keychain pattern, please leave your sincere opinion about the project and share your suggestions, modifications, or creative ideas. Your experience and feedback can inspire new ways to personalize this charming handmade crochet bat.