
Crocheted winter leaf pattern is a charming seasonal crochet project that transforms a small amount of yarn into a textured leaf inspired by the quiet beauty of winter.
One of the most appealing features of this crochet winter leaf is that it can be customized without making the pattern complicated.
This tutorial explains the Crocheted winter leaf pattern from the foundation chain to the final finishing details. The instructions use standard US crochet terminology and include a clear crochet stitch key, approximate measurements, shaping guidance, and practical tips for maintaining even tension. Instead of relying on complicated construction, the leaf is shaped by gradually moving from short stitches to taller stitches and then back to shorter stitches. This creates a natural pointed silhouette while keeping the project approachable, portable, and enjoyable for different skill levels.
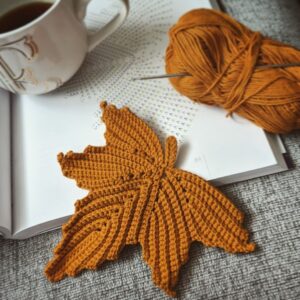
Materials, Crochet Stitch Key, and Preparation
For one medium crocheted winter leaf, prepare approximately 10–15 yards of DK or light worsted-weight yarn. Cotton, cotton blends, and smooth acrylic yarns are particularly useful because they allow the individual stitches to remain visible. Suggested winter colors include ivory, snow white, light gray, eucalyptus, dusty blue, and deep evergreen. You will also need a crochet hook suitable for your yarn, typically around 3.0 mm to 4.0 mm, plus scissors and a yarn needle.
Before beginning, it helps to understand the abbreviations used throughout the Crocheted winter leaf pattern. The stitch key is: ch = chain, sl st = slip stitch, sc = single crochet, hdc = half double crochet, dc = double crochet, tr = treble crochet, st = stitch, sts = stitches, sk = skip, FO = fasten off. When instructions appear inside parentheses, complete those stitches in the indicated stitch or space.
The basic leaf is constructed around a foundation chain rather than in separate pieces. This method allows you to crochet along one side of the chain, create the pointed tip, and then continue along the opposite side. The two sides naturally mirror each other, giving the finished winter leaf crochet motif a balanced shape. You do not need to turn the work while forming the main body unless you choose to add additional decorative rows later.
Start with a slip knot and ch 14. These chains determine the approximate length of the leaf. For a smaller leaf, try ch 10–12; for a larger decoration, try ch 16–20. When changing the foundation length, remember that the stitch sequence may also need to be extended. The goal is to maintain a gradual progression from short stitches near the stem to taller stitches around the center and then back toward shorter stitches at the point.
Your crochet tension should remain comfortable rather than extremely tight. Tight chains can make it difficult to work along both sides of the foundation, while very loose chains may leave visible gaps down the center. If your foundation chain naturally becomes tighter than your regular stitches, consider making the chains with a hook 0.5 mm larger, then switching back to your normal hook before forming the leaf.
A completed leaf made with DK yarn and a 3.5 mm hook will generally measure approximately 3.5 to 4.5 inches (9–11.5 cm) long, including the stem, depending on tension and yarn choice. Exact measurements are not essential because decorative leaves naturally look attractive with slight differences. In fact, making several leaves in different sizes can create a more organic winter arrangement.
Step-by-Step Crocheted Winter Leaf Pattern
Begin with ch 14. Starting in the second chain from the hook, work 1 sl st in the next ch, 1 sc in the next ch, 1 hdc in the next ch, 1 dc in each of the next 2 ch, 1 tr in each of the next 3 ch, 1 dc in each of the next 2 ch, 1 hdc in the next ch, and 1 sc in the next ch. One foundation chain should remain at the end. This progression creates the first curved side of the crocheted leaf pattern.
In the final foundation chain, work (1 sc, ch 2, 1 sc). The ch-2 space creates the pointed tip of the leaf. Rotate the work slightly so that you can crochet along the unused loops on the opposite side of the original foundation chain. Do not turn the project as you would when working ordinary rows. Instead, continue around the chain so that the stitches on the second side mirror those on the first.
Working down the opposite side, make 1 sc in the next ch, 1 hdc in the next ch, 1 dc in each of the next 2 ch, 1 tr in each of the next 3 ch, 1 dc in each of the next 2 ch, 1 hdc in the next ch, 1 sc in the next ch, and 1 sl st in the final ch. This completes the basic body of the Crocheted winter leaf pattern. At this stage, you should already see a pointed oval leaf shape.
To make the stem, do not fasten off yet. Ch 5, then starting in the second chain from the hook, work 1 sl st in each of the next 4 chains. Join with a sl st at the base of the leaf. For a longer stem, simply add additional chains before slip stitching back toward the leaf. A short stem is useful for appliqués, while a longer stem works especially well when the leaf will be attached to a garland or wreath.
For a more defined edge, you can add an optional finishing round. Work loose sl sts around the outer edge of the leaf, placing approximately one slip stitch into each stitch and working (sl st, ch 1, sl st) around the ch-2 point. Avoid pulling these stitches too tightly because a tight edging can cause the leaf to curl. This optional round provides a crisp outline and works particularly well when using a contrasting winter color.
Finish by cutting the yarn, leaving approximately a 6-inch tail. Pull the tail through the final loop and weave it carefully through several stitches on the back. Trim only after the yarn feels secure. Gently shape the sides and point with your fingers. Your basic crocheted winter leaf is now complete and can be used alone or combined with additional motifs.
Shaping, Texture, and Winter-Inspired Variations
The characteristic leaf shape comes primarily from stitch height. Slip stitches and single crochet stitches keep the ends narrow, half double crochet stitches create a gradual transition, and double and treble crochet stitches widen the center. Understanding this progression makes the pattern easier to customize because you can change the proportions while maintaining the same basic construction principle.
If you prefer a wider leaf, add another treble crochet on each side near the center. For example, use four treble crochet stitches instead of three. For a narrow, elegant leaf, reduce the number of tall stitches and use more double crochet stitches. Small adjustments can produce noticeably different silhouettes, which is helpful when making a mixed collection of winter crochet leaves.
Another attractive option is creating subtle texture along the center vein. After completing the leaf, attach yarn near the base and surface crochet a line of sl sts over the foundation chain toward the tip. This technique creates a visible central vein without substantially increasing the thickness of the motif. Use the same yarn for a subtle result or a slightly lighter shade for a decorative frosted effect.
For a snow-covered appearance, crochet the main leaf in sage, forest green, or gray-green and use white or cream yarn for the optional outer edging. Keep the contrasting stitches small and consistent so they resemble a delicate layer of frost rather than a heavy border. This simple color combination can make the Crocheted winter leaf pattern especially suitable for Christmas and winter decorations without limiting it to one specific holiday.
You can also create a more natural collection by changing the foundation chain count. Make one leaf using ch 10, another with ch 14, and another with ch 18, adjusting the middle section proportionally. Arrange the finished pieces together before attaching them permanently. Variations in size and shade often create more visual interest than producing every motif exactly the same.
Blocking can significantly improve the final appearance, especially when using cotton or other natural fibers. Lightly dampen the finished leaf, arrange it on a blocking surface, and gently shape the edges and tip. Pin it in place if necessary and allow it to dry completely. Always follow the care recommendations for your particular yarn because different fibers respond differently to moisture and heat.
Creative Uses, Finishing Tips, FAQ, and Conclusion
Once you understand the basic Crocheted winter leaf pattern, the motif can be used in many handmade projects. Sew several leaves along a crocheted cord to create a winter garland, arrange them around a handmade wreath, or attach one to a gift package instead of using a disposable decorative bow. The relatively flat construction also makes the leaf practical for cards, fabric projects, table décor, and seasonal displays.
For a winter table arrangement, make leaves in several coordinating shades such as cream, sage, gray, and icy blue. Place them around handmade coasters, candle holders, or other decorative items while keeping them safely away from open flames. A collection of slightly different sizes can create a soft botanical theme that works throughout the winter season rather than only during holiday celebrations.
These motifs can also be used as appliqués. Sew a crochet leaf onto a scarf, tote bag, cushion cover, hat, or other suitable textile item. When attaching the leaf, use a yarn needle and matching yarn, making small stitches around the outer edge. If you want the leaf to retain a slightly three-dimensional appearance, secure only the center and selected points instead of stitching around the entire perimeter.
When making multiple leaves, consistency becomes easier if you record your materials. Write down the yarn weight, hook size, foundation-chain count, and any modifications you make. Even small differences in hook size or tension can alter the dimensions. Keeping simple project notes makes it much easier to reproduce a favorite version of the Crocheted winter leaf pattern later.
Beginners sometimes notice that one side looks slightly different from the other. This usually happens because working into the opposite side of a foundation chain feels different from working into the first side. Try to insert the hook consistently and keep your tension relaxed. Minor differences can often be corrected during blocking, and subtle irregularities can actually make botanical crochet motifs look more natural.
Most importantly, use the pattern as a starting point rather than a strict limitation. Once you understand how the sc, hdc, dc, and tr stitches control the width of the leaf, you can experiment confidently. Try different fibers, sizes, edge treatments, stem lengths, and winter color combinations. A simple motif can become the foundation for many original handmade decorations.
FAQ – Frequently Asked Questions About the Crocheted Winter Leaf Pattern
Is the Crocheted winter leaf pattern suitable for beginners?
Yes. The project is approachable for beginners who already know how to make chains, slip stitches, single crochet, half double crochet, double crochet, and treble crochet. The most unusual part may be working along both sides of the foundation chain. Once you understand that construction method, the rest becomes straightforward.
What yarn is best for crocheting winter leaves?
Cotton and smooth acrylic yarns are excellent options because they provide clear stitch definition. DK and light worsted-weight yarns create versatile decorative leaves. Thinner yarn produces delicate motifs, while thicker yarn creates larger and more substantial leaves. Choose a fiber according to the final project and the texture you prefer.
Which colors work best for a winter leaf?
Classic choices include white, ivory, silver gray, dusty blue, sage, eucalyptus, and evergreen. You can also combine a darker main color with a pale edging to suggest frost. Neutral palettes tend to create a modern appearance, while green and white combinations offer a more traditional winter-inspired look.
How can I make the crocheted leaf larger?
Use thicker yarn and a larger hook or increase the number of foundation chains. When adding chains, extend the stitch progression gradually so that the widest section remains near the center. For example, additional double or treble crochet stitches can be incorporated around the middle while shorter stitches remain near both ends.
How can I make a smaller leaf?
Use lighter yarn, a smaller crochet hook, or reduce the foundation chain. A foundation of around 10–12 chains can create a compact leaf. You will need to reduce the number of stitches in the central sequence while preserving the basic progression from short to tall stitches and back again.
Why is my crochet leaf curling?
Curling can result from tight tension, a foundation chain that is too tight, or too many stitches around the outer edge. Try loosening your tension or using a slightly larger hook for the foundation chain. Gentle blocking can also help flatten the finished motif.
Do I have to add the optional border?
No. The first round already produces a complete leaf. The edging is purely decorative and can be omitted when you prefer a softer, simpler appearance. Adding an outline is especially useful when you want extra definition or a contrasting frosted edge.
Can I make the leaf without the stem?
Absolutely. After completing the second side, simply fasten off instead of chaining for the stem. A stemless leaf can be easier to sew onto clothing, bags, blankets, or other crochet projects.
How do I keep several leaves approximately the same size?
Use the same yarn, hook, foundation-chain count, stitch sequence, and tension for every motif. Blocking all of the leaves to similar dimensions can also improve consistency. Keeping notes about your chosen materials is useful when making a larger set over several crochet sessions.
Can these leaves be used for a garland?
Yes. Create multiple leaves and attach them to a crocheted chain or cord. You can alternate sizes and colors for a natural effect or use identical leaves for a more symmetrical design. Leave enough space between motifs so that each leaf remains visible.
How can I make the leaf look more realistic?
Add a surface-crocheted central vein, vary the sizes slightly, and choose botanical colors with subtle differences in tone. Blocking the leaf into a gentle curve rather than making it perfectly symmetrical can also create a more organic appearance.
How long does one crocheted winter leaf take to make?
The time depends on experience, yarn choice, and whether decorative details are added. Because the motif uses relatively few stitches, it is designed as a small project that can be completed considerably faster than larger crochet pieces. After making a few leaves, the repeating stitch sequence usually becomes easier to remember.
Conclusion
The Crocheted winter leaf pattern shows how a simple sequence of basic stitches can create an elegant seasonal motif. Beginning with a foundation chain, the project gradually moves through sl st, sc, hdc, dc, and tr stitches to shape the first side, forms a pointed tip, and then mirrors the sequence along the opposite side. A small crocheted stem completes the basic construction, while optional edging and surface crochet can add extra definition.
Throughout this tutorial, you learned how to choose appropriate yarn and hook sizes, understand the crochet stitch key, build the leaf around a foundation chain, create a balanced point, form a stem, add a decorative border, and finish the project neatly. You also learned how changes in stitch height influence the shape, making it possible to customize the length and width while preserving the recognizable leaf silhouette.The pattern is especially versatile because color can completely change its personality. White and silver-gray crochet leaves can suggest frost and snow, sage and cream can create a soft natural palette, and evergreen combined with white can produce a classic winter appearance. Creating several sizes and shades allows you to build coordinated garlands, appliqués, ornaments, gift decorations, and seasonal arrangements.
As you become comfortable with the pattern, experiment with different yarn weights, hook sizes, stem lengths, edging styles, and central-vein details. Crochet becomes especially rewarding when a basic pattern gives you enough structure to begin confidently while still leaving room for creativity.If you make your own Crocheted winter leaf pattern, leave your sincere opinion about the project and share any suggestions or variations you would like to try. Your ideas—whether they involve a new color combination, different leaf shape, decorative edging, or creative use for the finished motifs—can inspire even more ways to transform this simple winter crochet project into something personal and beautiful.