
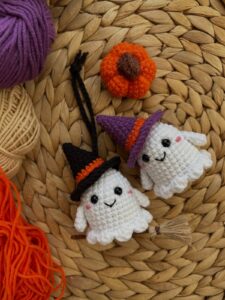
Crochet ghost with hat keychain pattern is a charming Halloween crochet project that transforms a small amount of yarn into an adorable handmade accessory.
One of the most appealing things about this crochet ghost keychain is that it can be made relatively quickly once you become familiar with the rounds.
The Crochet ghost with hat keychain pattern below is worked mainly in continuous rounds using basic amigurumi techniques. Beginners should place a stitch marker in the first stitch of every round because continuous rounds do not have an obvious beginning or ending point. The finished dimensions depend on yarn weight, hook size, and tension, but a small ghost made with medium-weight yarn will generally be suitable for attaching to a key ring. Before beginning, remember that stitch counts are important. Count the stitches after each shaping round and keep your tension reasonably consistent. The instructions use standard US crochet terminology and provide the stitch abbreviations needed to follow the pattern confidently.
Materials, Crochet Stitch Key, and Preparation
For this crochet ghost with hat keychain pattern, prepare white yarn for the ghost, black or another Halloween-inspired color for the hat, and a small amount of black yarn for the face. Purple, orange, charcoal, dark green, and deep burgundy can also make attractive hat colors. You will additionally need stuffing, a yarn needle, scissors, a stitch marker, and a sturdy metal keychain attachment. A 2.5 mm to 3.5 mm crochet hook is a practical starting range, although the ideal hook depends on your selected yarn.
Understanding the stitch key before starting will make the project much easier. Use these abbreviations throughout the pattern: MR = magic ring, ch = chain, sc = single crochet, inc = increase, dec = invisible decrease, sl st = slip stitch, hdc = half double crochet, dc = double crochet, BLO = back loop only, FLO = front loop only, st/sts = stitch/stitches, and FO = fasten off. Numbers inside brackets indicate the final stitch count for the round.
Start the ghost at the top of its head using white yarn. R1: MR, 6 sc into MR [6]. R2: inc in each st around [12]. R3: {1 sc, inc} × 6 [18]. R4: {2 sc, inc} × 6 [24]. R5: {3 sc, inc} × 6 [30]. Pull the magic ring firmly closed after completing the first round. These gradual increases form a smooth circular crown rather than a pointed top.
Continue shaping the head with R6–R10: sc around [30]. Five even rounds provide enough height for the rounded ghost head. If you want a shorter ghost, work four even rounds instead. If you prefer a slightly longer character, add one extra round. Maintaining an even stitch count during this section is important because accidental increases can make the ghost flare outward before you reach the body.
Next begin creating the lower body. Work R11: {3 sc, dec} × 6 [24]. R12: sc around [24]. R13: {2 sc, dec} × 6 [18]. R14: sc around [18]. Begin adding small pieces of fiberfill after Round 12. Add the stuffing gradually rather than pushing one large piece inside. The goal is a softly rounded ghost that keeps its shape without becoming extremely firm.
Before closing the bottom, check the overall silhouette. The top should look rounded and the lower section should narrow slightly. Continue with R15: {1 sc, dec} × 6 [12]. Add the final amount of stuffing, paying particular attention to the top of the head. Do not completely close the opening yet because the decorative ghost edge will be created in the next stage.
Crocheting the Ghost Body and Wavy Bottom
The recognizable floating shape is one of the most important details of an amigurumi ghost keychain. Instead of finishing the body with a perfectly round base, create a small scalloped edge that suggests the flowing bottom of a classic Halloween ghost. After Round 15, work R16: BLO sc around [12]. Working through the back loops creates a useful ridge where the decorative outer edge can later be attached.
Close the inner base by working R17: dec × 6 [6]. Cut the yarn, leaving a tail approximately 15 cm long. Thread the tail through a yarn needle, pass it through the front loops of the remaining six stitches, and gently pull the opening closed. Weave the tail securely into the body. This gives your stuffed crochet ghost a closed foundation while leaving the unused front loops from Round 16 accessible.
Rejoin white yarn into one of the unused front loops from Round 16. For a simple wavy border, work {sl st in next FLO, 3 dc in next FLO} repeatedly around. The groups of double crochet stitches naturally create small curves. Depending on your stitch tension, you may adjust individual scallops with hdc stitches. The important goal is to create a balanced lower edge that looks soft and flowing rather than perfectly symmetrical.
Once the border is finished, fasten off and carefully weave the yarn tail inside. Place the ghost on a flat surface and examine the scallops from every direction. If one section twists outward excessively, gently reshape it with your fingers. Crochet naturally responds to light manipulation, so small adjustments can significantly improve the final appearance of your handmade Halloween keychain.
Now create the face. Thread black yarn onto a yarn needle and embroider two small vertical or oval eyes between approximately Rounds 7 and 9, leaving several stitches between them. For a cute expression, add a tiny mouth one or two rounds below the eyes. A simple short horizontal stitch creates a calm expression, while a tiny oval mouth gives the ghost a surprised Halloween look. Secure all embroidery tails inside the body.
Embroidery is especially practical for a small keychain because there are no separate facial pieces that can loosen during regular use. If the finished accessory will be given to a young child, embroidered features are generally preferable to detachable decorative components. Keep the expression simple because small, clearly defined features complement the compact proportions of this mini crochet ghost.
How to Crochet the Mini Ghost Hat
The hat gives this Crochet ghost with hat keychain pattern its distinctive character. Begin with your selected hat color and create R1: MR, 4 sc [4]. R2: sc around [4]. R3: {1 sc, inc} × 2 [6]. R4: sc around [6]. R5: {2 sc, inc} × 2 [8]. R6: {3 sc, inc} × 2 [10]. These gradual increases create a small pointed cone suitable for a miniature witch-style hat.
Continue widening the hat with R7: {4 sc, inc} × 2 [12]. R8: {1 sc, inc} × 6 [18]. R9: sc around [18]. At this stage, check the hat against the top of your ghost. Crochet tension varies considerably, so fitting the piece before making the brim helps prevent an oversized hat. The cone should rest comfortably on the head without covering the embroidered eyes.
For the brim, work R10: FLO {2 sc, inc} × 6 [24]. R11: {3 sc, inc} × 6 [30]. Finish with sl st in the next stitch and fasten off, leaving a long tail for sewing. If you want a slightly more dramatic witch hat, work an additional brim round of sc around [30]. For a delicate brim, stop immediately after Round 10 instead.
A decorative hatband can add another layer of color. Join orange, purple, green, or another contrasting yarn around the base of the cone and work one round of surface slip stitches. Alternatively, embroider a narrow line around the hat. Keeping the embellishment relatively simple helps preserve the clean appearance of the crochet Halloween accessory while still allowing plenty of customization.
Position the hat slightly toward one side of the ghost’s head rather than placing it perfectly upright. This small angle can make the character look more playful. Using the long yarn tail, sew the underside of the brim to several stitches on the head. Make small, discreet stitches and periodically check the front to ensure the hat has not shifted over the face.
Before securing the final knot, gently bend the pointed section of the hat toward one side. You can tack the tip to the hat with one hidden stitch if you want it to remain curved. Weave all yarn tails securely inside. The finished hat should feel stable enough to handle movement when the ghost is hanging from keys, a bag, or a backpack.
Finishing, Adding the Keychain, and Customizing the Pattern
To turn your ghost into a functional crochet keychain, determine the strongest attachment point at the top of the project. Ideally, the keychain loop should connect through both the hat and the ghost body rather than relying only on the brim. Thread a strong length of matching yarn through the upper section of the ghost, pass it through the keychain ring or lobster clasp, and repeat several times before tying securely inside the project.
Another option is to crochet a small hanging loop. Attach yarn securely at the top and make ch 8–12, depending on the desired loop size. Join the final chain back to the starting point with a sl st, then fasten off and weave the tails securely. The metal ring can then be passed through this crocheted loop. Keep the loop relatively short so the ghost does not swing excessively during use.
Once the hardware is attached, inspect every part of the Crochet ghost with hat keychain pattern. Gently pull the hat, hanging loop, and embroidered details to confirm they are secure. Trim any visible yarn fibers carefully without cutting structural stitches. Shape the body between your hands and redistribute the stuffing if one side appears flatter than the other.
Color customization is one of the easiest ways to create variations. A white ghost with a black hat gives a traditional Halloween appearance, while lavender, pale gray, cream, or mint can produce a softer style. Hats can be orange, purple, green, black, striped, or decorated with tiny embroidered stars. You can even make several ghosts with different facial expressions for a coordinated set of Halloween crochet keychains.
Yarn weight also changes the final size. Thin cotton and a smaller hook produce a tiny keychain, while worsted yarn creates a larger, softer character. If you change yarn thickness, keep the same stitch counts but choose an appropriate hook. The proportions should remain similar even though the dimensions change. This makes the pattern useful for bag charms, ornaments, garlands, and small seasonal decorations in addition to keychains.
For the neatest final result, focus on consistency rather than speed. Even stitches, moderate stuffing, secure finishing, and carefully placed embroidery can make a simple pattern look polished. Because the project uses fundamental stitches such as single crochet, increases, decreases, slip stitches, and double crochet, it can also help beginners build confidence before attempting larger amigurumi projects.
FAQ About the Crochet Ghost with Hat Keychain Pattern
Is this crochet ghost pattern suitable for beginners?
Yes. The pattern mainly uses basic amigurumi techniques, including a magic ring, single crochet, increases, decreases, and simple embroidery. Beginners who are unfamiliar with continuous rounds may need a little practice, but using a stitch marker makes the process much easier.
What yarn works best for a crochet ghost keychain?
Cotton and acrylic yarn can both work well. Cotton usually provides excellent stitch definition and a firm shape, while acrylic can make the ghost softer. DK or light worsted yarn is especially practical when you want a compact keychain.
How can I make the ghost smaller?
Use thinner yarn and a smaller crochet hook while keeping the same stitch counts. You can also remove one of the even body rounds, but changing yarn weight is generally the easiest way to preserve the original proportions.
Why can I see stuffing between my stitches?
Visible stuffing usually means the crochet tension is too loose, the hook is too large, or the body has been overstuffed. Try using a slightly smaller hook and adding fiberfill gradually. The body should feel softly firm rather than stretched.
Can I make the hat in different colors?
Absolutely. Black creates a classic Halloween look, but orange, purple, dark green, gray, burgundy, and striped combinations also work beautifully. Changing the hat color is one of the simplest ways to personalize this crochet ghost keychain pattern.
How do I keep the hat attached securely?
Sew around several points of the brim using a long yarn tail. Instead of attaching the hat at only one or two locations, distribute the stitches around the base. This reduces movement and creates a more durable finish.
Can I use safety eyes instead of embroidered eyes?
Safety eyes can be used for decorative pieces intended for appropriate users, but embroidered eyes are an excellent choice for a small keychain because they remain lightweight and do not require additional plastic components. Embroidery also makes it easy to create different facial expressions.
How much stuffing should I add?
Add enough fiberfill for the ghost to hold its rounded shape without stretching the crochet fabric. Insert small pieces gradually and distribute them evenly. Excessive stuffing can enlarge gaps between stitches and distort the body.
Can this pattern be turned into a Halloween ornament?
Yes. Instead of installing keychain hardware, crochet a longer hanging loop and use the ghost as a seasonal ornament. Several ghosts can also be made in coordinating colors for a decorative Halloween display.
How can I make the bottom of the ghost more wavy?
Increase the height of each scallop by using groups such as 4 dc instead of 3 dc, or alternate groups of hdc and dc stitches. Experimenting with the border is an easy way to give each ghost a slightly different floating shape.
What should I do if my ghost becomes uneven?
First check your stitch counts. Missing or accidentally adding stitches is a common cause of uneven amigurumi. If the counts are correct, redistribute the stuffing and gently reshape the body. Consistent tension will also improve symmetry.
Can I make several ghosts from the same pattern?
Yes. Repeating the same basic body while changing the hat colors, facial expressions, and decorative details is an easy way to create a collection. This makes the pattern useful for handmade gifts, seasonal decorations, backpack charms, or coordinated Halloween accessories.
Conclusion
The Crochet ghost with hat keychain pattern combines simple amigurumi construction with playful Halloween details in a compact project. Throughout this tutorial, you learned how to build the rounded ghost body using a magic ring, single crochet stitches, increases, and invisible decreases, create a decorative wavy bottom, embroider a simple face, and crochet a miniature pointed hat.
You also learned how to customize the finished ghost through different yarn weights, hat colors, facial expressions, and hanging methods. Small details can completely change the personality of this project, which means the same basic instructions can produce many different versions without requiring an entirely new pattern.
Most importantly, take time with the finishing details. Secure stitches, balanced stuffing, careful embroidery, and a firmly attached keychain loop help transform a simple crochet piece into a polished handmade accessory. Once you have completed your first ghost, try experimenting with your own colors and expressions.If you make this crochet ghost with hat keychain, leave your sincere opinion about the pattern and share any suggestions you have for future projects. Your ideas about colors, modifications, decorations, and different ways to use the finished ghost can inspire even more creative versions of this fun Halloween crochet project.