
Mini crochet Christmas tree pattern is a cheerful project that turns a small amount of yarn into a handmade holiday decoration.With its simple cone shape, softly textured stitches, and embroidered details, this little tree brings warmth to a shelf or festive table.
A mini crochet Christmas tree is especially satisfying because its small size makes every detail feel intentional.A few embroidered ornaments, a contrasting trunk, or a simple hanging loop can change the finished appearance without changing the main pattern.
The phrase Mini crochet Christmas tree pattern describes written instructions for making a small tree using crochet stitches and shaped rounds.Here, mini refers to a compact decoration, crochet Christmas tree identifies the finished project, and pattern means the sequence of stitches required to make it.
Your finished measurements will depend on the yarn, hook, tension, and amount of stuffing you use, so treat the suggested size as an estimate.
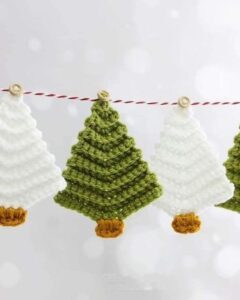
Materials and Stitch Key for Your Mini Crochet Christmas Tree
Gather approximately 25–35 grams of green yarn, a small amount of brown yarn if you want a trunk, polyester stuffing, scissors, a yarn needle, and a removable stitch marker. Smooth sport-weight or light DK yarn works well because it makes individual stitches easy to recognize. Keep a little contrasting yarn nearby for embroidered decorations.
Choose a 2.5–3 mm crochet hook as a starting point, adjusting it to suit your yarn and tension. The fabric should feel firm enough to keep stuffing inside while remaining comfortable to crochet. If noticeable gaps appear between stitches, try a smaller hook. This decorative project does not require an exact gauge, but dense fabric helps produce a tidy finish.
The stitch key uses ch = chain, sc = single crochet, sl st = slip stitch, st = stitch, and MR = magic ring. A single crochet is made by inserting the hook into a stitch, drawing up a loop, then yarning over and pulling through both loops. A slip stitch draws the yarn through the stitch and the loop already on your hook.
The abbreviation inc = increase means working two single crochet stitches into the same stitch. For example, [sc in next 2 sts, inc] × 6 means repeating that sequence six times. The number in parentheses at the end of a round gives its total stitch count. Brackets organize repeated instructions; they do not represent an additional stitch.
Work the tree in continuous rounds, placing a marker in the first stitch of each round and moving it upward as you go. Do not join each round or make a starting chain unless the instructions specifically tell you to do so. Count the stitches after every increase round, since an unnoticed extra stitch can make the tree lean or widen unevenly.
Before beginning, decide whether your Mini crochet Christmas tree pattern will become a standing decoration or a hanging ornament. A standing tree benefits from a flat base and balanced stuffing. A hanging tree needs a securely attached yarn loop at the top. Both versions use the same crocheted body, so you can choose the final purpose during assembly.
Crochet the Tree Body from the Tip Downward
Begin with green yarn and make a magic ring. Round 1: work 6 sc into the MR (6). Round 2: sc in each st around (6). Pull the starting tail firmly to close the opening. Place your stitch marker in the first stitch and check that the tiny beginning forms a closed tip rather than leaving a visible hole.
Start widening the upper part of the tree. Round 3: [sc in next st, inc] × 3 (9). Round 4: sc in each st around (9). Round 5: [sc in next 2 sts, inc] × 3 (12). These evenly spaced increases establish the tapered shape. Work gently around the small opening and avoid pulling the working yarn so tightly that inserting the hook becomes difficult.
Continue shaping the upper middle section. Round 6: sc in each st around (12). Round 7: [sc in next st, inc] × 6 (18). Round 8: sc in each st around (18). The plain rounds add height between increases, helping the piece develop into a tree instead of a flat circle. Check that your marker still identifies the beginning of the round.
Build the middle of your mini crochet Christmas tree. Round 9: [sc in next 2 sts, inc] × 6 (24). Round 10: sc in each st around (24). Round 11: [sc in next 3 sts, inc] × 6 (30). Round 12: sc in each st around (30). Gently turn the piece right side out if necessary, keeping the more defined stitch faces on the outside.
Shape the wider lower section. Round 13: [sc in next 4 sts, inc] × 6 (36). Round 14: sc in each st around (36). Round 15: [sc in next 5 sts, inc] × 6 (42). After Round 15, count all 42 stitches before moving on. The open edge should be noticeably wider than the top, with the body forming a soft cone.
Finish the body with Rounds 16–18: sc in each st around (42 in each round). After Round 18, sl st into the next stitch to smooth the finishing step, then fasten off and weave the end into the inside. The slip stitch does not add to the round count. Leave the bottom open for decorating, stuffing, and attaching the separate base.
Make the Base, Add Decorations, and Assemble the Tree
Make the circular base with green yarn. Round 1: 6 sc in an MR (6). Round 2: inc in each st around (12). Round 3: [sc in next st, inc] × 6 (18). Round 4: [sc in next 2 sts, inc] × 6 (24). Work in continuous rounds and mark the first stitch, just as you did for the body.
Complete the base with Round 5: [sc in next 3 sts, inc] × 6 (30). Round 6: [sc in next 4 sts, inc] × 6 (36). Round 7: [sc in next 5 sts, inc] × 6 (42). Sl st into the next stitch and fasten off, leaving approximately 24 inches of yarn for sewing. The base and body now have matching edges of 42 stitches.
Add embroidered Christmas ornaments before closing the tree, while you can still reach inside to secure the yarn ends. Make small straight stitches in red, cream, or gold, spacing them around the cone. For a simple garland, embroider a gently winding line with short stitches. Keep the embroidery relaxed so it decorates the surface without pulling the crocheted fabric inward.
Stuff the tree gradually, starting with a small amount pushed gently into the tip using a blunt tool. Add more filling through the middle and lower section, checking the silhouette from several directions. Aim for even stuffing that supports the cone without stretching the stitch openings. Leave the bottom slightly less firm so the base can sit flat after sewing.
Position the base against the open bottom and use the long tail to sew each base stitch to a corresponding body stitch. Match all 42 stitches around the edges, using whipstitch and even tension. Pause when a small opening remains to adjust the filling, then finish the seam. Secure the yarn and bury the end inside the tree.
For an optional brown trunk, make 6 sc in an MR, increase in every stitch on the next round (12), then work three rounds of 12 sc. Fasten off with a sewing tail, add a little stuffing, and sew the open edge to the center of the base. The trunk creates a different silhouette; omit it when you want a broader, more stable standing surface.
Finishing, Customization, and Care for Your Crochet Christmas Tree
Shape the finished tree with your hands, gently redistributing any uneven filling. The tip should look defined, the sides should widen gradually, and the base should sit evenly. If the tree leans, check whether the stuffing is heavier on one side or whether the base seam was pulled too tightly. Small adjustments often improve the shape without reworking any stitches.
To make a crochet Christmas tree ornament, attach a doubled strand of yarn near the tip. Pass it securely through several stitches, form a hanging loop approximately 2–3 inches long, and fasten the ends inside the tree. Test the loop with a gentle pull before hanging. Place the attachment centrally so the tree hangs upright.
Customize your Mini crochet Christmas tree pattern with forest green, sage, cream, or a combination of festive colors. For a striped version, change yarn at the beginning of a round and secure the ends inside. Continuous rounds can create a visible step at color transitions, so place those changes toward the back if you prefer a quieter finish.
Adjust the size through yarn and hook selection while keeping the written stitch counts unchanged. Finer yarn produces a smaller tree, while thicker yarn generally makes a larger one. For a coordinated display, make several trees with different yarn weights. Remember that different fibers also affect firmness, texture, and the amount of stuffing needed.
Treat the finished piece as a seasonal decoration. Embroidered details are a practical choice when you want to avoid glued embellishments or loose beads. If you add buttons, bells, or other small accessories, secure them carefully and keep the decoration away from young children and pets. Avoid placing yarn decorations near candles, heaters, or other heat sources.
Care for the tree according to the yarn manufacturer’s instructions. Light dust can usually be removed with a soft brush, while small marks may respond to gentle spot cleaning. Avoid soaking unless both the yarn and filling are washable. Allow any damp decoration to dry completely, then store it without heavy objects pressing against it so the cone keeps its shape.
FAQ: Mini Crochet Christmas Tree Pattern
Is this mini crochet Christmas tree pattern suitable for beginners?
Yes, it is suitable for beginners who can make a single crochet and are ready to practice increases. The smallest rounds require patience because the opening is narrow. Use a stitch marker, count after each increase round, and take your time with the base seam. Familiarity with a magic ring is helpful, although a chain-two start can be used instead.
What can I use instead of a magic ring?
Chain two and work the required six single crochet stitches into the second chain from the hook. Continue with the next round as written. This method may leave a slightly larger opening than a magic ring. Use the starting yarn tail to close that opening neatly before stuffing or attaching the base.
Why does my crochet tree look rounded instead of pointed?
Too much stuffing near the top can stretch the narrow rounds and soften the point. Excess filling in the middle can also make the cone bulge. Remove some stuffing and redistribute the remainder in smaller amounts. Check your stitch counts as well, since accidental increases change the intended proportions.
Why is the circular base curling or becoming wavy?
A little curling can happen with firm tension, but pronounced cupping may indicate missed increases or very tight stitches. A wavy edge may come from extra stitches or loose tension. Confirm the round totals of 6, 12, 18, 24, 30, 36, and 42. Also use the same yarn and hook for the base and body.
Can I make the tree without a brown trunk?
Absolutely. The flat green base is enough to close the stuffed tree and creates a useful standing surface. A trunk is an optional decorative addition that changes the appearance and can affect balance. If your main goal is a miniature tree for a tabletop display, begin with the trunk-free version.
How much yarn will I need, and can I use leftovers?
Small leftovers are often suitable, provided you have enough yarn in a consistent weight for the body and base. Approximately 25–35 grams of sport-weight or light DK green yarn is a reasonable starting allowance, but actual use varies. Contrasting embroidery and the optional trunk require only small additional amounts.
How can I decorate the tree without beads or buttons?
Use short embroidered stitches for ornaments and a fine contrasting yarn for a winding garland. You can also embroider a small star-like motif near the top. Secure every yarn end inside the body before assembly. These details add color while keeping the decoration soft and preserving its handmade character.
Conclusion
This Mini crochet Christmas tree pattern teaches you how to create a tapered body with single crochet stitches and controlled increases, make a matching circular base, embroider festive details, and assemble a softly stuffed decoration.
You also learned how to add an optional trunk or hanging loop, adjust the size through yarn choice, and care for the finished tree. Start with one simple version, then explore colors and decorations that suit your Christmas style.
Please leave your honest opinion about the pattern and share your suggestions, favorite color combinations, or ideas for future crochet projects.