
A Crochet Autumn Leaf Pattern is a wonderful way to bring the warm colors and natural beauty of fall into handmade decorations, accessories, and seasonal gifts.
One of the best things about a Crochet Autumn Leaf Pattern is its versatility. Small crocheted leaves can be used to decorate scarves, hats, blankets, table runners, wreaths, and handmade cards.
This crochet autumn leaf pattern is designed to help you understand the materials, stitches, shaping techniques, and finishing details needed to create an attractive leaf. The instructions use standard US crochet terminology and include a written pattern with abbreviations, row-by-row guidance, and practical tips for achieving a neat result. You can follow the basic instructions for a simple leaf or experiment with different yarn weights and colors to create a personalized collection. By the end of this guide, you will understand how to crochet an autumn leaf, how to shape its pointed edges, and how to use your finished pieces in seasonal projects.
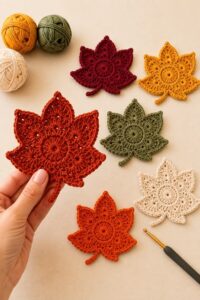
Materials, Crochet Stitches, and Preparation for Your Autumn Leaf
Before beginning your Crochet Autumn Leaf Pattern, gather the materials needed to create a neat and well-defined shape. You will need yarn in one or more autumn colors, a crochet hook suitable for your yarn, scissors, a yarn needle, and a stitch marker if you prefer to mark important stitches. Medium-weight yarn works well for decorative leaves, while cotton yarn is an excellent choice for pieces that need a firm shape. Choose a hook that produces stitches with enough structure to help the leaf hold its form.
The yarn choice influences the appearance, size, and texture of your finished leaf. Cotton yarn creates defined stitches and works especially well for appliqués, table decorations, and ornaments. Acrylic yarn is lightweight, widely available, and suitable for garlands or decorative arrangements. If you want a more natural autumn appearance, combine shades of rust, mustard, burgundy, forest green, and chocolate brown. You can also use a variegated yarn to create subtle color changes without switching yarn during the project.
Understanding the basic crochet stitches will make this pattern easier to follow. The chain stitch, abbreviated as ch, forms the foundation of the leaf. The slip stitch, abbreviated as sl st, helps connect sections and create a neat finish. The single crochet, abbreviated as sc, produces compact stitches, while the half double crochet (hdc) and double crochet (dc) add height and help shape the leaf. A treble crochet (tr) creates taller sections that can form pointed tips and broader outer edges.
For this pattern, the leaf is worked around a central foundation chain. Stitches of different heights are placed along the chain to create a pointed tip, a wider middle, and a tapered base. Working along both sides of the foundation chain creates a symmetrical leaf shape. Increases and decreases are used to adjust the width and contour of the design. If you are new to crocheting, remember that the goal is not to make every stitch perfectly identical at first, but to maintain consistent tension and follow the stitch sequence carefully.
The following instructions use the standard US crochet abbreviations. Ch means chain, sl st means slip stitch, sc means single crochet, hdc means half double crochet, dc means double crochet, and tr means treble crochet. A st refers to a stitch, while sts refers to multiple stitches. An increase means working more than one stitch into the same stitch or space, depending on the instruction. When the pattern says to work along the opposite side of the chain, turn the foundation chain so that you can crochet into the unused loops on its other side.
Before starting the main pattern, make a short practice chain and work a few stitches into it. This helps you become comfortable locating the chain spaces and controlling your tension. If your stitches are too tight, the leaf may curl inward; if they are too loose, the edges may appear uneven. A moderate, consistent tension usually produces the best result. Once your materials are ready and you understand the abbreviations, you can begin creating your first crocheted autumn leaf.
Step-by-Step Crochet Autumn Leaf Pattern Instructions
To begin the Crochet Autumn Leaf Pattern, make a slip knot and chain 13. This foundation chain forms the central length of the leaf. If you want a smaller leaf, begin with 9 or 10 chains; for a longer leaf, try 15 or 17 chains. The number of foundation chains influences the proportions of the finished piece, so choose a length that matches your intended use. For your first attempt, the 13-chain version provides a manageable shape with a recognizable pointed tip.
Foundation: Ch 13. Do not turn the chain yet. Starting in the second chain from the hook, work 1 sc, 1 hdc, 2 dc, 3 tr, 2 dc, 1 hdc, and 1 sc along the chain. This sequence creates one side of the leaf, gradually increasing the height toward the wider section before tapering toward the base. The tallest stitches help form the broad upper contour, while the shorter stitches create a more delicate transition toward the lower end.
At the final chain, work 3 sc into the same chain space to help turn the work around the tip. These stitches form a rounded point rather than a sharp corner. Next, continue along the unused loops on the opposite side of the foundation chain. Work 1 sc, 1 hdc, 2 dc, 3 tr, 2 dc, 1 hdc, and 1 sc in the corresponding chain spaces. Keep the stitch sequence aligned with the first side so that the leaf develops a balanced outline. Depending on your yarn and tension, you may need to adjust the placement slightly to keep the fabric flat.
Once you have completed both sides, examine the shape before fastening off. The central chain should run through the middle of the leaf, and the taller stitches should create a broad upper section. If the piece looks narrow, try using a slightly larger hook or increasing the number of taller stitches on your next leaf. If the edges flare excessively, check that you have not accidentally added extra stitches. Small variations are normal, but maintaining a consistent stitch count helps the leaf look polished.
To create a more defined leaf outline, join the yarn at the base if necessary and work a round of slip stitches or single crochet around the outside edge. Use slip stitches for a subtle, delicate border or single crochet for a more pronounced outline. At the pointed tip, work carefully into the turning stitches so that the edge remains smooth. Avoid pulling the yarn too tightly around the corners because excessive tension can cause the leaf to curl. A contrasting color, such as dark brown around a golden-yellow leaf, can make the outline stand out beautifully.
For a more natural finish, create a small leaf stem at the bottom. Attach the yarn to the base of the leaf, chain 5 to 7 stitches, and slip stitch back along the chain toward the leaf. Fasten off and weave in the ends with a yarn needle. If you prefer a firmer stem, you can work single crochet stitches into the chain instead of slip stitches. Adjust the stem length to suit the project, keeping it short for appliqués and slightly longer for garlands or decorative arrangements.
Shaping, Finishing, and Creative Uses for Crocheted Autumn Leaves
After completing the main stitches, take a moment to inspect the leaf’s proportions. The shape of a crocheted leaf depends on the relationship between the foundation chain, stitch heights, and turning stitches. If the tip looks too rounded, use fewer stitches at the turning point on your next attempt. If the middle appears too narrow, add a wider section of double crochet stitches. Small adjustments can help you create maple-inspired, oval, or elongated leaf shapes without changing the basic technique.
One of the easiest ways to personalize a Crochet Autumn Leaf Pattern is to experiment with color changes. You can work the entire leaf in one solid shade or change colors halfway through the project. For a two-tone leaf, use golden yellow for the first side and burnt orange for the second side, joining the new yarn carefully at the base or another discreet point. You can also embroider a few short lines down the surface with a yarn needle to suggest the veins of a natural leaf. Keep the embroidery light so that it does not distort the crocheted fabric.
Blocking can help improve the final appearance of your leaf. For cotton yarn, gently dampen the piece, arrange it on a flat surface, and pin the edges into the desired shape if the yarn care instructions allow it. Let it dry completely before removing the pins. For acrylic yarn, follow the manufacturer’s care instructions and avoid direct high heat, which can damage the fibers. Blocking is especially useful when the leaf curls at the edges or when you want several leaves to have similar dimensions for a coordinated project.
These handmade leaves are ideal for autumn home decorations. Attach several to a crocheted garland, arrange them in a shallow decorative bowl, or sew them onto fabric napkins and cushion covers. A combination of red, orange, and yellow leaves can create an inviting seasonal display. For a table centerpiece, crochet leaves in different sizes and arrange them around a reusable decorative base. If you use the leaves on household textiles, secure them firmly and consider how the finished item will be washed or cleaned.
You can also incorporate the pattern into wearable accessories and handmade gifts. Sew a small leaf onto a beanie, attach it to a scarf, or use it as a decorative detail on a fabric tote bag. Several leaves connected with chains can form a lightweight necklace or a seasonal hanging decoration. If you are creating gifts, choose colors that suit the recipient’s style and add a small handmade tag. Always secure yarn tails carefully, particularly when the leaves will be handled frequently or attached to items that may experience friction.
If you want to develop your skills further, try making a collection of leaves with different proportions. Use fewer foundation chains for small appliqués and more chains for elongated decorations. Experiment with different combinations of single, half double, double, and treble crochet stitches to create different contours. You can also place small embroidered veins along the center and sides to give each leaf additional character. Keep notes about your foundation chain, hook size, and stitch sequence so you can reproduce your favorite designs consistently.
Frequently Asked Questions About the Crochet Autumn Leaf Pattern
1. Is the Crochet Autumn Leaf Pattern suitable for beginners?
Yes. This Crochet Autumn Leaf Pattern is suitable for beginners who already know how to make a chain and work basic crochet stitches. The pattern uses common stitches and a straightforward construction method. If you have never worked treble crochet before, practice on a small swatch first. You can also substitute shorter stitches to simplify the design, although the resulting leaf may have a different shape.
2. What yarn is best for crocheting autumn leaves?
Cotton yarn is a good choice because it creates defined stitches and usually holds a decorative shape well. Acrylic yarn is another practical option for garlands, wall decorations, and other lightweight projects. Choose yarn that is easy to handle and appropriate for the intended use. Medium-weight yarn is convenient for a first attempt, while finer yarn can produce delicate leaves and bulky yarn creates larger, more textured pieces.
3. Which crochet hook size should I use?
Use the hook size recommended on your yarn label as a starting point. A slightly smaller hook can create firmer stitches, while a larger hook can produce a softer, more flexible leaf. The ideal size depends on your yarn, tension, and desired dimensions. If your leaf curls or becomes difficult to shape, try a different hook size and compare the results.
4. How can I make the leaf larger or smaller?
The simplest way to change the size is to adjust the length of the foundation chain and use a suitable hook and yarn. A shorter chain generally produces a smaller leaf, while a longer chain creates a longer shape. Remember to adjust the stitch sequence proportionally so that the tallest stitches remain near the wider section. Make a sample first if you need several leaves of a consistent size.
5. Why is my crocheted leaf curling at the edges?
Curling can result from tight tension, an unsuitable hook size, or too many stitches being compressed into a small area. Try relaxing your tension and checking the stitch placement along both sides of the foundation chain. Gentle blocking may help flatten the finished piece. If the edges still curl, experiment with a slightly larger hook or a different yarn.
6. How do I make the leaf look more realistic?
Use natural autumn colors and create a clearly defined central line. After crocheting the leaf, embroider a central vein and a few smaller diagonal lines using a yarn needle. You can also vary the leaf’s width and length to create different natural-looking shapes. Slight differences between individual leaves can make a collection look more organic.
7. Can I use this pattern to make maple leaves?
Yes, you can use the basic technique as a starting point for maple-inspired leaves. However, the simple version described here has a rounded, tapered outline rather than the distinctive multi-pointed silhouette of a traditional maple leaf. To create a more recognizable maple shape, you will need to add several pointed sections using chains, taller stitches, and carefully placed decreases. Experiment with a small sample before making a larger decoration.
8. How do I attach crocheted leaves to other projects?
Use a yarn needle to sew the leaf securely to a crocheted blanket, hat, scarf, or decorative textile. For a garland, you can attach leaves to a crocheted chain or sew them onto a length of yarn. Position the leaf before stitching so that it lies flat and the stem points in the intended direction. Use attachment methods appropriate for the item’s intended use and care requirements.
9. Can I wash items decorated with crocheted leaves?
That depends on the yarn and the item to which the leaves are attached. Check the yarn care instructions and the care label of the finished project. If the item is washable, secure all loose ends and use a gentle cleaning method appropriate for the fibers. Decorative pieces made with delicate yarn, embroidery, or mixed materials may require hand washing or spot cleaning.
10. What can I make with several crochet autumn leaves?
There are many possibilities, including seasonal garlands, wreath decorations, table centerpieces, gift embellishments, cushion appliqués, bookmarks, and decorative wall hangings. You can combine several colors and sizes for a layered appearance or use one color for a coordinated design. If you make a set of leaves as a gift, arrange them in a small reusable container or attach them to handmade packaging.
11. How can I keep my leaf from losing its shape?
Consistent tension, suitable yarn, secure finishing, and gentle blocking all contribute to a stable shape. Cotton yarn often provides good stitch definition, while some softer yarns may need more careful shaping. Avoid stretching the leaf during use or storage, and keep decorative pieces away from excessive heat and moisture. If the leaf becomes misshapen, reshape it gently according to the yarn’s care instructions.
12. Can I sell items made with this pattern?
You can generally make and sell finished handmade items based on your own work, but you should respect any applicable pattern terms, marketplace rules, and intellectual property rights. If you publish your own version of the instructions or use another creator’s design, make sure your use is permitted. Describe your finished products honestly and provide accurate information about materials, dimensions, and care.
Conclusion: Create Your Own Crochet Autumn Leaf Pattern
The Crochet Autumn Leaf Pattern is a simple and versatile way to celebrate the colors and textures of autumn through handmade crafts. By learning how to create a foundation chain, combine different crochet stitches, shape the outer edge, and finish the stem, you can make attractive leaves for a wide range of seasonal projects. Choosing the right yarn and hook, maintaining consistent tension, and blocking the finished piece when appropriate will help you achieve a neat and balanced result.
Throughout this guide, you have learned which materials to prepare, how to follow the written crochet instructions, how to adjust the size and shape, and how to use your finished leaves in decorations and accessories. You can begin with the basic design and gradually experiment with different colors, stitch combinations, embroidered veins, and pointed outlines. Each new leaf is an opportunity to practice your skills and develop a style that reflects your own creativity.
Now it is your turn to pick your favorite autumn colors and start crocheting. Leave your honest opinion in the comments and share any suggestions that could help other crocheters improve their projects. Which colors would you choose for your autumn leaves, and would you use them for a garland, a wreath, or a handmade accessory? Your ideas and experiences can inspire others to try this enjoyable seasonal craft.