
One of the most appealing aspects of this Fabric Christmas Angel Pattern is that it can be adapted to different sewing skills and personal styles.
In this tutorial, you will learn how to prepare the materials, cut the fabric pieces, sew the angel’s body, create the wings, assemble the decorative elements, and finish the ornament with beautiful details. The Christmas fabric angel sewing pattern described here uses a simple decorative silhouette with a fabric body, gathered dress, separate wings, and a small head. The measurements can be adjusted to create larger or smaller angels according to your decorating needs. By following each step carefully, you will be able to produce a handmade Christmas angel that adds charm and personality to your holiday decorations.
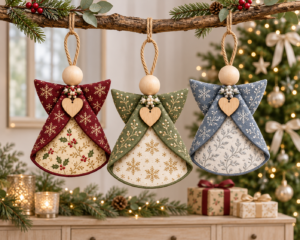
Materials and Preparation for the Fabric Christmas Angel Pattern
Before beginning the Fabric Christmas Angel Pattern, organize all the materials you will need. Preparing your supplies in advance makes the sewing process easier and helps you maintain consistency when cutting and assembling the different pieces. Since this is a decorative project, you can choose materials according to the style and size of the angel you want to create.
For the angel’s dress, select approximately 12 by 8 inches of cotton fabric. White, cream, red, green, and gold are excellent choices for a traditional Christmas appearance. You can also use small floral prints, gingham, linen, or lightweight decorative cotton. If you want a more delicate finish, choose fabrics with subtle patterns rather than very large prints.
For the wings, prepare a separate piece of fabric measuring approximately 8 by 5 inches. A contrasting material can make the wings stand out beautifully against the dress. White cotton, lace fabric, soft beige linen, or fabric with small embroidered details can create an elegant effect. Lightweight interfacing may be used to give the wings additional structure.
You will also need a small fabric-covered ball or a suitable lightweight decorative form for the angel’s head. A wooden bead can be used as an alternative, provided it is appropriate for the intended decorative use. For the hair, prepare a small quantity of embroidery thread, yarn, or soft decorative fiber in a color of your choice.
Other essential supplies include fabric scissors, a sewing machine or hand-sewing needle, matching thread, sewing pins, a ruler, a fabric marking pencil, an iron, and a small amount of polyester stuffing. A ribbon measuring approximately 6 to 8 inches can be used to create a hanging loop. Optional decorative materials include lace, small fabric flowers, embroidery thread, and narrow ribbons.
Before cutting anything, draw a simple angel template on paper. The basic design should include a small rounded head, a triangular or slightly flared dress, and two symmetrical wings. You can create these shapes yourself using the suggested measurements or adjust an existing personal template. Having paper templates makes it easier to reproduce the same shape when creating multiple ornaments.
Wash and iron your fabric if necessary, especially if you are using cotton that may shrink after washing. Place the fabric on a flat surface and check that the grain is straight before marking the pieces. Accurate preparation is important because uneven fabric pieces can make the angel look unbalanced after assembly.
Step-by-Step Instructions for Sewing Your Christmas Fabric Angel
Now it is time to start creating your Fabric Christmas Angel Pattern. Begin with the dress, which forms the main body of the ornament. Cut two identical dress-shaped pieces from your chosen fabric. For a small decorative angel, each piece can measure approximately 6 inches tall and 5 inches wide at the lower edge. Make the upper section narrower and gradually widen the shape toward the bottom.
Place the two dress pieces together with their right sides facing inward. Align the edges carefully and secure them with sewing pins or clips. Sew along both sides and the top edge, leaving the bottom open. Use a seam allowance of approximately 1/4 inch. This creates a simple fabric pouch that will become the angel’s dress.
After sewing, carefully trim excess fabric around the curved or angled areas without cutting through the stitches. Turn the dress right side out through the open bottom. Use a blunt turning tool to shape the corners and edges. Press the dress gently with an iron, following the care instructions for your fabric.
Prepare a small amount of polyester stuffing and place it inside the upper portion of the dress if you want the angel to have a slightly dimensional body. Do not overfill the piece. The dress should maintain its soft shape without becoming bulky. If you prefer a flatter ornament, you can leave the body unstuffed.
Next, prepare the head. If you are using a small fabric-covered ball, wrap a square piece of flesh-toned, cream, or beige fabric around the lightweight filling. Gather the fabric at the bottom and secure it with thread. Alternatively, use a suitable wooden bead or another decorative form. Position the head at the top center of the dress and secure it firmly with hand stitches.
Now create the wings. Draw two symmetrical wing shapes on paper, with a total width of approximately 6 inches and a height of 3 inches. Transfer the shape onto two pieces of fabric placed with their right sides together. If you want firmer wings, add lightweight interfacing to the appropriate fabric layer before sewing.
Sew around the wing shape, leaving a small opening along the lower edge. Trim the seam allowance carefully, especially around rounded sections. Turn the wings right side out through the opening and use your fingers to shape the curves. Close the opening with small hand stitches. Press lightly if the material allows it.
To give the wings a more decorative appearance, add a few lines of embroidery or simple stitched details. You can also sew a narrow piece of lace along the outer edges. Avoid adding too much decoration, because the wing shape should remain visible and balanced.
Attach the wings to the back of the angel’s dress. Position them symmetrically, with one wing on each side of the upper body. Use small, strong hand stitches to secure the central area of the wings to the dress. Check the front of the ornament to ensure that the wings are positioned evenly.
For the dress decoration, prepare a narrow ribbon or lace strip measuring approximately 10 to 12 inches. Gather the strip slightly with a running stitch and attach it around the waist or lower section of the dress. This creates a decorative detail that gives the angel a more finished appearance. You can also add a small fabric bow at the center.
Create the angel’s hair using embroidery thread or soft yarn. Cut several strands of equal length and arrange them over the head. Secure them with small stitches or an appropriate fabric-compatible adhesive, following its instructions. You can create short hair, long hair, or a simple hairstyle with a small decorative bun.
If you want to add a halo, use a narrow piece of gold-colored ribbon or a small flexible decorative cord. Shape it into a circle and secure it carefully above or behind the head. Make sure the halo is firmly attached and does not interfere with the angel’s overall shape.
Finally, attach a hanging loop to the back of the ornament. Fold a 6-inch piece of ribbon in half and position the ends at the top center of the angel. Sew the ends securely to the back using several stitches. Check the attachment before hanging the ornament. Your handmade fabric Christmas angel is now ready for its final decorative adjustments.
Creative Ways to Customize and Decorate Your Handmade Fabric Angel
One of the most enjoyable parts of the Fabric Christmas Angel Pattern is choosing how to personalize the finished ornament. Small changes in color, fabric texture, and decorative details can create completely different styles. You can make a traditional angel with white wings and a cream dress or choose a more colorful design that coordinates with your Christmas decorations.
For a classic Christmas look, use white cotton for the wings and a red or green fabric for the dress. Add a gold ribbon around the waist and a small halo above the head. These colors create a festive appearance that works beautifully on Christmas trees, wreaths, and holiday displays.
If you prefer a rustic decoration, choose beige linen, natural cotton, or fabric with subtle brown patterns. Use twine or neutral-colored yarn for the hair and keep the wings simple. A small lace detail can add softness without taking away from the natural appearance of the material.
Another lovely idea is to create a fabric angel Christmas tree ornament using different fabrics for each angel. You can make a coordinated collection in pastel pink, light blue, cream, and white. Arrange the finished ornaments throughout the tree or use them to decorate a small Christmas display.
You can also create a larger fabric angel for a tabletop arrangement. Simply increase the dimensions of the paper template and use slightly heavier fabric to support the structure. A larger dress and wider wings can create a beautiful centerpiece for a Christmas table or shelf.
For an elegant appearance, experiment with satin, lace, and gold-colored decorative details. Satin can give the dress a subtle shine, while lace can make the wings look delicate. If you use slippery fabrics, take extra care when pinning and sewing the pieces to prevent them from shifting.
Personalized embroidery is another way to make each angel special. You can add small stars, flowers, initials, or decorative lines to the dress. Use embroidery thread in a contrasting color and keep the stitches small and consistent. These details can turn a simple handmade ornament into a meaningful gift.
If you have leftover fabric from other sewing projects, this pattern is an excellent way to reuse it. Small floral scraps can become beautiful dresses, while plain cotton pieces can be transformed into wings. Combining different fabric textures can produce interesting results without requiring expensive materials.
You can also use your DIY fabric Christmas angel as part of a handmade gift arrangement. Attach the ornament to a gift bag, place it inside a decorative box, or use it as a reusable gift topper. A handmade angel adds a personal touch that makes holiday packaging feel more thoughtful.
For a more dimensional design, consider adding a gathered skirt. Cut a longer rectangular piece of fabric, fold the upper edge inward, and sew a running stitch along it. Pull the thread gently to create gathers and attach the skirt around the lower part of the angel’s body. This creates additional volume and movement.
Finishing Tips, Common Mistakes, and Frequently Asked Questions
The final stage of the Fabric Christmas Angel Pattern is important because careful finishing helps the ornament look neat and professionally assembled. Examine the dress, wings, head, and decorative details before displaying your angel. Check that all stitches are secure and that the different pieces are properly aligned.
One common mistake is cutting the fabric pieces without using a template. This can result in uneven wings or a dress that looks asymmetrical. To avoid this problem, draw your shapes on paper first and use the same template for both sides of the design. Fold the paper template in half when necessary to check symmetry.
Another frequent issue is adding too much stuffing to the dress. Excessive filling can distort the fabric and make it difficult to attach the head and wings. Use small amounts of stuffing and distribute them evenly. The goal is to create a soft shape rather than a rigid body.
Choosing the wrong fabric can also affect the final appearance. Very thick fabrics may create bulky seams, while extremely slippery materials can be difficult to sew accurately. Cotton and lightweight linen are excellent options for beginners because they are generally easier to cut, pin, and stitch.
When attaching the wings, take time to check their position from the front and back. If one wing is higher than the other, remove a few stitches and reposition it. Small adjustments at this stage can make the finished angel look much more balanced.
Always check the strength of the hanging loop before displaying the ornament. Use several stitches to attach the ribbon and avoid relying on a single knot. If the angel is intended for a household with children or pets, keep small detachable decorative components out of reach and treat the finished piece as a decoration rather than a toy.
Frequently Asked Questions About the Fabric Christmas Angel Pattern
1. Is the Fabric Christmas Angel Pattern suitable for beginners?
Yes! This project is suitable for beginners who have basic sewing skills. The main techniques include cutting fabric, sewing straight or slightly curved seams, turning fabric pieces, adding simple stuffing, and attaching decorative elements by hand. You can simplify the design by using fewer embellishments.
2. What is the best fabric for making a Christmas angel?
Cotton is one of the easiest fabrics to work with because it is stable and easy to sew. Linen, satin, felt, and lightweight decorative fabrics can also be used. The best choice depends on the style and structure you want for your finished angel.
3. Can I make a fabric Christmas angel without a sewing machine?
Absolutely! You can sew the entire project by hand using a needle and thread. Use small, even stitches to join the dress and wing pieces. Hand sewing is particularly useful for small decorative projects because it allows you to control the details carefully.
4. How much fabric do I need for one Christmas angel?
For the small angel described in this tutorial, approximately 12 by 8 inches of fabric for the dress and 8 by 5 inches for the wings should provide a useful starting point. You will also need a small piece for the head covering and optional decorative details.
5. How do I make the wings look symmetrical?
Create a paper template and fold it in half to check that both sides have the same shape. When sewing and attaching the wings, align their central points carefully. Before completing the stitches, examine the ornament from the front to make any necessary adjustments.
6. Can I use felt instead of cotton fabric?
Yes! Felt is an excellent option for some parts of a fabric angel because it does not fray easily and can hold decorative shapes. It works particularly well for flat wings, small embellishments, and simplified angel designs. You may need to adapt the sewing technique because felt behaves differently from woven fabric.
7. How can I make my fabric angel more elegant?
Use delicate fabrics such as satin, lace, or fine cotton. Add subtle gold details, a small halo, embroidered accents, and a carefully shaped dress. Keeping the color palette simple can also create a more sophisticated appearance.
8. Can I make different sizes using the same pattern?
Yes! Simply enlarge or reduce the paper templates proportionally. Remember to adjust the ribbon, head, and decorative details to match the new dimensions. For larger angels, use fabric with enough structure to support the design.
9. How do I attach the fabric angel to a Christmas tree?
Sew a small ribbon loop securely to the back of the angel’s head or upper body. Use several stitches to reinforce the attachment. Make sure the loop is strong enough to support the ornament before placing it on the tree.
10. Can I wash a handmade fabric Christmas angel?
Cleaning depends on the materials used. Cotton pieces without delicate embellishments may tolerate gentle spot cleaning, but beads, wooden heads, glued details, and decorative ribbons may be damaged by washing. Test any cleaning method on an inconspicuous area and follow the care instructions for the materials.
11. What can I use for the angel’s hair?
Embroidery thread, cotton yarn, wool yarn, and soft decorative fibers are all possible choices. Select a material that complements the fabric and is easy to secure. Arrange the strands neatly and attach them firmly to prevent loose pieces.
12. Can I sell handmade fabric Christmas angels?
Handmade fabric angels can be suitable products for craft markets and seasonal sales. Before selling them, check the applicable rules for your location and ensure that any templates, artwork, or design elements you use are permitted for commercial use. Describe the materials and dimensions accurately.
Conclusion
The Fabric Christmas Angel Pattern is a wonderful way to create meaningful handmade decorations for the holiday season. In this tutorial, you learned how to prepare the materials, cut and sew the dress, create the wings, assemble the head, add decorative details, and finish the ornament with a secure hanging loop.
You also discovered several ways to customize your handmade fabric Christmas angel, from traditional red and white combinations to rustic linen designs and elegant satin decorations. Whether you choose to display your angel on a Christmas tree, use it as a gift topper, or create a larger decorative centerpiece, the basic techniques can be adapted to suit your creativity.
The most important part of this project is enjoying the process and adding your own personal touches. Every fabric combination and decorative detail can make your angel different, giving your Christmas decorations a unique handmade character.If you enjoyed this Fabric Christmas Angel Pattern, please leave your honest opinion in the comments! Tell us how your angel turned out, which fabrics and colors you chose, and what suggestions you have for making this project even more beautiful. Your ideas and experiences can inspire other sewing enthusiasts to create their own special Christmas decorations.