
The Crochet Mini-Beanie Pattern for Decoration is a charming and creative project that allows crochet enthusiasts to transform a small amount of yarn into an adorable handmade accessory.
One of the best features of this crochet mini-beanie pattern for decoration is that it is suitable for beginners and experienced crocheters alike.
In this tutorial, you will learn how to make a mini crochet beanie step by step, from choosing the right materials to shaping the crown and finishing the decorative brim. The instructions include crochet abbreviations, stitch counts, and practical tips to help you achieve consistent results. You will also discover creative ways to use your finished mini hats in seasonal decorations, handmade gifts, and craft projects. By following the instructions carefully, you can create a lovely collection of miniature beanies that bring warmth and personality to your handmade decorations.
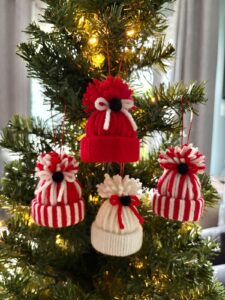
Materials, Crochet Stitches, and Preparation for Your Mini-Beanie
Before beginning the Crochet Mini-Beanie Pattern for Decoration, prepare all the materials needed for the project. Since this is a miniature crochet accessory, you will not need a large amount of yarn. A small quantity of medium-weight or lightweight yarn is usually enough to create several decorative hats, depending on their final size.
Choose yarn in colors that complement the decoration you have in mind. Red, green, white, and gold are excellent choices for Christmas-themed mini beanies. Pastel shades create a delicate appearance, while neutral colors such as beige, gray, and cream are suitable for rustic and minimalist decorations. Cotton yarn produces a defined stitch texture, while acrylic yarn offers softness and a wide variety of colors.
You will need a crochet hook appropriate for your chosen yarn. For a small decorative beanie, a hook between 2.5 mm and 3.5 mm can be a useful starting point, depending on the yarn thickness and your tension. A smaller hook generally creates a firmer fabric, which helps the miniature hat maintain its shape.
Additional materials include a yarn needle, scissors, stitch marker, and a small amount of contrasting yarn for optional decorative details. If you want to hang the finished beanie, you can also prepare a short piece of yarn to create a hanging loop. Avoid adding unnecessary accessories if you prefer a simple and traditional miniature hat.
For this pattern, you will use a few basic crochet techniques. The magic ring (MR) is an adjustable starting loop that allows you to close the center of the crown neatly. The single crochet (sc) creates a compact fabric, making it particularly suitable for miniature decorations. The slip stitch (sl st) is used to join rounds and finish details.
You will also need to understand the increase (inc) technique. An increase means working two single crochet stitches into the same stitch from the previous round. This gradually expands the crown and creates the rounded shape of the mini-beanie. The chain stitch (ch) is used for the beginning of rounds and for creating the optional hanging loop.
The following instructions use US crochet terminology and produce a small decorative beanie approximately 2.5 to 3.5 inches tall, depending on your yarn and tension. The measurements are approximate because different yarns and crochet techniques can produce slightly different results. You can adjust the hook size or yarn weight to customize the finished dimensions.
Step-by-Step Crochet Mini-Beanie Pattern for Decoration
Now it is time to start your Crochet Mini-Beanie Pattern for Decoration. Begin with your chosen main color and create a magic ring. If you are unfamiliar with this technique, you can alternatively chain 2 and work the first round into the second chain from the hook. Pull the magic ring gently to close the center after completing the stitches.
Round 1: Work 6 single crochet stitches (6 sc) into the magic ring. Pull the yarn tail to close the opening and place a stitch marker in the first stitch. You should have 6 stitches at the end of this round. This small circle forms the top center of your miniature hat.
Round 2: Work 2 single crochet stitches into each stitch around (6 inc). You will have 12 stitches. These increases begin expanding the circular crown. Keep your stitches consistent so the top of the hat remains smooth and symmetrical.
Round 3: Repeat the sequence of 1 single crochet in the next stitch and 2 single crochet stitches in the following stitch around (1 sc, inc). You will finish with 18 stitches. The crown should now look like a small, flat circle.
Round 4: Repeat 1 sc in each of the next 2 stitches, followed by an increase in the next stitch (2 sc, inc). Continue around until you have 24 stitches. If the circle begins curling slightly, check your stitch count and tension before continuing.
Round 5: Work 1 single crochet into each stitch around (24 sc). Do not increase in this round. This helps establish the transition from the expanding crown to the sides of the beanie. Your crochet piece should begin to form a shallow cup shape.
Round 6: Repeat the sequence of 1 sc in each of the next 3 stitches, followed by an increase in the next stitch (3 sc, inc). You will have 30 stitches. This final increase round creates a slightly wider decorative beanie. For a smaller hat, you can stop increasing after Round 4 or Round 5.
Rounds 7–11: Work 1 single crochet into every stitch around (30 sc per round). Continue without increases to build the sides of the crochet mini-beanie. The fabric should gradually extend downward, creating the recognizable hat shape. If you want a taller miniature hat, add one or two extra rounds.
Round 12: Work 1 single crochet into each stitch around (30 sc). Finish with a slip stitch into the first stitch if you are working joined rounds. If you prefer continuous spiral rounds, simply continue to the brim without joining. Both methods work well, but using a stitch marker is especially helpful when crocheting in a spiral.
Now prepare the brim. For a simple decorative edge, work one round of slip stitches around the bottom opening. This creates a neat finish and helps the edge maintain its shape. If you prefer a more visible folded brim, switch to a contrasting yarn color before beginning the next step.
To create a textured brim, attach your contrasting yarn and work one round of single crochet stitches around the lower edge. For a more elastic-looking finish, you can use half double crochet stitches, keeping the tension consistent. Avoid making the brim too tight, as this can cause the opening to contract excessively.
Once the brim is complete, fasten off the yarn and leave a short tail. Use your yarn needle to weave the tail through the stitches on the inside of the beanie. Secure it carefully and trim any excess yarn. Check that the brim is even and that there are no loose ends visible.
For an extra decorative touch, make a small pom-pom using a little yarn in a matching or contrasting color. Wrap yarn around two fingers several times, carefully remove the bundle, and tie it tightly in the middle with another piece of yarn. Cut the loops and trim the strands until the pom-pom looks round and even.
Attach the pom-pom securely to the top of the beanie using a yarn needle. Pass the yarn through the center of the crown and fasten it firmly on the inside. Your mini crochet hat pattern is now complete. Gently shape the hat with your fingers and adjust the brim to create the appearance you prefer.
Creative Decoration Ideas and Ways to Customize Your Crochet Mini Beanie
One of the most enjoyable parts of the Crochet Mini-Beanie Pattern for Decoration is discovering how many different ways you can customize the finished piece. A simple change in color or yarn texture can completely transform the appearance of the miniature hat. You can make a collection of matching beanies or create individual designs for different decorative occasions.
For Christmas decorations, traditional red and white combinations are especially charming. Crochet the body of the hat in red yarn and finish the brim and pom-pom in white. Green, gold, silver, and cream are also beautiful alternatives. These miniature hats can be displayed on a Christmas tree, attached to decorative wreaths, or incorporated into festive table arrangements.
A crochet mini-beanie ornament can also become a lovely handmade gift. Create several hats in different colors and place them in a small decorative box. They can be used as small seasonal decorations or personalized gifts for friends and family who appreciate handmade crafts. You can also attach a hanging loop to make each beanie suitable for display.
If you enjoy making garlands, crochet several miniature beanies using coordinated colors. Attach them to a longer piece of yarn, leaving a little space between each hat. Alternate the colors or repeat a particular pattern to create a balanced appearance. This decoration works especially well for shelves, craft rooms, seasonal displays, and party decorations.
Another idea is to create striped mini beanies. Change colors every two or three rounds to produce horizontal stripes. You can use two contrasting shades for a classic appearance or several complementary colors for a more playful design. To make clean color changes, complete the final yarn-over of the last stitch with the new color.
You can also experiment with different brim styles. A simple single crochet brim gives the hat a compact appearance, while a half double crochet brim creates a slightly taller edge. For a folded brim, work additional rounds at the bottom and fold the edge upward. Secure the fold with a few discreet stitches if necessary.
Texture is another way to personalize your decorative crochet beanie. Try using back-loop-only single crochet stitches for a subtle ribbed appearance. This technique involves inserting the hook into the back loop of each stitch rather than both loops. It creates horizontal ridges that add visual interest to the hat.
For a rustic design, choose neutral yarn colors and leave off the pom-pom. Beige, brown, cream, and muted green can create a natural appearance that complements wooden decorations and handmade home accessories. A small embroidered star or simple stitched detail can add personality without making the design too complicated.
You can even create miniature themed collections. Make one set in winter colors, another in pastel shades, and a third in bright colors for birthday decorations. Since the crochet mini-beanie pattern for decoration requires relatively little yarn, it is a practical way to explore new combinations without committing to a large project.
Finishing Tips, Common Mistakes, and Frequently Asked Questions
Finishing your Crochet Mini-Beanie Pattern for Decoration carefully is important because miniature projects make small details more noticeable. Before considering the hat complete, examine the crown, sides, and brim. Make sure the stitches are consistent and that the shape is balanced. If necessary, use your fingers to adjust the loops and gently reshape the fabric.
One common mistake is increasing too quickly or forgetting an increase. This can make the crown uneven or cause it to curl in an unexpected way. Use a stitch marker and count your stitches at the end of each increase round. Keeping track of the stitch count is one of the easiest ways to achieve a symmetrical result.
Another issue is crocheting with very loose tension. Because decorative mini beanies are small, loose stitches can make the fabric look irregular and allow the filling or decorative elements behind the stitches to become visible. Try using a slightly smaller hook if your stitches are too loose, while making sure you can still insert the hook comfortably.
Crocheting too tightly can also create difficulties. Extremely tight stitches make it harder to work into the next round and can cause the hat to become smaller than expected. Maintain a comfortable grip on your hook and yarn, allowing the stitches to move naturally along the hook.
If the finished hat looks too short, simply add more rounds of single crochet before making the brim. If it looks too tall, remove one or two rounds from the straight section. These small adjustments allow you to customize the mini crochet beanie pattern without changing the basic construction.
For a polished result, weave in every loose yarn end carefully. Avoid leaving long tails inside the hat, particularly if the finished decoration will be handled frequently. If you are making ornaments for households with children or pets, avoid detachable small decorations and ensure every attachment is secure. These miniature pieces are intended as decorations, not toys for unsupervised young children.
Frequently Asked Questions
1. Is the Crochet Mini-Beanie Pattern for Decoration suitable for beginners?
Yes! This pattern is suitable for beginners who know how to make basic crochet stitches. The project uses a magic ring, single crochet, increases, slip stitches, and simple finishing techniques. If you are still learning, practice the magic ring and increase stitches separately before beginning the complete project.
2. What yarn is best for a crochet mini-beanie?
Cotton and acrylic yarn are both good choices. Cotton provides clear stitch definition and a firm appearance, while acrylic yarn is soft, lightweight, and available in many colors. Choose a yarn that works comfortably with your crochet hook.
3. How much yarn do I need to make a miniature crochet hat?
Very little yarn is required. Depending on the yarn thickness, hook size, and final dimensions, you can often make several mini beanies from a small leftover yarn ball. This makes the pattern ideal for using yarn scraps.
4. How can I make my mini-beanie smaller?
Use a thinner yarn and a smaller crochet hook, or stop increasing the crown earlier. For example, finishing the increase rounds at 18 or 24 stitches will produce a smaller hat than continuing to 30 stitches. You should also reduce the number of straight rounds to maintain balanced proportions.
5. Can I make the mini-beanie without a pom-pom?
Absolutely! A pom-pom is optional. The beanie looks attractive with a simple rounded crown, a contrasting brim, or a small embroidered detail. Leaving off the pom-pom can also create a cleaner, more minimalist appearance.
6. How do I attach a hanging loop to my crochet mini-beanie?
Cut a short piece of yarn, fold it in half, and pass the ends through a stitch at the top of the hat. Tie the ends securely on the inside and weave them through nearby stitches. Check that the loop is firmly attached before hanging the decoration.
7. Why is my crochet mini-beanie curling at the top?
Curling can occur when the crown does not have enough increases or when your stitches are too tight. Check your stitch count and compare the shape with the instructions. A slightly larger hook may also help if your tension is particularly tight.
8. Can I use this pattern to make Christmas tree ornaments?
Yes! This crochet mini-beanie ornament is ideal for Christmas decorations. Use festive colors, add a small pom-pom, and attach a hanging loop. You can create a coordinated collection in different colors and display the hats throughout your seasonal decorations.
9. How can I make a striped mini crochet beanie?
Change yarn colors after completing a round or every two rounds. Join the new yarn when finishing the last stitch of the previous color. Keep the yarn tails on the inside and weave them in carefully to create a neat finish.
10. Can I sell mini crochet beanies made with this pattern?
You can generally create handmade items for personal use or sale, provided you respect any applicable rights associated with patterns, designs, and materials you use. If you intend to sell your finished decorations, make sure your product descriptions accurately explain the materials, dimensions, and intended decorative use.
11. How do I keep my crochet mini-beanie in good shape?
Store the finished hats in a clean, dry container away from excessive moisture and direct sunlight. Avoid crushing the crown or pom-pom under heavy objects. If necessary, gently reshape the hat with your fingers before displaying it again.
12. Can I use different crochet stitches for the brim?
Yes! Single crochet, half double crochet, and slip stitches can all be used to create different finishes. Back-loop-only stitches are particularly useful if you want a ribbed appearance. Experiment with small samples to find the texture you prefer.
Conclusion
The Crochet Mini-Beanie Pattern for Decoration is a delightful project that combines simple crochet techniques with endless creative possibilities. Throughout this tutorial, you learned how to choose suitable yarn and tools, create an adjustable magic ring, increase the crown, crochet the sides, finish the brim, and add an optional pom-pom.
You also discovered how to customize your mini crochet beanie with different colors, stripes, textures, and decorative details. These miniature hats can become beautiful Christmas ornaments, handmade gift decorations, colorful garlands, and charming additions to seasonal displays. Because they require very little yarn, they are also an excellent project for using leftover materials.
The most important thing is to enjoy the process and experiment with your own ideas. Once you understand the basic construction, you can easily change the dimensions, colors, and finishing details to create a collection of unique handmade decorations.If you enjoyed this Crochet Mini-Beanie Pattern for Decoration, leave your honest opinion in the comments! Tell us how your mini beanie turned out, which colors you chose, and what decorative ideas you would like to try next. Your suggestions and experiences are valuable and can inspire other crochet enthusiasts to create their own beautiful miniature hats.