
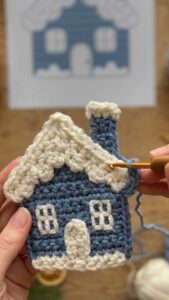
The Crochet gingerbread house pattern for decoration is a delightful holiday project that brings the warmth, sweetness, and magic of Christmas into your home.
One of the best things about this Crochet gingerbread house pattern for decoration is that it can be adapted to different sizes, color combinations, and decorative styles.
This crochet gingerbread house is also an enjoyable opportunity to practice several useful crochet techniques. You will work with basic stitches, simple shaping, separate fabric panels, decorative borders, and small embellishments that bring the design to life. Beginners who already understand basic crochet stitches can follow the instructions carefully, while more experienced crocheters can experiment with additional textures and details. The pattern below explains the materials, construction process, and finishing techniques step by step so you can create a beautiful gingerbread house crochet decoration with confidence.
Materials, Crochet Stitches, and Preparation for Your Gingerbread House
Before beginning your Crochet gingerbread house pattern for decoration, gather all the necessary materials. Having everything prepared will make the project easier to follow and help you maintain consistent stitches throughout the construction process. Choose materials that complement the traditional gingerbread appearance while providing enough structure for the house to stand attractively.
For the main body, use medium-weight cotton or acrylic yarn in a warm gingerbread brown shade. White yarn will represent the icing, while small amounts of red, green, yellow, and pink can be used for candy decorations. Cotton yarn is particularly useful when you want clearly defined stitches and a firm finish, whereas acrylic yarn offers softness and a wide selection of festive colors.
You will also need a crochet hook appropriate for your chosen yarn, preferably slightly smaller than the hook recommended on the yarn label. A tighter stitch helps prevent stuffing from showing through the fabric. Prepare fiberfill stuffing, a yarn needle, stitch markers, scissors, and a measuring tape. Small pieces of felt or embroidery thread can also be useful for adding decorative details.
The following abbreviations use standard US crochet terminology: ch means chain, sc means single crochet, hdc means half double crochet, dc means double crochet, sl st means slip stitch, inc means increase, dec means decrease, and MR means magic ring. If you are accustomed to UK crochet terminology, remember that US single crochet is equivalent to UK double crochet.
For this project, you will create the front and back walls, two side walls, and two roof panels. These pieces will be joined to form a three-dimensional house. The suggested finished size is approximately 6 to 8 inches tall, depending on your yarn, hook, and tension. You can adjust the dimensions by adding or removing stitches and rows, provided that the corresponding panels remain proportional.
Before starting, make a small gauge swatch using your brown yarn. Crochet several rows of single crochet and check whether the fabric feels firm without becoming excessively stiff. Consistent tension is especially important because the walls and roof panels need to fit together neatly. Once your materials and measurements are ready, you can begin creating the individual parts of your gingerbread house crochet pattern.
Step-by-Step Crochet Gingerbread House Pattern for Decoration
The first step is to crochet the front wall of your gingerbread house. Using brown yarn, chain 21. Starting in the second chain from the hook, work 20 single crochet stitches across the row. Chain 1 and turn at the end of each row. Continue working single crochet stitches until you have completed approximately 24 rows. This creates a rectangular front wall with a firm and even texture.
To shape the upper part of the house, you will create a triangular roofline above the rectangular wall. After completing the main rectangle, mark the center stitches along the top edge. Work the first section of the roofline by decreasing one stitch at the beginning and end of each row, keeping the center symmetrical. Continue until the upper section reaches a point. Fasten off and weave in the yarn ends securely.
Next, crochet the back wall using the same instructions as the front wall. Matching dimensions are important because the two panels will be joined later. You can place the completed front panel over the back panel to check that their edges and roof shapes align. If necessary, make small adjustments before proceeding.
For the side walls, use brown yarn and chain 13. Work 12 single crochet stitches across the row and continue for approximately 24 rows. Make two identical panels. These rectangular pieces will connect the front and back walls, creating the depth of your decorative house. Keep the edges straight so that the assembly process is easier.
Now prepare the roof panels. With brown yarn, chain 16 and work 15 single crochet stitches across. Continue for approximately 20 rows, creating a rectangular panel. Make a second identical panel. These pieces will form the two sloping sides of the roof. For a more decorative appearance, you can use half double crochet stitches for the final few rows to create a slightly different texture.
The next step is to add the white icing details. Using white yarn, attach your hook to the lower edge of the front wall. Work a decorative border using a combination of single crochet and chain stitches. For a scalloped effect, try the following sequence: [sc, ch 3, sl st in the same stitch, skip 1 stitch], repeating across the edge. This creates small rounded icing decorations that resemble frosting dripping from a traditional gingerbread house.
For the roof, crochet a separate white border along the sloping edges. You can use the same scalloped technique or create longer decorative points by working additional chains between slip stitches. Keep the white edging consistent on both roof panels so the finished house looks balanced. This small detail makes the Crochet gingerbread house pattern for decoration especially attractive.
To create the door, use brown yarn in a slightly darker shade or a contrasting caramel color. Chain 9 and work 8 single crochet stitches across. Continue for approximately 12 rows to create a small rectangular piece. Round the upper corners by working a few decreases near the top, or leave the piece rectangular for a simpler design. Add a white border around the door using slip stitches or single crochet.
For the windows, make two small squares using white or cream yarn. Start with a magic ring or chain 2 and work 6 single crochet stitches into the ring. Increase evenly in the following rounds until you obtain a small square-like shape. Alternatively, crochet a small rectangle using chain stitches and single crochet rows. Embroider a cross in the center with white yarn to represent traditional window frames.
Once all the individual pieces are complete, arrange them on a flat surface before joining them. Attach the front wall to one side wall using a yarn needle and matching brown yarn. Continue joining the back wall and the remaining side panel. Use mattress stitch or whip stitch, keeping the seams secure and evenly spaced. At this stage, the structure should resemble an open-bottomed box with a peaked front and back.
Before closing the house completely, add a small amount of fiberfill stuffing if you want a soft three-dimensional decoration. Distribute the stuffing evenly, avoiding excessive pressure that could distort the walls. You can also insert a lightweight cardboard or plastic canvas support inside the base if you prefer a firmer structure. Make sure any internal support is completely covered and cannot be seen from the outside.
Attach the two roof panels along their upper edges to create the familiar peaked roof. Position the roof carefully so that it sits evenly over the front and back walls. Sew the lower roof edges to the top of the side walls, adjusting the placement as needed. Avoid pulling the yarn too tightly because this may cause the roof to become uneven.
Finally, decorate the house with colorful crochet candies, embroidered details, and small festive embellishments. Use red and green yarn to create tiny circles, bows, or decorative strips. Add a white snow effect along the roofline using small stitches. These finishing touches transform a simple crochet structure into a charming gingerbread house decoration suitable for Christmas displays.
Decorating, Customizing, and Finishing Your Crochet Gingerbread House
The decorative stage is where your Crochet gingerbread house pattern for decoration becomes truly personal. Traditional gingerbread houses often feature white icing, colorful candies, and playful architectural details. You can reproduce this appearance using crochet techniques, embroidery, and carefully selected yarn colors. Start by arranging the decorative elements before attaching them permanently so you can experiment with different compositions.
One beautiful idea is to create small candy buttons using colorful yarn. To make a simple candy, form a magic ring and crochet 6 single crochet stitches into it. Join with a slip stitch and fasten off. Make several candies in different colors and sew them onto the front wall, around the windows, or along the roof. Small crocheted circles provide a soft and coordinated alternative to plastic embellishments.
The windows can be decorated with additional icing details. Use white embroidery thread to create small lines around the edges, or crochet tiny scalloped borders. You can also add a contrasting color behind the window frames to create the impression of warm light inside the house. Yellow or cream yarn works particularly well for this effect.
Another attractive feature is a decorative chimney. Crochet a small rectangular tube using brown yarn and join its edges to create a hollow shape. Attach it to one side of the roof, making sure it is securely stitched. Add a white border at the top to imitate snow or icing. A tiny red or green detail can make the chimney look even more festive.
For a snowy roof, use white yarn to create textured stitches along the upper surface. Small clusters of single crochet stitches can represent snow-covered sections. You can also crochet small white circles and sew them onto the roof to create the appearance of snowflakes. Keep the details relatively small so that the overall shape of the house remains visible.
If you want a more elegant decoration, consider using a limited color palette. Brown, cream, white, and muted red create a traditional handmade appearance. For a playful Christmas design, introduce brighter green, pink, turquoise, and yellow details. You can even make several houses in different colors to create a miniature crochet Christmas village.
After all the decorations have been attached, inspect the seams and weave in every loose yarn end. Check that the roof is firmly connected, the door and windows are secure, and the house maintains its intended shape. If the structure looks slightly uneven, gently adjust the stuffing or reshape the fabric with your hands. Avoid applying excessive heat or using unsuitable washing methods, especially when the decoration contains stuffing or additional materials.
Frequently Asked Questions About the Crochet Gingerbread House Pattern for Decoration
1. Is the Crochet gingerbread house pattern for decoration suitable for beginners?
Yes! This project can be suitable for beginners who already know basic crochet stitches, such as chain, single crochet, slip stitch, and simple increases and decreases. The construction involves several separate pieces, so patience and careful assembly are important. Beginners can simplify the design by using rectangular walls, a basic triangular roof, and simple embroidered decorations.
2. What yarn is best for making a crochet gingerbread house?
Medium-weight cotton or acrylic yarn is a good choice. Cotton provides excellent stitch definition and creates a firm structure, while acrylic yarn is soft, lightweight, and available in many festive colors. Choose brown yarn for the gingerbread walls, white for icing, and small quantities of colorful yarn for the candies and other details.
3. Can I make the gingerbread house without stuffing?
Absolutely. If you prefer a flat decorative ornament, you can crochet the front and back pieces and join them without adding fiberfill. However, stuffing helps create a more dimensional appearance. Another option is to use lightweight internal support to maintain the shape without making the house too soft.
4. How do I make the crochet gingerbread house stand upright?
The most effective approach is to create firm stitches and provide support inside the structure. A small piece of plastic canvas or lightweight cardboard can help stabilize the base. You can also distribute fiberfill evenly throughout the walls. Make sure the base is flat and the roof panels are attached symmetrically.
5. How can I make the roof look like real gingerbread icing?
Use white yarn to create scalloped borders along the roof edges. A combination of single crochet, chain stitches, and slip stitches produces an attractive frosting effect. You can also add small white crochet clusters to imitate snow or decorative icing patterns.
6. Can I change the size of the gingerbread house?
Yes. To make a larger house, increase the number of starting chains and crochet additional rows. Remember to adjust the side walls and roof panels proportionally. For a miniature version, use thinner yarn and a smaller crochet hook. Always check the dimensions of the individual pieces before assembly.
7. How long does it take to complete this crochet decoration?
The time required depends on your crochet experience, yarn thickness, and the amount of decoration you choose. A simple version may take several hours, while a detailed house with candy embellishments, embroidered windows, and a decorative chimney may require multiple crafting sessions. Working in stages makes the project easier to manage.
8. Can I use the crochet gingerbread house as a Christmas tree ornament?
Yes, especially if you make a smaller and lightweight version. Add a secure hanging loop made from chains or a strand of matching yarn. Attach it firmly to the roof or upper part of the house. Before hanging it, check that the loop can support the finished decoration.
9. How should I clean and store my crochet gingerbread house?
For routine maintenance, gently remove dust using a soft brush or a clean, dry cloth. If the yarn and other materials allow washing, follow the care instructions for the yarn and clean the decoration carefully. Allow it to dry completely before storing. Keep the house in a dry container away from excessive pressure so that the roof and decorative elements retain their shape.
10. Can I sell gingerbread houses made with this crochet pattern?
You can create handmade decorations for personal use or consider selling your finished creations, provided that you comply with the applicable rules for your pattern source and materials. If you are using an original design, keep your pattern documentation and clearly describe the handmade nature of your product. Always provide accurate information about dimensions, materials, and care instructions.
11. What can I use instead of crocheted candy decorations?
You can use embroidered circles, small fabric appliqués, or securely attached felt shapes. However, consider the intended use of the decoration. If the house will be displayed in a home with young children or pets, avoid small detachable pieces that could present a choking hazard.
12. Can I create an entire Christmas village using this pattern?
Definitely! One of the most enjoyable possibilities is to make several houses in different sizes and color combinations. You can add crocheted trees, snow-covered roofs, tiny doors, and decorative pathways to create a coordinated Christmas village. Using the same basic construction method will help the pieces look harmonious while allowing each house to have its own personality.
Conclusion
The Crochet gingerbread house pattern for decoration is a wonderful handmade project that combines creativity, traditional Christmas colors, and enjoyable crochet techniques. Throughout this tutorial, you learned how to prepare your materials, crochet the front and back walls, create the side panels, construct the roof, and assemble the individual pieces into a three-dimensional decorative house. You also discovered how to add white icing borders, colorful candies, windows, doors, and other charming details that make the finished project special.
Whether you are an experienced crocheter or a beginner looking to develop new skills, this project offers plenty of opportunities to experiment with stitches, textures, and festive decorations. You can follow the suggested instructions or customize the dimensions and colors to create a unique gingerbread house that matches your Christmas style.
The best part of handmade decorations is that every finished piece carries a little of the time, patience, and creativity invested in making it. Your crochet gingerbread house can become part of your annual Christmas decorations, a thoughtful handmade gift, or the beginning of a beautiful miniature holiday village.Have you tried making a Crochet gingerbread house pattern for decoration? We would love to hear your sincere opinion! Leave a comment sharing your experience, the colors you would choose, or any suggestions you have for improving this pattern. Your ideas and feedback can inspire other crochet enthusiasts to create their own beautiful Christmas decorations.