
Crochet baby shoe pattern projects are among the most rewarding creations for crochet enthusiasts. Whether you are making a thoughtful baby shower gift, preparing handmade accessories for your little one, or simply expanding your crochet skills, a beautiful Crochet baby shoe pattern offers the perfect combination of creativity, practicality, and charm.
Handmade baby shoes have become increasingly popular because they combine comfort with personality. Unlike mass-produced items, crocheted baby shoes can be customized with different yarn colors, decorative buttons, flowers, bows, or simple minimalist finishes.
One of the greatest advantages of following a Crochet baby shoe pattern is that it is suitable for crocheters of different experience levels. Beginners can practice fundamental stitches while advanced crocheters can personalize the design with unique textures and embellishments. Throughout this guide, you will learn each stage of the project, understand the stitch sequence, discover helpful finishing techniques, and gain confidence to create beautiful baby shoes that are soft, durable, and comfortable.
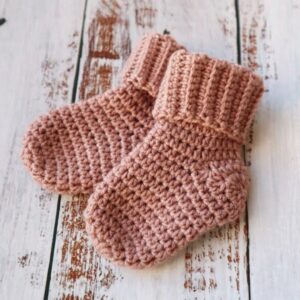
Materials and Preparing Your Crochet Baby Shoe Pattern
Before beginning your Crochet baby shoe pattern, gather all of your supplies. A soft baby-friendly yarn is the best choice because it feels gentle against delicate skin while remaining durable enough for everyday use. Cotton blends and premium acrylic yarns are excellent options since they are lightweight, washable, and maintain their shape after repeated use.
Select a crochet hook that matches your yarn weight. Most baby shoe patterns work beautifully with hooks ranging from 3.0 mm to 4.0 mm, depending on the desired size and stitch tension. Always make a small sample swatch if you’re unsure about your gauge, as consistent tension helps both shoes turn out identical.
Additional supplies include scissors, a yarn needle for weaving in ends, stitch markers, and a measuring tape. These simple tools make the finishing process much easier and help maintain accurate sizing throughout the project.
Choosing the color is another enjoyable step. Soft neutrals like cream, beige, white, and gray create timeless baby shoes, while pastel pink, blue, mint, lavender, and yellow produce cheerful nursery accessories. Many crocheters also enjoy combining two complementary colors for a modern appearance.
Before crocheting, familiarize yourself with the stitch abbreviations commonly used in a Crochet baby shoe pattern. Understanding each abbreviation will help you work confidently without constantly stopping to interpret instructions.
Common crochet stitch abbreviations include:
Foundation Chain: Ch
Slip Stitch: Sl St
Single Crochet: Sc
Half Double Crochet: Hdc
Double Crochet: Dc
Increase: Inc (2 stitches in one stitch)
Decrease: Dec (Crochet two stitches together)
Working in Back Loop Only: BLO
Working in Front Loop Only: FLO
Step-by-Step Crochet Baby Shoe Pattern Instructions
The foundation begins with the sole. Start by creating a foundation chain that matches the desired baby size. Most newborn shoes begin with approximately 10 to 12 chain stitches, although sizes can be adjusted depending on age and yarn thickness.
Round 1:
Ch 11.
Sc in second chain from hook.
Sc in next 8 stitches.
5 Sc in last chain.
Continue along opposite side of foundation chain.
Sc in next 8 stitches.
3 Sc in final stitch.
Join with Sl St.
Round 2:
Ch 1.
Inc in first 2 stitches.
Sc across.
Inc in next 5 stitches around toe.
Sc across opposite side.
Inc in final 3 stitches.
Join with Sl St.
Round 3:
Ch 1.
Sc around.
Place increases evenly at both rounded ends.
Join with Sl St.
Once the sole reaches the correct dimensions, begin building the sides. This transition is achieved by working one complete round in the back loops only. This creates a neat edge that naturally folds upward to form the shoe walls.
Round 4:
Ch 1.
Sc in BLO around entire sole.
Join with Sl St.
Continue building the body.
Round 5:
Ch 1.
Sc around.
Join.
Round 6:
Ch 1.
Sc around.
Join.
Now begin shaping the toe.
Round 7:
Ch 1.
Sc to center front.
Work Dec repeatedly across the toe area.
Continue Sc around remaining stitches.
Join.
Round 8:
Repeat toe decreases until the opening reaches the desired width while maintaining smooth sides.
After shaping the toe, create the upper section.
Round 9:
Ch 1.
Sc around.
Join.
Round 10:
Hdc around for a decorative finish or continue with Sc for a classic look.
Finish by fastening off, leaving a long tail for weaving securely into the inside of the shoe.
Repeat the entire sequence for the second shoe while counting stitches carefully to ensure both shoes match perfectly.
Customizing and Perfecting Your Crochet Baby Shoe Pattern
One of the best features of a Crochet baby shoe pattern is its versatility. Once you understand the basic construction, you can personalize each pair with countless decorative elements that make every project unique.
Small crochet flowers are one of the most popular embellishments. They can be sewn near the ankle opening or placed on the toe to create a delicate and elegant appearance. Tiny leaves can also be added for extra texture without making the shoes bulky.
Crocheted bows provide another timeless decoration. Simple rectangles gathered in the center can be attached securely to produce adorable baby footwear suitable for everyday wear or special occasions.
Color changes offer endless possibilities. Alternate rounds in different shades or create striped soles with solid-colored uppers. Neutral colors paired with soft pastel trims create especially attractive handmade gifts.
Texture stitches can also enhance the overall design. Instead of using only single crochet stitches, you can alternate with half double crochet or create subtle ribbing by working in back loops only for selected rounds.
Always prioritize safety when decorating baby shoes. Avoid loose beads, detachable buttons, or decorations that could become choking hazards. Secure every embellishment firmly with strong yarn and multiple stitches.
Tips for Success, Care Instructions, and Frequently Asked Questions
Maintaining even tension throughout the project is one of the most important aspects of creating symmetrical baby shoes. Try to crochet in a relaxed manner without pulling the yarn too tightly, especially around the toe decreases where uneven stitches become more noticeable.
Blocking is optional for baby shoes, but lightly shaping them after completion helps produce a polished finish. Simply dampen the shoes slightly and allow them to dry naturally while maintaining their intended shape.
Wash finished baby shoes gently using mild detergent and cool water. Hand washing preserves the stitches, softness, and overall appearance much better than machine washing, especially if decorative details have been added.
Store the shoes flat in a clean, dry location. Because they are small, many crocheters keep them inside fabric gift bags or decorative boxes until they are ready to be gifted or worn.
As your crochet experience grows, experiment with different yarn textures, color combinations, and ankle styles. Some versions include straps with crocheted loops, while others feature folded cuffs or boot-style tops for colder seasons.
Most importantly, enjoy the creative process. Every completed pair improves your skills while producing a meaningful handmade item that families will appreciate for years to come.
Frequently Asked Questions
Is this Crochet baby shoe pattern suitable for beginners?
Yes. The pattern mainly uses basic stitches such as chain, single crochet, half double crochet, increases, and decreases, making it an excellent beginner-friendly project.
How much yarn is needed?
One skein of baby yarn is usually enough to complete several pairs because baby shoes require only a small amount of material.
What yarn works best?
Soft cotton, cotton blends, or premium baby acrylic yarns provide excellent comfort, flexibility, and durability.
Can I make different sizes?
Absolutely. Simply adjust the foundation chain length and increase the number of shaping rounds while maintaining the same construction method.
How do I ensure both shoes are identical?
Count every stitch carefully, use stitch markers, and compare measurements after each completed round before moving forward.
Can I wash crocheted baby shoes?
Yes. Gentle hand washing with mild soap is recommended to preserve softness and maintain the original shape.
Are crochet baby shoes safe for newborns?
Yes, provided that all decorative elements are securely attached and no small detachable pieces are used.
Can I sell baby shoes made from this pattern?
Many crocheters create handmade baby shoes for craft fairs and small businesses. Always ensure your finishing quality is consistent and your materials are safe for babies.
Conclusion
Creating a Crochet baby shoe pattern is an enjoyable project that combines creativity, practical skills, and thoughtful craftsmanship.
Throughout this guide, you learned how to prepare the necessary materials, understand the essential crochet abbreviations, build the sole, shape the sides, form the toe, complete the upper section, and customize the finished shoes with beautiful yet safe decorative details.
With regular practice, you’ll gain confidence to experiment with different sizes, colors, and finishing styles while producing comfortable handmade footwear for babies. Every completed pair becomes a heartfelt keepsake that reflects your dedication and creativity. If you enjoyed this tutorial, please leave your honest opinion, share your experience with this pattern, and feel free to suggest ideas or techniques you would like to see in future crochet guides.