
Pattern for Making Crocheted Slippers is one of the most rewarding crochet projects for beginners and experienced crafters alike.
Crocheting slippers is an enjoyable process because it combines simple stitches with creative shaping techniques. Unlike many large crochet projects, slippers can be completed in a relatively short amount of time, making them ideal for weekend crafting sessions.
Another advantage of making crocheted slippers is their versatility. They can be made for adults, children, and even babies with only minor adjustments to the stitch count and measurements. Soft yarns create warm winter slippers, while lightweight cotton yarn produces breathable slippers suitable for warmer seasons. As you continue reading, you will discover a detailed step-by-step guide that helps you understand each stage of the project while maintaining a professional finish that lasts through everyday use.
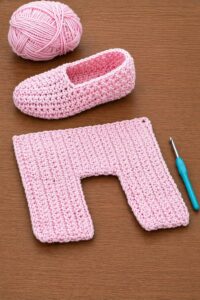
Choosing Materials and Preparing Your Crochet Project
The first step in any successful Pattern for Making Crocheted Slippers is selecting the right yarn. Medium-weight worsted yarn is often recommended because it creates a sturdy fabric while remaining soft and comfortable. Acrylic blends provide warmth and durability, while cotton blends offer breathability and excellent stitch definition.
A crochet hook that matches your chosen yarn is equally important. Most worsted-weight yarn works well with a 5 mm (H-8) hook, although you should always make a small swatch first. Proper tension ensures your slippers fit comfortably without becoming too loose after use.
Before beginning, gather a tapestry needle, stitch markers, scissors, and a measuring tape. These simple tools make shaping, sewing, and finishing much easier while helping maintain consistent stitch placement throughout the project.
Taking accurate foot measurements is essential. Measure the total foot length, the widest part of the foot, and the heel circumference. Recording these measurements before crocheting reduces the need for adjustments later.
Practice a few basic stitches before starting if you are new to crochet. The chain (ch), single crochet (sc), half double crochet (hdc), double crochet (dc), and slip stitch (sl st) are the primary stitches used in many slipper designs.
Creating a small gauge swatch is highly recommended. Crochet approximately 15 stitches and several rows, then measure the finished fabric. Matching the recommended gauge helps ensure the final slippers fit as expected.
Step-by-Step Instructions for Making the Slippers
Begin your Pattern for Making Crocheted Slippers by creating a foundation chain of approximately 21 chains for an average women’s size. Adjust the number of chains depending on the desired slipper size while keeping the stitch pattern balanced.
Row 1: Work one single crochet (sc) into the second chain from the hook and continue placing one sc into each remaining chain. Chain one and turn your work. This forms the sole foundation.
Rows 2–10: Continue working one single crochet into every stitch across each row. Repeat until the rectangle reaches the appropriate foot length, leaving enough room for shaping the toe and heel sections.
To shape the toe, fold one short end inward and use slip stitches or a tapestry needle to join both edges neatly. This creates the rounded front section that comfortably fits the toes.
For the heel, fold the opposite end and sew approximately half of the opening together using mattress stitch or whip stitch. Leave the remaining opening large enough for the foot to slide in comfortably.
Finish the upper edge with one decorative round of half double crochet or crab stitch for added durability and a polished appearance. Weave in every loose yarn end securely before wearing your finished slippers.
Customizing Your Crocheted Slippers
One of the greatest benefits of following a Pattern for Making Crocheted Slippers is the endless customization possibilities. You can easily adapt colors to match your favorite outfits, home décor, or seasonal themes.
Adding textured stitches creates both visual interest and extra warmth. Consider using front post stitches, back loop-only rows, puff stitches, or basketweave textures to give your slippers a premium handmade appearance.
Decorative embellishments can completely transform the final design. Crochet flowers, bows, hearts, buttons, pom-poms, or simple embroidered details add personality while making each pair unique.
For extra comfort, consider sewing a fleece lining inside the slippers. This additional layer increases warmth during colder months while providing a softer feel against the feet.
If you expect frequent use, attach non-slip fabric or silicone grip dots to the bottom sole. This simple addition improves safety when walking on smooth flooring such as hardwood or tile.
Experimenting with color changes also produces beautiful results. Solid colors create a classic look, while stripes, gradients, and multicolored yarns offer a playful appearance that highlights your crochet skills.
Tips for Achieving Professional Results
Maintaining consistent tension throughout your Pattern for Making Crocheted Slippers produces even stitches and symmetrical shaping. Avoid pulling stitches too tightly, especially around the toe and heel sections.
Count your stitches at the end of every row. This simple habit prevents accidental increases or decreases that could affect the final shape and overall fit of the slippers.
Choose high-quality yarn that resists pilling and stretching. Durable fibers help maintain the slipper’s appearance even after repeated wear and gentle washing.
When sewing the slipper pieces together, use invisible mattress stitch whenever possible. This creates clean seams that remain comfortable against the foot while enhancing the overall professional finish.
Always try on the slipper before permanently fastening the heel seam. Minor adjustments at this stage can significantly improve comfort and prevent the slippers from slipping during use.
Finally, block your completed slippers lightly if the yarn fiber allows it. Blocking smooths the stitches, enhances the overall shape, and gives the finished project a polished handcrafted appearance that looks beautiful whether kept at home or presented as a gift.
FAQ About Pattern for Making Crocheted Slippers
1. Is this project suitable for beginners?
Yes. Most Pattern for Making Crocheted Slippers designs use basic crochet stitches, making them an excellent project for beginners who already know the fundamentals.
2. What is the best yarn for crocheted slippers?
Worsted-weight acrylic, acrylic blends, or cotton blends are popular choices because they provide durability, comfort, and easy maintenance.
3. How long does it take to crochet one pair?
Depending on your experience, most crafters can complete a pair within four to eight hours.
4. Can I make different sizes using the same pattern?
Absolutely. Simply adjust the starting chain length and overall sole dimensions while maintaining the same stitch pattern.
5. How do I prevent slippers from stretching?
Using the correct gauge, maintaining even tension, and selecting quality yarn greatly reduce stretching over time.
6. Can I wash crocheted slippers?
Yes. Most acrylic yarns are machine washable on a gentle cycle, while cotton slippers can usually be hand washed for maximum longevity.
7. How can I make slippers warmer?
Use thicker yarn, add a fleece lining, or crochet with textured stitches that create a denser fabric.
8. What decorations work best?
Flowers, bows, pom-poms, textured edging, and simple embroidery are all popular decorative options that personalize your slippers.
Conclusion
Creating your own Pattern for Making Crocheted Slippers is a satisfying project that combines creativity with everyday practicality.
Throughout this guide, you learned how to choose the right materials, measure correctly, crochet the sole, shape the toe and heel, finish the edges, and customize your slippers with decorative details.
You also discovered helpful techniques for achieving professional-quality results that are both comfortable and durable. With patience and regular practice, each new pair will become even more beautiful and better fitted than the last. If you enjoyed this tutorial, please leave your honest opinion in the comments and share your suggestions or favorite customization ideas. Your feedback can inspire other crochet enthusiasts and help make future projects even more enjoyable.