
Crochet bear key hider pattern is a charming project that combines decorative crochet with a simple storage idea for keeping a small key covered inside a handmade bear-shaped pouch.
Creating a Crochet bear key hider pattern is also a useful opportunity to practice several essential crochet skills within one compact project.
Another advantage of this Crochet bear key hider pattern is its flexibility. A traditional teddy bear can be created with brown or beige yarn, but there is no reason to limit yourself to realistic colors. Cream, gray, pastel pink, blue, mustard, or even multicolored yarn can produce completely different personalities. Cotton yarn provides clear stitch definition, while soft acrylic can create a slightly fluffier appearance. The pattern below uses simple stitch counts as a practical starting point, but crochet tension and yarn thickness can affect the final dimensions. Measure the key you plan to use before beginning, and remember that the finished cover should have enough room for the key to move freely without becoming excessively loose.
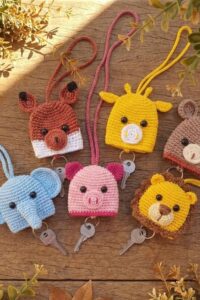
Materials, Abbreviations, and Preparation for the Bear Key Hider
For this Crochet bear key hider pattern, gather lightweight or medium-weight yarn in your preferred bear color. You will need only a relatively small amount for the main body, plus scraps in darker and lighter colors for the muzzle and facial details. A crochet hook between approximately 2.5 mm and 3.5 mm works well for many yarns used for small projects. You will also need scissors, a yarn needle, stitch markers, and a small amount of fiberfill if you want lightly padded ears or facial details.
Understanding the abbreviations before beginning will make the instructions easier to follow. This tutorial uses US crochet terminology. MR means magic ring, ch means chain, sl st means slip stitch, sc means single crochet, hdc means half double crochet, inc means increase by making two stitches into the same stitch, and dec means decrease by combining two stitches. The notation [24 sts], for example, indicates that you should have 24 stitches after completing that round.
The main bear body is worked using single crochet, which creates a dense and durable fabric. A tight fabric is particularly useful for this project because it prevents the key from easily poking through large spaces between stitches. Your tension should be firm but comfortable. Avoid pulling every stitch excessively tight, since the cover still needs enough flexibility to allow the key to move in and out.
Before crocheting, measure the key from its top to its longest point. Also measure the widest section. The finished bear cover should be slightly wider and longer than these measurements. If your key is significantly larger than an ordinary house key, you may need to add additional increase rounds or several extra body rounds. Custom measurement is more reliable than assuming that every key has identical dimensions.
A stitch marker is one of the most useful tools for this pattern. The bear body will be worked in continuous rounds, meaning that you will normally not join every round with a slip stitch. Place the marker into the first stitch and move it upward after completing each round. This simple habit makes counting easier and prevents accidental increases or decreases.
Finally, decide how you want your finished bear to look. Brown yarn with a cream muzzle creates a traditional teddy bear appearance, while a monochromatic design looks simple and modern. Choose contrasting yarn or embroidery thread for the eyes and nose so the expression remains visible. For a small handmade accessory, carefully chosen details can make a surprisingly large difference.
Crochet the Bear Head and Main Key Cover
Start at the top of the bear head. Round 1: Make an MR and work 6 sc into the ring. [6 sts] Pull the ring closed gently. Place your stitch marker into the first stitch. The center should be secure without leaving a large opening because this area will become the top of the bear.
Continue increasing the circle. Round 2: Inc in each stitch around. [12 sts] *Round 3: Sc 1, inc in next stitch; repeat from * around. [18 sts] *Round 4: Sc in next 2 sts, inc in next stitch; repeat from * around. [24 sts] These evenly distributed increases create a smooth rounded top instead of producing sharp corners.
For a slightly larger key cover, add another increase round. *Optional Round 5: Sc in next 3 sts, inc in next stitch; repeat from * around. [30 sts] If the 24-stitch circumference is already comfortably wider than your key, skip this optional increase. The goal is to create enough space without making the bear unnecessarily bulky.
Once the required width has been established, begin building the length. Body Rounds: Sc in each stitch around. [24 or 30 sts] Repeat this round approximately 10 to 16 times, depending on your yarn, tension, and key length. The fabric will gradually form a small cylindrical pouch. Continue checking the key against the cover as you crochet.
To create a slightly rounded lower section, you can add subtle shaping before finishing the main body. *Shaping Round: Sc in next 4 sts, dec over next 2 sts; repeat around as evenly as possible. The exact placement may vary according to your established stitch count. Do not close the bottom completely because the key needs an opening through which it can enter and exit the bear cover.
Finish the bottom edge with a neat round. Final Body Round: Sc evenly around without increasing. Sl st into the next stitch and fasten off. Check that the opening is wide enough for the key to slide through comfortably. If it feels too tight, undo the final shaping round and use fewer decreases. Functional movement is more important than maintaining an exact stitch count.
Make the Bear Ears, Muzzle, Face, and Key Mechanism
The ears transform the simple pouch into a recognizable bear. For the first ear, Round 1: MR, 6 sc into ring. [6 sts] Round 2: Inc in each stitch around. [12 sts] Fasten off, leaving a long tail for sewing. Make a second identical ear. You can leave the ears flat or add a tiny amount of fiberfill for extra dimension.
Position the ears near the upper sides of the head. Before sewing, pin or temporarily place both ears and compare their positions. Once satisfied, use the yarn tails to stitch them securely to the main body. Keep the stitches small and neat. Symmetrical placement generally creates a classic teddy bear appearance, although slightly uneven ears can give the bear a playful handmade personality.
For the muzzle, use cream, beige, or another contrasting color. Muzzle Round 1: MR, 6 sc into ring. [6 sts] Round 2: Inc in each stitch around. [12 sts] For a larger oval muzzle, work a few additional stitches at opposite sides rather than increasing uniformly. Fasten off with a long tail, then position the muzzle on the lower front portion of the bear’s face.
Embroider the nose onto the muzzle using dark yarn or embroidery thread. A small triangle or oval works particularly well. Add a short vertical line beneath the nose and, if desired, two tiny curved lines for the mouth. Sew the muzzle securely to the face. Lightly stuffing it before closing the final stitches can create a gentle three-dimensional effect.
For the eyes, embroidery is a practical choice because it avoids adding hard pieces to a small accessory. Use several short stitches to create two compact eyes positioned evenly above the muzzle. You can create round eyes, small vertical lines, or sleepy curved eyes depending on the expression you prefer. Secure every embroidery end carefully inside the crochet fabric.
The key hider mechanism can be created with a simple crocheted cord attached to the key ring. Join yarn near the upper interior section and ch 25–35, adjusting the length according to how far you want the key to extend from the cover. Turn and sl st into each chain back toward the body for a stronger cord. Fasten the cord securely around a key ring or suitable key attachment. The cord allows the bear cover to slide upward when you need the key and return downward when you want the key covered.
Finishing, Customizing, and Caring for Your Crochet Bear Key Hider
Before declaring your Crochet bear key hider pattern complete, test the mechanism several times. Hold the ring and gently pull the cord so the key moves out through the lower opening. Then slide the crochet bear back over the key. The movement should feel easy without requiring excessive force. If the opening catches on the key, carefully loosen or adjust the final stitches.
Inspect all seams and yarn tails. Because a key cover may be handled frequently, secure finishing is important. Thread each tail onto a yarn needle and weave it through several stitches in different directions. Trim only after you are confident the yarn cannot easily work loose. Pay particular attention to the ears, muzzle, and cord attachment.
You can personalize the bear with small crochet details. A tiny bow can be made by chaining several stitches and working short rows of single crochet. A miniature scarf can be created from a narrow crochet strip. You could also add a small heart applique, contrasting inner ears, rosy embroidered cheeks, or a patch around one eye. Keep embellishments relatively flat so the cover remains practical.
Changing yarn colors is another easy way to create variations from the same Crochet bear key hider pattern. Dark brown produces a classic woodland-inspired bear, cream creates a soft minimalist look, and gray can resemble a modern plush toy. Pastel colors are excellent for whimsical versions. Using leftover yarn makes this project particularly useful for reducing small scraps from previous crochet projects.
When cleaning the finished key cover, consider the care requirements of your yarn. Gentle hand washing is often suitable for small handmade accessories. Use mild soap and avoid aggressively twisting the crochet fabric. Reshape the bear while damp and allow it to dry completely before returning the key. Proper care helps preserve the facial embroidery and overall structure.
After completing one bear, the basic construction can be adapted to create other animal key covers. Longer ears can turn the design into a rabbit, triangular ears can suggest a cat, and different facial embroidery can create many personalities. Learning the Crochet bear key hider pattern therefore provides more than one project; it introduces a flexible foundation that can inspire an entire collection of small crochet accessories.
Frequently Asked Questions About the Crochet Bear Key Hider Pattern
Is the Crochet bear key hider pattern suitable for beginners?
Yes. This project is suitable for confident beginners who understand basic single crochet, increases, decreases, chains, and slip stitches. The small size also makes it less intimidating than a large wearable or blanket.
What is a crochet key hider?
A crochet key hider is a small decorative cover designed to surround or conceal a key when it is not being used. In this pattern, the cover resembles a teddy bear and uses a cord system so the key can slide in and out.
What type of yarn should I use?
Cotton and acrylic yarn are both practical choices. Cotton often produces crisp stitch definition, while acrylic can provide a softer appearance. Choose yarn that is durable enough to tolerate frequent handling.
What crochet hook size works best?
A hook around 2.5 mm to 3.5 mm is a useful starting range for many lightweight and medium yarns. However, always consider the yarn label and your personal tension. You want a dense fabric without making the stitches painfully tight.
How much yarn does a bear key hider require?
Only a small quantity is generally required. The exact amount depends on yarn thickness and finished size, but this is an excellent project for leftover yarn because the main body and decorative pieces are relatively small.
How do I make the bear larger?
Continue the increase sequence at the top. After Round 4 [24 sts], work Round 5: *Sc 3, inc; repeat around [30 sts]. Additional proportional increase rounds can be added if necessary. You will also need more body rounds for additional length.
How do I make a smaller version?
Use thinner yarn and a smaller hook or stop increasing at a lower stitch count. Remember to compare the crochet piece with the actual key before continuing the body.
Why is my bear becoming too wide?
You may have added an extra increase or accidentally worked two stitches into the same stitch. Count the stitches after every increase round. Using a stitch marker also helps identify the beginning of each round.
Why does the body look twisted?
Continuous crochet rounds naturally shift slightly because crochet stitches do not stack perfectly vertically. A gentle spiral is normal and contributes to the handmade appearance. Severe distortion, however, may indicate uneven tension or accidental increases.
Can I add safety eyes instead of embroidered eyes?
They can be used for decorative pieces intended for appropriate users, but embroidered details are a simple alternative for this small accessory. Embroidery keeps the surface soft and avoids adding separate hard components.
Should I stuff the entire bear?
No. The main body needs to remain open so it can accommodate the key. Only tiny decorative components, such as the muzzle or ears, may be lightly padded if desired.
How long should the crochet cord be?
Approximately 25 to 35 chains can provide a useful starting point, but the ideal length depends on your key and finished bear size. The cord needs enough movement to expose the key comfortably without being excessively long.
Can I make this pattern without a magic ring?
Yes. If you prefer not to use a magic ring, chain 2 and work the required starting stitches into the second chain from the hook. The important goal is creating a compact beginning without a large central opening.
Can I sell finished items made from this type of project?
Handmade project selling practices depend on the pattern terms you are following and the rules of the marketplace where you sell. If you are working from your own adaptation, keep accurate notes about your materials, production costs, and finished dimensions.
Can I use this pattern for other animals?
Yes. The basic pouch construction is highly adaptable. Change the ears, colors, muzzle, and embroidery to create rabbits, cats, dogs, pandas, and other playful designs.
How can I make the bear look more professional?
Consistent tension makes a major difference. Count stitches carefully, position the ears before permanently sewing them, center the muzzle, and embroider the facial details slowly. Neatly woven yarn tails and balanced proportions also improve the final appearance.
Is the key supposed to remain completely hidden?
The amount of coverage depends on the size of your key and the length of the crochet body. Adjust the number of body rounds until the key fits comfortably inside without stretching the stitches excessively.
Can I make several bear key hiders as gifts?
Yes. Their compact size makes them practical handmade gift projects. You can customize each bear with a different color, expression, embroidered detail, or accessory to create unique versions.
How do I keep the lower opening from stretching too much?
Maintain firm tension around the final rounds and avoid making the opening unnecessarily wide. If your yarn stretches considerably, you can work the final round with a slightly smaller hook while making sure the key can still pass through comfortably.
What are the most important skills used in this pattern?
The main techniques are single crochet, crochet increases, crochet decreases, continuous rounds, basic embroidery, sewing crochet pieces together, and making a simple crochet cord. These skills are useful for many small crochet and amigurumi-style projects.
Conclusion
The Crochet bear key hider pattern is a fun way to transform basic crochet techniques into a small accessory with both decorative and practical value. Throughout this tutorial, you learned how to choose suitable yarn and hook sizes, understand the main crochet abbreviations, measure your key, and establish the correct dimensions before beginning the project.You also learned how to build the bear from the top down using continuous rounds. Starting with a magic ring, the pattern gradually increases to establish the width before continuing into the main body. The lower section remains open so the key can move in and out instead of being permanently enclosed inside the crochet piece.
The decorative stages showed how a few small details can transform a basic crochet pouch into an adorable bear. Simple circular ears, a contrasting muzzle, an embroidered nose, mouth, and eyes create the character, while careful placement gives the finished project a balanced and polished appearance. You can easily change these details to give every bear its own personality.Finally, the crochet cord connects the practical key function with the decorative cover, completing the Crochet bear key hider pattern. Once you understand the construction, you can customize the size, yarn colors, facial expression, accessories, and even the animal itself. It is a useful pattern for practicing small-scale crochet construction while creating something that can be used in everyday life.
If you try this Crochet bear key hider pattern, please leave your sincere opinion about the project. Share what worked well for you, which colors you chose, and whether you made any modifications to the original construction. Suggestions for improvements and ideas for future crochet patterns are always welcome, especially when they can help inspire new creative variations of this cute handmade accessory.