
Spiral crochet sock pattern is a creative way to make comfortable handmade socks while exploring a beautiful textured construction that looks much more complicated than it actually is.
A successful Spiral crochet sock pattern begins with the right materials and a little attention to gauge. Socks experience considerably more movement than many decorative crochet projects, so choosing a yarn that feels comfortable against the skin is important.
Another advantage of learning a Spiral crochet sock pattern is the opportunity to understand crochet construction beyond simple flat rectangles. You will work in rounds, shape the toe, create the main foot section, form a heel area, and finally crochet the ankle and cuff. Each stage introduces a useful skill that can later be applied to slippers, booties, leg warmers, and other wearable projects. The instructions below provide a practical foundation rather than relying on one rigid size, allowing you to customize the sock according to your measurements. Take your time with the first sock and record any adjustments you make. When you begin the second sock, those notes will help you reproduce the same proportions and create a balanced pair.
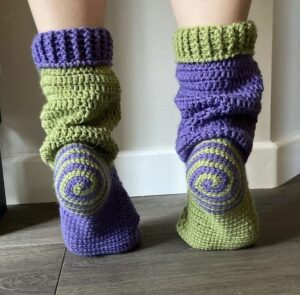
Materials, Crochet Abbreviations, Gauge, and Measurements
For this Spiral crochet sock pattern, choose a lightweight yarn that is comfortable, durable, and suitable for garments. Approximately 200 to 300 yards of yarn should be enough for many adult sizes, although the exact amount depends on foot length, ankle height, yarn thickness, and tension. A crochet hook around 3.0 mm to 3.5 mm can be a useful starting point for lightweight yarn. You will also need scissors, a yarn needle, stitch markers, and a measuring tape.
Before beginning, familiarize yourself with the main crochet stitch abbreviations used throughout the project. In US terminology, ch means chain, sl st means slip stitch, sc means single crochet, hdc means half double crochet, dc means double crochet, inc means increase, and dec means decrease. An increase normally means working two stitches into the same stitch, while a decrease combines stitches to reduce the total stitch count. These basic techniques provide almost everything needed for the sock.
The spiral effect is created primarily by working continuously in rounds without joining each round with a slip stitch. Place a marker into the first stitch of every round and move it upward as you work. Because the beginning of each round gradually shifts visually, the marker becomes extremely important. This method creates a smoother surface and prevents the obvious horizontal joining line that can appear when traditional rounds are joined.
Gauge deserves special attention when making crochet socks. Create a small test swatch using your selected yarn and hook, then compare the fabric against your foot. It should feel flexible without having large openings between stitches. If the fabric feels excessively rigid, try a slightly larger hook. If the stitches are very loose and unstable, switch to a smaller hook. Comfortable tension is more important than matching a universal gauge because yarn characteristics vary considerably.
Measure around the widest part of the foot and record the circumference. Next, measure from the tip of the longest toe to the back of the heel. Finally, measure the ankle circumference and decide how tall you want the cuff to be. Crochet fabric can stretch, so the finished circumference should usually be slightly smaller than the actual foot circumference. This gentle negative ease helps the sock stay comfortably in position.
Color choice can make the spiral crochet design especially attractive. A solid yarn makes the stitch direction easy to see, while variegated or self-striping yarn can create dramatic swirling effects without requiring frequent color changes. Two contrasting colors can also be alternated for a stronger spiral appearance. Whatever combination you choose, keep comfort and washability in mind because socks are practical garments that will need regular care.
Crochet the Toe and Build the Spiral Foot
Begin the Spiral crochet sock pattern at the toe. Create a magic ring or make 3 to 4 chains and join them into a small circle. Round 1: Work 8 hdc into the ring. Do not join. Place a stitch marker in the first hdc. [8 sts] Pull the center closed carefully. Working continuously from this point creates the foundation of the spiral structure.
For the next round, increase evenly. Round 2: Work 2 hdc in each stitch around. [16 sts] Move the marker when you reach the first stitch. *Round 3: 1 hdc in next stitch, 2 hdc in next stitch; repeat from * around. [24 sts] These increases expand the toe gradually instead of creating a flat circular disk too quickly.
Continue shaping the toe according to the width required. *Round 4: 1 hdc in next 2 sts, 2 hdc in next stitch; repeat from * around. [32 sts] For a wider sock, continue the same increase sequence by adding another regular stitch between increases on each new increase round. Try the toe section over your toes as you work. It should fit comfortably without excessive pressure or loose fabric.
Once the toe reaches the required circumference, stop increasing. Foot Round: Work 1 hdc in each stitch around. [Maintain established stitch count] Repeat this round continuously. Because you are not joining the rounds, the stitches naturally move upward in a gentle spiral. Keep the stitch marker in place so you can accurately count rounds and identify your starting point.
Continue the foot until the piece reaches approximately the point where the ankle begins, but stop before reaching the full measured foot length because space is still needed for the heel. A useful approach is to try the sock on regularly. The crocheted foot should cover the toes, ball of the foot, and most of the arch while leaving sufficient room for heel construction. Custom fitting is particularly valuable because everyone has slightly different foot proportions.
If you want the spiral to appear more pronounced, you can introduce subtle texture. For example, alternate regular hdc stitches with occasional back-loop-only rounds. Texture Round: Work 1 hdc in the back loop only of each stitch around. Follow with one or more standard rounds. Avoid making the texture excessively dense because a sock should remain comfortable. The objective is a soft visual spiral rather than a heavy raised ridge pressing against the foot.
Shape the Heel and Continue Into the Ankle
The heel is often the section that makes beginners hesitate, but breaking it into simple stages makes the process much easier. Instead of continuing around the entire sock, you will temporarily work across approximately half of the stitches in rows. If your sock has 32 stitches, for example, you might work across 16 stitches for the heel section. The exact number can be adjusted according to the wearer’s heel width.
Begin the heel flap with straightforward rows. Heel Row 1: Ch 1, turn, sc across half of the total stitches. Heel Row 2: Ch 1, turn, sc across. Repeat these rows until the flap is approximately long enough to reach from the beginning of the heel to the lower back of the foot. Keep the edges neat because stitches will later be worked along them.
Next, shape the bottom of the heel using decreases. Heel Turn Row 1: Sc across until 2 sts remain before the center, sc2tog, sc 1, turn. Heel Turn Row 2: Sc across until reaching the corresponding position on the opposite side, sc2tog, sc 1, turn. Continue working short shaping rows so the center section develops a gentle cup. The goal is to create enough depth for the heel rather than leaving a completely flat flap.
After the heel cup is formed, return to working in rounds. Crochet along the edge of the heel flap, across the unworked top-of-foot stitches, and down the opposite edge of the heel. Joining Round: Hdc evenly around the complete opening, placing stitches consistently along both heel edges. You may temporarily have more stitches than you had before beginning the heel. This is normal and provides enough room for the foot to enter the sock.
Reduce the extra stitches gradually around the sides of the ankle. Decrease Round: Work hdc around, making one hdc2tog near each side of the heel. Follow with a plain round. Repeat the decrease sequence as necessary until you return approximately to your original circumference or achieve a comfortable fit. Gradual decreases generally create a smoother transition than removing many stitches in one round.
Now continue the ankle using the same continuous-round method established earlier. Ankle Round: Work 1 hdc in each stitch around. Repeat until the ankle reaches your preferred height. Try the sock on during this stage to make sure it slides comfortably over the heel while remaining secure around the ankle. If necessary, add one or two evenly spaced increases where additional room is required.
For a decorative variation, alternate the stitch placement while crocheting the ankle. *Spiral Texture Round: Hdc in back loop of next 3 sts, regular hdc in next stitch; repeat around. Small changes like this emphasize the directional appearance without making the sock overly complicated. The texture should remain subtle enough that the inside feels comfortable against the skin.
Finish the Cuff, Adjust the Fit, and Complete the Pair
A good cuff helps the sock stay in place, so it should be flexible but slightly more fitted than the main ankle. One simple option is alternating front-post and back-post double crochet stitches. *Cuff Round 1: Ch 2, FPdc around next stitch, BPdc around next stitch; repeat around. Join with sl st. Unlike the continuous spiral body, joining the cuff rounds can make the ribbing easier to control.
Continue the ribbed cuff for several rounds. Cuff Rounds 2–5: Ch 2, FPdc around each FPdc and BPdc around each BPdc; repeat around and join. Add more rounds if you prefer a taller cuff. If post stitches feel too advanced, use back-loop-only single crochet or half double crochet instead. The important feature is enough stretch to move comfortably over the heel.
When the cuff reaches the desired height, finish the final stitch and cut the yarn, leaving a tail approximately 6 inches long. Thread the tail through a yarn needle and weave it securely through several stitches on the inside. Avoid creating a bulky knot because it could feel uncomfortable when worn. Weave in the beginning tail and any additional color-change ends in the same manner.
Inspect the finished sock before beginning the second one. Check the toe width, total foot length, heel depth, ankle circumference, and cuff height. Write these measurements down. Recording the final number of rounds in each section is even better. Crochet projects can look similar while differing by several rounds, and careful notes make it much easier to produce a matching second sock.
For the second sock, follow exactly the same Spiral crochet sock pattern, using your notes as a personal size guide. Count rounds rather than relying only on visual comparison. Yarn tension can sometimes change as you become more familiar with a pattern, so periodically place the two socks beside each other. Small differences can usually be corrected by adjusting a round before finishing.
Once both socks are complete, gently shape them by hand. If the yarn care instructions allow it, light blocking can help settle the stitches and improve the overall appearance. Avoid stretching the socks excessively during blocking because this may permanently change the fit. Allow them to dry completely in their natural shape. The spiral texture often becomes more even after the stitches have relaxed.
The completed project demonstrates how a seemingly advanced Spiral crochet sock pattern can be divided into manageable sections. The toe introduces increases, the foot develops the continuous spiral, the heel provides three-dimensional shaping, and the ankle and cuff complete the wearable structure. Once you understand these sections, experimenting with different yarns, stripe arrangements, cuff heights, and stitch textures becomes much easier.
Frequently Asked Questions About the Spiral Crochet Sock Pattern
Is the Spiral crochet sock pattern suitable for beginners?
Yes. A beginner who already understands basic stitches such as chains, single crochet, half double crochet, increases, and decreases can work through this project. The heel requires more attention than the main foot, but it becomes manageable when completed one row at a time.
Why is the sock worked continuously in a spiral?
Continuous rounds eliminate the obvious seam created when every round is joined. They also allow the stitches to flow naturally around the sock, creating the characteristic spiral appearance. A stitch marker is essential because there is no visible joined beginning or ending point.
What yarn is best for crochet socks?
A lightweight, soft, durable yarn is generally the most practical choice. The yarn should produce a comfortable fabric that can tolerate regular use. Very bulky yarn can create thick stitches that may feel uncomfortable inside shoes, although thicker yarn can work well for cozy house socks.
How much yarn do I need for one pair?
Approximately 200 to 300 yards can be a reasonable starting estimate for many adult ankle socks, but yarn requirements vary. Larger sizes, taller cuffs, thicker stitches, or complex textures may require additional yarn. Keeping an extra amount available is useful when matching two socks.
How do I make the crochet socks larger?
Increase the toe until it reaches the required circumference, then maintain that stitch count through the foot. You can also add rounds to increase the length. For a wider ankle, add one or more evenly spaced increases after completing the heel.
How can I make the socks smaller?
Stop the toe increases earlier and crochet fewer rounds through the foot section. Measure frequently rather than relying entirely on a standard stitch count. Using a slightly smaller hook may also reduce the finished size, although it can make the fabric denser.
Why does my spiral look uneven?
Uneven spirals are commonly caused by inconsistent tension or accidentally adding or skipping stitches. Count your stitches regularly and always use a marker. Maintaining approximately the same tension throughout the project will produce a smoother spiral.
Can I use single crochet instead of half double crochet?
Yes. Single crochet produces a denser and slightly firmer fabric, while half double crochet creates more height and can feel more flexible. If you substitute stitches, the number of rounds required to reach the desired length will change.
Can I make striped spiral socks?
Absolutely. Stripes are an excellent way to highlight the spiral construction. Change colors at controlled intervals, such as every two or three rounds. Self-striping yarn is another convenient option because the color transitions occur automatically while you crochet.
How do I prevent the cuff from becoming too tight?
Try the sock on before finishing the cuff and maintain relaxed tension when working ribbing. If necessary, switch to a slightly larger hook for the cuff or add a few evenly spaced stitches before beginning it. The cuff should stretch comfortably over the heel without becoming loose around the ankle.
Can these crochet socks be worn inside shoes?
That depends on yarn thickness, stitch density, and shoe fit. Lightweight yarn and relatively flat stitches create a thinner sock, while thicker yarn produces a better house sock or boot sock. Always prioritize comfort, especially around the heel and sole where bulky stitches may be noticeable.
How can I make both socks exactly the same size?
Record every important detail while making the first sock, including stitch counts, toe rounds, foot rounds, heel rows, decrease rounds, ankle rounds, and cuff rounds. Following those notes for the second sock is much more reliable than estimating the size visually.
Do I need to block crochet socks?
Blocking is optional but can improve stitch definition and help the pair look more consistent. Follow the care recommendations for your chosen yarn and avoid aggressive stretching. Gentle shaping is usually enough for a wearable project like socks.
What is the most important part of getting a comfortable fit?
Frequent measuring is the key. Crochet tension, yarn thickness, hook size, and individual foot shape all influence the final dimensions. Trying the project on during the toe, foot, heel, and ankle stages allows you to correct the fit before completing the entire sock.
Can the Spiral crochet sock pattern be customized?
Yes. Once the basic construction is understood, you can experiment with different colors, stripes, textured rounds, cuff styles, ankle heights, and yarn combinations. Keeping the fundamental measurements consistent allows you to personalize the appearance without sacrificing fit.
Conclusion
The Spiral crochet sock pattern combines practical construction with an attractive handmade texture, making it a rewarding project for crocheters who want to explore wearable designs. Throughout this tutorial, you learned how to select suitable materials, understand the essential crochet abbreviations, measure the foot, establish gauge, increase for the toe, crochet the foot continuously in a spiral, shape the heel, decrease around the ankle, and finish the project with a flexible cuff.The most important lesson is that crochet socks do not need to be intimidating. Breaking the project into the toe, foot, heel, ankle, and cuff makes every stage easier to understand. Careful measurements and consistent stitch counts are more valuable than rushing to finish, especially when creating a matching pair. After completing your first pair, you can use the same basic Spiral crochet sock pattern as a foundation for different sizes, colors, textures, and cuff styles.
Handmade socks are also a wonderful way to practice techniques that can be transferred to many other crochet projects. Continuous rounds improve your understanding of circular construction, increases and decreases teach controlled shaping, and heel construction introduces three-dimensional garment design. With patience and a few notes about your personal measurements, the pattern can become a reliable starting point for many future pairs.
If you make these spiral crochet socks, leave your sincere opinion about the pattern and how the finished project worked for you. Your suggestions are also welcome. Share which colors, yarn types, stitch textures, or modifications you would like to try, and let others know what you learned while creating your own handmade pair.