
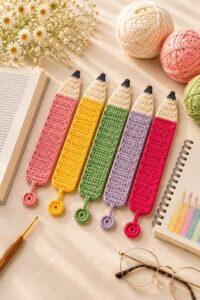
Crochet pencil-shaped bookmark pattern is a fun and practical crochet project that transforms a few small amounts of yarn into a colorful accessory for books, notebooks, journals, and planners. Designed to resemble a classic wooden pencil, this handmade bookmark can include a bright colored body, a beige sharpened section, a dark graphite tip, and even a pink eraser at the opposite end.
One of the best features of this Crochet pencil-shaped bookmark pattern is the opportunity to customize almost every detail.
Throughout this tutorial, you will learn how to create a crochet pencil bookmark from beginning to end using standard US crochet terminology. We will cover yarn selection, hook size, stitch abbreviations, the foundation chain, pencil body, pointed wooden section, graphite tip, eraser, finishing, and optional decorative details. The instructions are designed to produce a flat bookmark rather than a thick stuffed pencil, helping it sit comfortably between pages. Stitch counts are included wherever practical, but you can also adapt the dimensions to suit your preferred yarn and book size. With careful tension and neat color changes, this simple Crochet pencil-shaped bookmark pattern can become a polished handmade project that is both decorative and useful.
Materials, Crochet Stitch Key, and Getting Started
For this Crochet pencil-shaped bookmark pattern, choose a lightweight cotton or cotton-blend yarn. DK or light worsted yarn works especially well because it creates a bookmark that is sturdy without becoming excessively thick. Cotton yarn provides clear stitch definition and tends to hold a flat shape nicely. You will need approximately 10 to 15 yards for the main pencil color and only small scraps of beige, dark gray or black, pink, and optionally silver or gray yarn for the eraser band.
A crochet hook between 3.0 mm and 3.5 mm is a practical starting point, although the ideal hook depends on your yarn and personal tension. Using a slightly smaller hook than you might normally choose for the yarn can create compact stitches and a cleaner bookmark. Your additional supplies include scissors, a yarn needle, stitch markers if desired, and a measuring tape. No stuffing is required because this flat crochet bookmark is intended to remain thin.
Before beginning, become familiar with the crochet stitch abbreviations used throughout the pattern. CH means chain, SC means single crochet, SL ST means slip stitch, ST means stitch, and INC means increase by working two single crochet stitches into the same stitch. DEC means decrease, typically created with a single crochet two together, written as SC2TOG. FO means fasten off. The pattern uses US crochet terminology.
The finished pencil can measure approximately 7 to 8 inches long and around 1 to 1.25 inches wide, depending on your yarn, hook, and tension. These dimensions are only a guide. If you frequently read larger books, make the bookmark slightly longer. For smaller novels or children’s books, a shorter pencil may be more convenient. The advantage of this easy crochet bookmark pattern is that its dimensions are simple to customize.
For the main pencil body, choose your favorite color. Traditional yellow is instantly recognizable, but there is no reason your handmade pencil cannot be turquoise, lavender, coral, or bright green. The wooden section looks most convincing in beige, tan, cream, or light brown. Use charcoal gray or black for the graphite tip. A small pink section at the opposite end creates the familiar eraser appearance.
Make a small gauge swatch if you want precise dimensions, although gauge is not critical for this project. A useful approximate gauge is 5 to 6 single crochet stitches per inch with a 3.0 to 3.5 mm hook and lightweight yarn. More important than exact gauge is maintaining consistent tension. The stitches should be firm enough to create structure while remaining flexible enough for the finished bookmark to lie comfortably between pages.
Crocheting the Long Pencil Body Step by Step
Begin the Crochet pencil-shaped bookmark pattern with your main pencil color. CH 7. Starting in the second CH from the hook, work 1 SC into each chain across. You should have 6 SC. CH 1 and turn. For Row 2, SC in each of the 6 stitches across. CH 1 and turn again. These six stitches establish the width of the pencil body.
Continue repeating Row 2 until the main colored section measures approximately 4.5 to 5 inches. Keep your stitch count at 6 SC throughout this section. Depending on your yarn and tension, you may need approximately 25 to 35 rows. Rather than focusing exclusively on row count, measure the work periodically. A consistent width is more important than reaching an exact number of rows.
While crocheting the body, pay attention to the edges. Insert the hook correctly into the first and last stitch of every row so you do not accidentally add or lose stitches. Counting the six stitches after every few rows can prevent a gradually narrowing or widening pencil. Beginners sometimes overlook the final stitch because it can turn toward the side of the work, so using a stitch marker can be helpful.
To give the pencil more visual character, you can create subtle vertical details after finishing the main body. Using a slightly darker shade of the main color, surface crochet or embroider one or two narrow lines along the pencil. This optional technique suggests the faceted appearance of a real wooden pencil. Keep the decorative stitching flat so the handmade crochet bookmark does not become bulky.
When the colored body reaches the desired length, do not fasten off immediately if you plan to add an eraser to the starting edge later. Instead, finish the current working end and prepare to change to beige yarn for the sharpened wooden section. On the final SC of the colored row, begin the stitch normally but complete the final yarn-over using the beige yarn. This creates a cleaner color transition.
Check the pencil body before proceeding. Lay it flat and gently shape the edges with your fingers. The piece should resemble a long, narrow rectangle. If it curls slightly, do not worry; gentle blocking can correct minor curling at the end. However, severe curling may indicate overly tight tension. Once the body looks even, you are ready to transform the rectangular strip into a recognizable crochet pencil bookmark by adding the pointed tip.
Creating the Wooden Pencil Tip and Pink Eraser
With beige or light tan yarn attached, CH 1 and turn. Work 1 SC in each of the 6 stitches across. This first beige row creates the beginning of the sharpened wooden area. CH 1 and turn. Work another row of 6 SC if you want a slightly longer wooden section. These straight rows create a smooth transition between the painted pencil body and the sharpened tip.
Now begin decreasing. For the next row, SC2TOG over the first 2 stitches, SC in the next 2 stitches, then SC2TOG over the final 2 stitches. You should now have 4 stitches. CH 1 and turn. Work 1 SC in each of the 4 stitches. This gradual narrowing produces a balanced pencil shape rather than an abrupt triangular point.
For the next decrease row, SC2TOG twice, leaving 2 stitches. CH 1 and turn. Work 1 SC in each of those 2 stitches. At this stage, change from beige to dark gray or black yarn. The dark color represents the graphite pencil tip. Work one row of 2 SC, then decrease the final 2 stitches together to create 1 stitch. Fasten off and weave the yarn tail securely into the back.
Return to the opposite end of the bookmark to make the eraser. Attach gray or silver yarn to one corner of the foundation edge. CH 1 and work 6 SC evenly across. CH 1 and turn, then SC across again. These one or two gray rows imitate the metal ferrule that traditionally connects a pencil to its eraser. If you want a simpler design, you can skip the gray section and attach pink yarn directly.
Change to pink yarn and work 6 SC across. Repeat for another 2 or 3 rows, depending on how large you want the eraser. On the final row, you can work SC across normally for a square eraser or create slightly softened corners by using slip stitches near the outer edges. Fasten off and weave in the ends carefully. The pink section provides a cheerful finishing detail and makes the pencil-shaped crochet pattern immediately recognizable.
At this point, examine the entire bookmark. You should have a long colored pencil body, a narrowing beige wooden section, a small dark graphite point, and a contrasting eraser at the opposite end. If any section looks uneven, gently shape it by hand. Small variations are normal in handmade crochet and can add character, but careful finishing will give the final project a cleaner, more professional appearance.
Finishing, Blocking, Customizing, and Using Your Crochet Bookmark
Weaving in the yarn ends neatly is essential because this project has several color changes. Thread each tail onto a yarn needle and weave it through the back loops of nearby stitches. Change direction at least once to help secure the yarn. Trim the remaining tail close to the fabric without cutting the crochet stitches. Avoid creating large knots, since they can make the bookmark unnecessarily thick.
Gentle blocking can dramatically improve the finished appearance. For cotton yarn, lightly dampen the bookmark and arrange it on a blocking surface. Straighten the long edges, shape the wooden point, and make sure the eraser sits squarely. Allow the bookmark to dry completely before removing it. Always follow the care recommendations for your particular yarn fiber.
If you want your pencil to have a more decorative personality, embroider a tiny smile, initials, or simple line details on the colored body. These embellishments should remain relatively flat. You can also use a contrasting yarn to embroider tiny zigzags where the colored body meets the wooden section, creating the impression of a realistically sharpened pencil. Small details can turn this simple Crochet pencil-shaped bookmark pattern into a charming handmade gift.
Another customization idea is to create a complete set in different colors. Make yellow, red, blue, green, purple, and orange pencils using the same basic instructions. A collection of crochet pencil bookmarks can make a thoughtful handmade present for teachers, students, readers, librarians, or stationery enthusiasts. You can also coordinate the colors with a school theme or someone’s favorite palette.
The pattern can easily be resized. For a wider pencil, begin with CH 9 and work 8 SC across instead of 6, then adjust the decreases gradually at the pointed end. To make a longer bookmark, simply crochet additional rows before beginning the beige wooden section. For a miniature version, use thinner yarn, a smaller hook, and fewer body rows. This flexibility makes the pattern useful for many creative variations.
Once finished, slide the flat pencil between the pages of a book with either the eraser or pencil point extending slightly above the top edge. Avoid making the bookmark excessively thick or adding hard embellishments that could press against delicate pages. The simple flat construction is one of the biggest advantages of this Crochet pencil-shaped bookmark pattern, offering a practical balance between decorative crochet and everyday functionality.
FAQ About the Crochet Pencil-Shaped Bookmark Pattern
Is the Crochet pencil-shaped bookmark pattern suitable for beginners?
Yes. This is a beginner-friendly project because it mainly uses chains, single crochet stitches, simple color changes, and basic decreases. It is also small enough to complete without the time commitment required for larger crochet projects.
What crochet skill level is required?
A basic understanding of CH, SC, turning rows, changing yarn colors, and SC2TOG is sufficient. If you can make a simple single crochet rectangle, you already have most of the skills needed for this project.
What is the best yarn for a crochet bookmark?
Cotton or cotton-blend yarn is an excellent choice because it creates defined stitches and a relatively flat fabric. DK or light worsted yarn works particularly well. Very bulky yarn should generally be avoided because it can make the bookmark too thick for comfortable use inside books.
What hook size should I use?
A 3.0 mm to 3.5 mm crochet hook is a good starting range for lightweight cotton yarn. However, you should adjust the hook size according to your yarn and tension. The objective is to create firm, neat stitches without making the fabric excessively rigid.
How long should a crochet pencil bookmark be?
Approximately 7 to 8 inches is a versatile finished length for many books. You can make it shorter for small paperbacks or longer for textbooks and journals. Simply add or remove rows from the straight pencil body.
Why is my crochet bookmark curling?
Curling is often caused by tight tension or uneven edge stitches. Try relaxing your tension or using a slightly larger hook. Gentle blocking after finishing can also help flatten minor curling.
How do I keep the sides of the pencil straight?
Count your stitches regularly. If the pattern begins with 6 SC, maintain exactly 6 stitches in each main body row. Pay particular attention to the first and last stitches because these are the ones beginners most commonly miss or accidentally duplicate.
Can I make the pencil in colors other than yellow?
Absolutely. The Crochet pencil-shaped bookmark pattern can be made in virtually any color. Yellow gives it a traditional school-pencil appearance, while pink, purple, blue, green, and multicolored versions create a more playful style.
Do I need to stuff the crochet pencil?
No. This pattern is specifically designed as a flat bookmark, so stuffing is unnecessary. A stuffed pencil would be thicker and less convenient between book pages.
How do I make the pencil point?
The point is created by gradually decreasing the stitch count. Begin with 6 stitches, decrease to 4, then decrease to 2, and finally finish with a small dark graphite section. Gradual decreases create the triangular appearance of a sharpened pencil.
Can I use leftover yarn for this pattern?
Yes. This is an excellent scrap yarn crochet project. The main body requires only a small amount of yarn, while the wooden tip, graphite, ferrule, and eraser can be made from tiny leftover pieces.
Can these bookmarks be made as handmade gifts?
Certainly. Pencil bookmarks are especially appropriate for teachers, students, readers, and stationery lovers. A set of several colors can create an attractive handmade gift while allowing you to practice the same pattern repeatedly.
Can I add a tassel to the bookmark?
Yes, although keeping embellishments small and soft is recommended. A lightweight yarn tassel can be attached to the eraser end if desired. Make sure it does not make the bookmark uncomfortable to use or place unnecessary pressure on book pages.
How can I make my finished bookmark look more professional?
Maintain even tension, count your stitches, make clean color changes, weave in all yarn ends securely, and block the finished piece. Consistent edges and careful finishing usually make the greatest visual difference.
Can I change the dimensions of the pattern?
Yes. Add more foundation chains for width or additional rows for length. Remember that if you change the number of body stitches, you will also need to modify the decrease sequence so the sharpened section narrows evenly toward the graphite point.
Conclusion
The Crochet pencil-shaped bookmark pattern is a creative and approachable project that combines simple crochet techniques with a practical finished accessory. Throughout this tutorial, you learned how to select suitable yarn and a crochet hook, understand the essential stitch abbreviations, build the long pencil body, create gradual decreases for the sharpened wooden section, crochet a dark graphite tip, and finish the opposite end with a gray ferrule and colorful pink eraser.The basic stitch sequence is straightforward: CH 7, work 6 SC across, repeat rows of 6 SC until the body reaches the desired length, change to beige yarn, and gradually decrease from 6 stitches to 4, then 2, and finally 1 at the pencil point. These simple instructions make the project manageable for beginners while still providing opportunities to practice consistent tension, straight edges, color changes, decreases, and finishing techniques.
You also learned several ways to customize the crochet pencil bookmark, including changing the main pencil color, adjusting the length and width, adding embroidered details, creating sets in multiple colors, and experimenting with different yarn weights. Because the pattern requires relatively little yarn, it is an excellent way to transform leftover materials into something useful instead of leaving small scraps unused.Whether you make a traditional yellow pencil or a colorful collection, this Crochet pencil-shaped bookmark pattern offers plenty of room for creativity. It can become a useful accessory for your own books or a thoughtful handmade project for teachers, students, friends, and fellow readers.
Now it is your turn to experiment with the pattern. What colors would you choose for your crochet pencil? Leave your sincere opinion about this project and share your suggestions for future crochet patterns. Your creative ideas, color combinations, and personal variations can inspire even more ways to transform simple crochet stitches into useful handmade pieces.