
Crochet bucket hat pattern is one of the most loved and versatile projects in the world of handmade fashion, and it continues to grow in popularity among beginners and experienced crafters alike. This timeless accessory combines style, comfort, and creativity, making it a perfect addition to any wardrobe. Whether you are crafting for yourself, gifting to a loved one, or even selling your handmade creations, mastering a Crochet bucket hat pattern can open many creative possibilities while allowing you to explore different stitches, textures, and yarn combinations.
Creating a Crochet bucket hat pattern is not just about following instructions; it is about expressing your personality through yarn and design. The beauty of this project lies in its adaptability—you can make it simple and minimalist or bold and colorful depending on your taste. With the right techniques and a bit of patience, you can turn a basic pattern into a unique masterpiece that reflects your creativity. This makes crochet bucket hats a favorite project for those who enjoy both structure and artistic freedom.
Another reason why the Crochet bucket hat pattern stands out is its practicality. Bucket hats are not only trendy but also functional, offering protection from the sun while keeping you comfortable. This makes them ideal for all seasons, especially when crafted with breathable yarns. As you dive deeper into this guide, you will learn everything you need to confidently create your own crochet bucket hat, improve your skills, and even customize designs to suit different styles and preferences.
Understanding the Basics of a Crochet Bucket Hat Pattern
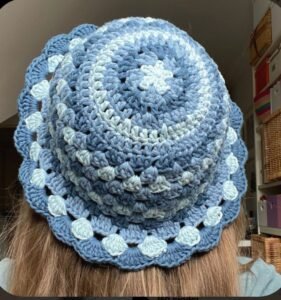
The foundation of any successful Crochet bucket hat pattern beg ins with understanding the structure of the hat. Typically, it is made in three main sections: the crown, the body, and the brim. Each section plays an important role in shaping the final look and fit of the hat. The crown starts with a magic ring or a small loop, gradually increasing to form a flat circle that sits comfortably on the top of the head.
Once the crown reaches the desired size, the next step in the Crochet bucket hat pattern is working on the body. This part is usually crocheted without increases, allowing the hat to extend downward and create depth. The body can be customized using different stitches such as single crochet, half double crochet, or even textured stitches for a more intricate look.
The brim is where creativity truly shines in a Crochet bucket hat pattern. You can make it narrow for a subtle style or wide for a more dramatic effect. Increasing stitches evenly in this section helps the brim flare outward, giving the classic bucket hat silhouette that is both stylish and functional.
Choosing the right yarn is another essential element. Cotton yarn is often preferred for a Crochet bucket hat pattern because it is breathable, durable, and holds its shape well. However, acrylic or blended yarns can also be used depending on the desired texture and season.
Hook size also plays a crucial role in achieving the correct tension. A smaller hook creates a tighter fabric, while a larger hook results in a looser and more flexible hat. Adjusting your hook size can significantly impact the final outcome of your Crochet bucket hat pattern.
Finally, understanding basic crochet techniques such as increasing, working in rounds, and maintaining consistent tension is key. These foundational skills ensure that your Crochet bucket hat pattern turns out even, comfortable, and visually appealing.
Step-by-Step Process to Create a Crochet Bucket Hat Pattern
To begin your Crochet bucket hat pattern, start by creating a magic ring and working your first round of stitches into it. This technique allows you to close the center tightly, avoiding any gaps at the top of the hat. Gradually increase stitches in each round to form a flat circle that matches the diameter of the crown.
As you continue working on the crown of your Crochet bucket hat pattern, it is important to keep track of your stitch count. Consistent increases ensure that the circle remains flat and does not curl or ripple. Using stitch markers can help you maintain accuracy and avoid mistakes.
Once the crown is complete, transition to the body by crocheting without increases. This step gives the hat its depth and shape. The body length can be adjusted depending on personal preference, making the Crochet bucket hat pattern highly customizable.
Adding texture to the body is a great way to enhance your design. You can experiment with different stitch patterns, such as ribbing or shell stitches, to create a unique look. This flexibility is what makes the Crochet bucket hat pattern so appealing to crafters of all skill levels.
When working on the brim, evenly spaced increases are essential. This allows the brim to extend outward smoothly. A well-shaped brim not only improves the aesthetics but also adds functionality by providing shade and structure.
Finishing touches are just as important. Weaving in ends, blocking the hat, and ensuring all stitches are secure will give your Crochet bucket hat pattern a polished and professional appearance.
Tips for Customizing Your Crochet Bucket Hat Pattern
One of the best aspects of a Crochet bucket hat pattern is the ability to customize it according to your style. You can play with color combinations, from neutral tones to vibrant palettes, to create a hat that reflects your personality. Stripes, color blocking, and gradients are popular techniques that add visual interest.
Yarn choice also influences the final look and feel of your Crochet bucket hat pattern. Lightweight yarns are ideal for summer hats, while thicker yarns can create cozy versions suitable for cooler weather. Exploring different materials allows you to expand your creative possibilities.
Adding embellishments is another way to personalize your design. You can incorporate crochet flowers, appliqués, or even simple embroidery to enhance your Crochet bucket hat pattern. These details can transform a basic hat into a standout accessory.
Adjusting the size is important when making hats for different age groups. By modifying the number of increases or the length of the body, you can create a Crochet bucket hat pattern that fits children, teens, or adults comfortably.
You can also experiment with different brim styles. A floppy brim gives a relaxed and casual look, while a structured brim offers a more polished appearance. This versatility makes the Crochet bucket hat pattern suitable for various occasions.
Finally, keeping notes of your modifications is highly recommended. This allows you to recreate successful designs and refine your technique over time, making each Crochet bucket hat pattern even better than the last.
Common Mistakes and How to Avoid Them
Even experienced crafters can encounter challenges when working on a Crochet bucket hat pattern. One common mistake is incorrect stitch counting, which can lead to uneven shaping. Regularly checking your stitch count helps maintain consistency throughout the project.
Another issue is improper tension. If your stitches are too tight, the hat may feel stiff and uncomfortable. On the other hand, loose stitches can result in a floppy structure. Practicing consistent tension is essential for a well-balanced Crochet bucket hat pattern.
Skipping stitch markers can also cause confusion, especially when working in continuous rounds. Using markers ensures that you always know where each round begins and ends, reducing the risk of errors in your Crochet bucket hat pattern.
Choosing the wrong yarn can affect both the appearance and functionality of the hat. For example, overly stretchy yarn may not hold the shape well. Selecting appropriate materials is crucial for achieving the desired results.
Another common mistake is neglecting to measure the crown correctly. If the crown is too small or too large, the entire fit of the Crochet bucket hat pattern will be affected. Taking accurate measurements ensures a comfortable and secure fit.
Lastly, rushing through the finishing process can compromise the overall quality. Taking the time to properly weave in ends and shape the hat will elevate your Crochet bucket hat pattern to a professional level.
FAQ About Crochet Bucket Hat Pattern
What is the best yarn for a Crochet bucket hat pattern?
Cotton yarn is often the best choice because it is breathable, durable, and holds its shape well, making it ideal for everyday wear.
Is a Crochet bucket hat pattern suitable for beginners?
Yes, many patterns are beginner-friendly, especially those using basic stitches like single crochet and simple increases.
How long does it take to complete a Crochet bucket hat pattern?
It depends on your skill level, but most hats can be completed within a few hours to a couple of days.
Can I adjust the size of a Crochet bucket hat pattern?
Absolutely. You can modify the number of increase rounds and the length of the body to fit different head sizes.
Why does my hat not keep its shape?
This can be due to loose tension or the type of yarn used. Switching to a sturdier yarn or a smaller hook can help.
Do I need to block my finished hat?
Blocking is recommended as it helps shape the hat and gives it a more polished and professional finish.
Conclusion
In this guide, you learned everything about creating a Crochet bucket hat pattern, from understanding its structure to mastering the step-by-step process and exploring customization options.
You also discovered practical tips to improve your technique and avoid common mistakes, ensuring that your finished hat looks both stylish and professional. The Crochet bucket hat pattern is truly a versatile and rewarding project that allows you to combine creativity with functionality.
Now it’s your turn to put these ideas into practice and create your own unique designs. Your feedback is very important, so feel free to share your honest opinion and suggestions. This will help improve future content and inspire even more creative crochet projects.