
Fabric manicure kit tutorial is a practical and creative sewing project that combines organization, style, and functionality into one compact handmade accessory. This type of project is ideal for anyone who wants to keep their manicure tools neatly stored while also expressing their personal taste through fabric choices and design details. The beauty of a fabric manicure kit tutorial is that it allows you to create something useful for everyday life while enjoying a relaxing and rewarding crafting process.
The popularity of the fabric manicure kit tutorial continues to grow because it is both beginner-friendly and highly customizable. Whether you are new to sewing or already experienced, this project offers a balanced mix of simplicity and creativity. You can choose fabrics that reflect your personality, experiment with layouts, and even add personal touches such as embroidery or labels. This makes each finished piece unique and meaningful.
Another reason why the fabric manicure kit tutorial is so appealing is its practicality. A well-designed fabric manicure kit helps protect your tools, keeps everything organized, and is easy to carry in a bag or suitcase. It is also a great gift idea, as handmade items often carry a special sentimental value. By following a fabric manicure kit tutorial, you can create something that is not only beautiful but also highly functional.
Understanding the Basics of Fabric Manicure Kit Tutorial
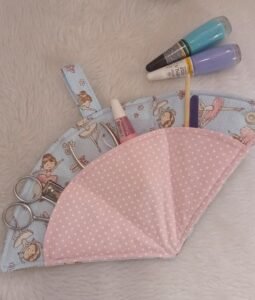
To start a fabric manicure kit tutorial, it is important to understand the basic structure of the project. Typically, a fabric manicure kit consists of a rectangular or roll-up design with compartments to hold tools like scissors, nail files, and clippers.
Choosing the right fabric is essential for durability and appearance. Cotton fabric is a popular choice because it is easy to work with and provides a clean, polished finish for your fabric manicure kit tutorial.
Interfacing is often used to add structure and stability. This helps the kit maintain its shape and ensures that it can securely hold the tools without sagging or folding incorrectly.
Accurate measurements are crucial for a successful project. Properly sized compartments ensure that each tool fits comfortably, which enhances the usability of your fabric manicure kit tutorial.
Selecting closures such as snaps, Velcro, or ties is another important step. The closure keeps the kit securely closed while also contributing to the overall design.
Finally, understanding basic sewing techniques like straight stitching, seam allowances, and topstitching will help you achieve a professional and durable result.
Step-by-Step Guide to Creating a Fabric Manicure Kit Tutorial
The first step in a fabric manicure kit tutorial is cutting your fabric pieces according to your chosen design. You will typically need an outer layer, a lining, and additional pieces for pockets or compartments.
Next, attach interfacing to the outer fabric. This step gives the kit structure and ensures that it holds its shape over time.
Sew the pockets onto the lining fabric, making sure to create compartments that fit your manicure tools. This is a key step in making your fabric manicure kit tutorial both functional and organized.
After preparing the inner section, place the outer fabric and lining together, right sides facing each other. Sew around the edges, leaving a small opening for turning.
Turn the fabric right side out and press it carefully. This step helps define the shape and gives your fabric manicure kit tutorial a clean and professional appearance.
Finally, add the closure and finish with topstitching. This not only secures the edges but also enhances the durability and style of your finished kit.
Creative Variations of Fabric Manicure Kit Tutorial
One of the most exciting aspects of a fabric manicure kit tutorial is the ability to personalize your design. You can experiment with different fabric patterns to create a kit that reflects your style.
Using contrasting fabrics for the outer layer and lining can add visual interest. This simple technique can make your fabric manicure kit tutorial stand out.
You can also incorporate decorative elements such as embroidery, appliqué, or labels. These details add a unique touch and make your kit more special.
Different closure options can change the overall look and functionality. For example, a tie closure gives a classic feel, while snaps provide a modern and practical solution.
Adding extra pockets or elastic loops can improve organization. This allows you to store additional tools and customize your fabric manicure kit tutorial to your needs.
Creating matching sets, such as a manicure kit and cosmetic pouch, is another creative idea. This approach adds consistency and makes your handmade items even more appealing.
Tips for Improving Your Fabric Manicure Kit Tutorial Skills
Precision is essential when working on a fabric manicure kit tutorial. Taking the time to measure and cut accurately ensures a better final result.
Practicing your sewing techniques can greatly improve the quality of your work. The more projects you complete, the more confident you will become.
Using high-quality materials can make a noticeable difference. Durable fabrics and strong thread contribute to a longer-lasting fabric manicure kit tutorial.
Paying attention to details such as seam alignment and finishing touches can elevate your project from simple to professional.
Learning from mistakes is an important part of the process. Each attempt at a fabric manicure kit tutorial helps you refine your skills and improve your technique.
Finally, enjoy the process. Sewing should be a relaxing and creative activity that allows you to express yourself while making something useful.
Fabric Manicure Kit Tutorial
What is a fabric manicure kit tutorial?
A fabric manicure kit tutorial is a step-by-step guide for creating a fabric organizer designed to hold manicure tools.
Is this project suitable for beginners?
Yes, it is beginner-friendly and requires only basic sewing skills.
What materials are needed?
You will need fabric, interfacing, thread, scissors, and a closure such as snaps or Velcro.
How long does it take to complete?
Most projects can be completed in a few hours, depending on complexity.
Can I customize my design?
Yes, you can choose different fabrics, colors, and features to create a unique kit.
What type of fabric is best?
Cotton is commonly used because it is easy to handle and durable.
Do I need interfacing?
Interfacing is recommended to provide structure and stability.
Can I wash my finished kit?
Yes, most fabric kits can be gently hand-washed and air-dried.
Can I sell items made from this tutorial?
Yes, handmade items can typically be sold, depending on usage rights.
What makes this project popular?
Its practicality, simplicity, and customization options make the fabric manicure kit tutorial a favorite among crafters.
Conclusion
The fabric manicure kit tutorial is a perfect combination of creativity, organization, and practicality. Throughout this article, you learned about the basics of the project, step-by-step instructions, creative variations, and helpful tips to improve your sewing skills. This project is suitable for all skill levels and offers endless opportunities for customization.
By experimenting with different fabrics, layouts, and techniques, you can transform a simple fabric manicure kit tutorial into a unique and functional accessory. Whether you are making it for personal use or as a thoughtful gift, this project provides both satisfaction and creative fulfillment.
Now it’s your turn to get started. Share your honest opinion about this article and leave your suggestions for future sewing topics. Your feedback is valuable and helps inspire more creative ideas.