
Crochet chicken earring pattern projects are a delightful way to combine creativity, fashion, and the timeless charm of handmade accessories.
One of the best things about creating crochet earrings is that they require only a small amount of yarn, making them an excellent stash-busting project.
In this complete guide, you will learn everything needed to make your own Crochet chicken earring pattern, from selecting the best materials to assembling the finished earrings. You’ll also discover helpful crochet stitch abbreviations, finishing techniques, and practical tips that will improve the overall appearance of your handmade jewelry. By following each step carefully, you’ll create an adorable pair of crochet chicken earrings that are both durable and comfortable to wear.
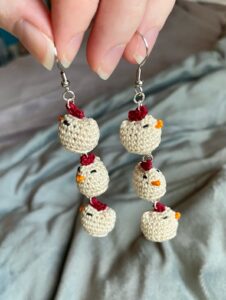
Choosing the Best Materials for Your Crochet Chicken Earring Pattern
The quality of your materials plays an important role in the final appearance of your Crochet chicken earring pattern. Mercerized cotton thread is one of the best choices because it provides excellent stitch definition, durability, and a lightweight finish. Fine cotton yarn also helps maintain the small shape of the earrings without becoming bulky.
For tiny crochet projects like earrings, a steel crochet hook between 1.5 mm and 2.25 mm usually works best. The smaller hook produces tighter stitches, preventing gaps and helping the finished chicken maintain its shape. Always match the hook size to your chosen thread for the neatest results.
In addition to yarn and a crochet hook, gather a yarn needle, stitch markers, embroidery thread, small scissors, jump rings, and stainless steel or hypoallergenic earring hooks. These jewelry findings provide a professional finish while ensuring comfortable everyday wear.
Crochet Stitch Key
- ch = chain
- sl st = slip stitch
- sc = single crochet
- hdc = half double crochet
- dc = double crochet
- inc = increase (2 sc in one stitch)
- dec = invisible decrease
- MR = magic ring
- st = stitch
- FO = fasten off
Select classic chicken colors such as white, cream, yellow, or light brown for the body. Bright red works beautifully for the comb and wattle, while orange or gold creates an attractive beak. Feel free to experiment with pastel shades or vibrant combinations to give your earrings a playful personality.
Before beginning the full project, crochet a small practice circle to ensure your tension is consistent. Tight stitches are especially important in miniature crochet because they create cleaner edges and help the earrings maintain their shape over time.
Step-by-Step Crochet Chicken Earring Pattern Instructions
Start by creating the chicken’s body.
Round 1:
MR, ch 1, work 6 sc into the magic ring. Join with a sl st.
Round 2:
Inc in each stitch around (12 sts).
Round 3:
Sc in first stitch, inc in next stitch. Repeat around (18 sts).
Round 4:
Sc evenly around without increasing.
Fasten off, leaving a long tail for sewing or attaching decorative pieces later.
To create the wing, make 5 chains. Beginning in the second chain from the hook, crochet 4 sc. Fasten off and sew one wing to each side of the body. Small wings add dimension without making the earrings too heavy.
For the comb, attach red yarn to the top of the head. Crochet (ch 2, sl st into next stitch) three times to create three tiny rounded bumps. Fasten off securely.
For the beak, attach orange yarn in the center of the face. Chain 2, then work one slip stitch into the second chain from the hook. Attach the beak firmly to the front of the chicken.
Embroider tiny black eyes using embroidery floss or create French knots. Position both eyes evenly to give your crochet chicken a cheerful and balanced expression.
Weave in every loose yarn end carefully with a tapestry needle. Clean finishing work makes miniature crochet projects appear much more polished and professional.
Assembling and Finishing the Crochet Chicken Earrings
After completing both chickens, lightly steam block them if your yarn allows it. Blocking helps even out the stitches and improves the overall symmetry of each earring.
Attach a small jump ring through the top center stitch of each chicken. Make sure the ring is fully closed using jewelry pliers to prevent the earring from separating during wear.
Next, connect the jump ring to the earring hook. Stainless steel or surgical steel hooks are excellent choices because they are durable and suitable for most sensitive ears.
If you’d like additional stability, apply a tiny amount of fabric stiffener to the back of each earring. Allow the earrings to dry completely before wearing them. This optional step helps maintain their shape while remaining lightweight.
For extra decoration, sew tiny crochet flowers, miniature bows, or embroidered feathers onto the chicken. These small embellishments personalize your Crochet chicken earring pattern and make every pair unique.
Finally, inspect every stitch, knot, and jewelry connection carefully. A final quality check ensures your handmade earrings are secure, durable, and ready to wear or gift.
Creative Ideas for Customizing Your Crochet Chicken Earring Pattern
One of the greatest advantages of a Crochet chicken earring pattern is its versatility. Small modifications allow you to create dozens of different styles while following the same basic pattern.
Create seasonal versions by using pastel yarn for spring, bright colors for summer, earthy tones for autumn, or festive holiday combinations. Seasonal collections are especially popular at craft fairs and handmade markets.
Experiment with textured yarns or metallic embroidery thread to add subtle sparkle. Small details often make handmade accessories feel even more special and eye-catching.
You can also crochet matching accessories such as keychains, brooches, bookmarks, zipper pulls, or appliqués using the same miniature chicken design. Coordinated handmade sets make thoughtful gifts for family and friends.
If you’re making earrings for children or people who prefer extremely lightweight jewelry, choose thinner crochet thread instead of thicker yarn. This creates delicate earrings that remain comfortable even during extended wear.
Store finished earrings inside a jewelry box or small fabric pouch to protect them from dust, moisture, and tangling. Proper storage helps preserve their appearance for years to come.
Frequently Asked Questions
Is this Crochet chicken earring pattern suitable for beginners?
Yes. Beginners who already know the basic crochet stitches can complete this project successfully. The pattern is simple, repetitive, and works up quickly.
What yarn works best?
Mercerized cotton thread or lightweight cotton yarn provides excellent stitch definition, durability, and a professional finish.
How long does it take to make one pair?
Most crocheters complete a pair within two to four hours, depending on their experience and the amount of decorative detail added.
Can I wash the earrings?
Yes. Hand wash gently using cool water and mild soap. Lay them flat to dry completely before storing or wearing.
Can I sell earrings made from this pattern?
Yes. Handmade finished products are generally suitable for sale as long as the design does not copy protected copyrighted artwork or trademarks.
Which crochet hook should I use?
A steel crochet hook between 1.5 mm and 2.25 mm is ideal for fine cotton thread, although you may adjust the size depending on your yarn and personal tension.
How can I make the earrings stiffer?
A light application of fabric stiffener or diluted craft glue applied carefully to the back can help maintain the desired shape.
Can I customize the design?
Absolutely. You can change colors, facial expressions, wings, decorative flowers, bows, comb styles, and even create different chicken breeds using the same foundation pattern.
Conclusion
Creating a Crochet chicken earring pattern is a rewarding project that combines traditional crochet techniques with creative jewelry making. Throughout this tutorial, you learned how to select suitable materials, understand essential crochet abbreviations, crochet the miniature chicken body, add charming details such as the comb, wings, beak, and eyes, and assemble everything into a lightweight, comfortable pair of handmade earrings. Because this project uses only small amounts of yarn, it is an excellent way to use leftover supplies while creating thoughtful gifts or unique accessories for your own collection.
Whether you are a beginner looking for a fun challenge or an experienced crocheter searching for a quick and satisfying project, this Crochet chicken earring pattern offers endless opportunities for creativity. By experimenting with colors, embellishments, and finishing techniques, you can make every pair truly one of a kind.
Thank you for taking the time to read this guide. I hope it inspires you to create your own adorable crochet chicken earrings with confidence. If you enjoyed this tutorial, please leave your honest opinion and share your suggestions for future crochet patterns. Your feedback is always appreciated and helps inspire even more creative crochet projects for everyone.