
String Quilt Sashing Tutorial projects are a wonderful way to add structure, color, and personality to a quilt while making excellent use of fabric scraps.
One of the biggest advantages of string quilt sashing is its versatility. Instead of using solid strips of fabric, you create decorative sashing by piecing together narrow fabric strips, commonly called “strings.”
In this guide, you will learn how to create beautiful string quilt sashing from start to finish. From choosing fabrics and cutting accurate strips to sewing, trimming, pressing, and assembling your quilt, every step is explained clearly. Whether your quilt style is modern, farmhouse, vintage, or traditional, this String Quilt Sashing Tutorial will help you achieve a polished and professional-looking finish.
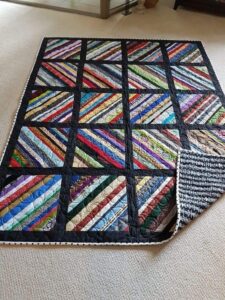
Selecting Fabrics and Preparing Your String Quilt Sashing
The success of a String Quilt Sashing Tutorial begins with selecting fabrics that complement your quilt blocks. Scraps of cotton quilting fabric work exceptionally well because they are stable, easy to sew, and available in countless colors and prints. Mixing lights, mediums, and darks creates visual balance while allowing the sashing to become an attractive design feature.
Begin by sorting your fabric strips according to color family, value, or print style. You may choose a rainbow arrangement, coordinated color palette, low-volume prints, or high-contrast combinations depending on the overall appearance you want your quilt to have. Organizing the strips before sewing helps maintain consistency throughout the project.
For this tutorial, prepare strips measuring approximately 1 to 2½ inches wide. The lengths may vary since the strips will be trimmed after sewing. This flexibility makes string piecing one of the best techniques for using leftover fabric from previous quilting projects.
Gather your quilting supplies before beginning. You will need a rotary cutter, acrylic quilting ruler, self-healing cutting mat, sewing machine, coordinating thread, quilting pins or clips, an iron, ironing board, and optional lightweight foundation paper if you prefer foundation piecing.
If you decide to use a foundation, cut lightweight paper or muslin slightly larger than your finished sashing size. Sewing directly onto the foundation helps maintain straight lines and prevents distortion, especially when using narrow fabric strips.
Finally, determine the finished width of your sashing. A common finished measurement ranges from 1½ to 3 inches, depending on the scale of your quilt blocks. Add seam allowances before cutting your foundation or trimming your completed string units.
Step-by-Step String Quilt Sashing Tutorial
Begin by placing your first fabric strip diagonally or vertically across the foundation, positioning the right side of the fabric facing upward. If you are not using a foundation, simply begin sewing the strips together directly.
Place the second strip right sides together along one edge of the first strip. Sew using a standard quarter-inch seam allowance. Open the strip and press it flat before adding the next strip.
Continue adding strips one at a time until the entire foundation is covered. Alternate colors, prints, and values to create visual interest while avoiding clusters of similar fabrics in one area.
After the foundation is completely covered, press the entire unit thoroughly using a dry iron. Pressing after every few seams helps reduce bulk and produces flatter, more accurate quilt pieces.
Using your acrylic ruler and rotary cutter, trim each string unit to the exact unfinished sashing measurement. For example, if your finished sashing will measure 2 inches wide, trim the unfinished strip to 2½ inches to include seam allowances.
Repeat this process until you have enough string sashing units for every row and column in your quilt layout. Arrange them around your quilt blocks before sewing to ensure the colors are balanced across the entire quilt top.
Assembling the Quilt with String Sashing
Lay all quilt blocks on a large design wall or flat surface. Position the completed string sashing strips between each block until you are satisfied with the overall arrangement. This planning stage allows you to make adjustments before sewing anything permanently.
Sew the vertical sashing strips to one side of each quilt block using an accurate quarter-inch seam allowance. Press the seams toward the sashing to reduce bulk and create smooth transitions between the blocks.
Once the vertical rows are complete, join the rows together using the horizontal string sashing strips. Pin carefully at every seam intersection to keep the quilt aligned and prevent shifting during stitching.
If your quilt design includes cornerstones, sew them between the horizontal and vertical sashing strips before attaching the rows. Cornerstones create neat intersections while adding another opportunity to introduce color or contrast.
After the quilt top is fully assembled, inspect every seam carefully. Reinforce any weak stitching before moving on to quilting. Small repairs at this stage help improve the durability of the finished quilt.
Give the completed quilt top one final press using gentle steam if your fabric allows. A smooth, flat quilt top makes layering, basting, and quilting significantly easier while improving the finished appearance.
Finishing Tips and Creative Ideas for String Quilt Sashing
One of the greatest strengths of a String Quilt Sashing Tutorial is its adaptability. Every quilt becomes unique because the arrangement of fabric strips is never exactly the same. Even identical color palettes produce different visual effects depending on the placement of each strip.
Consider using themed fabric collections for seasonal quilts. Floral prints create beautiful spring quilts, while warm reds, oranges, and golds produce cozy autumn designs. Holiday-themed scraps also work wonderfully for festive projects.
You can create additional visual interest by sewing some strips diagonally instead of vertically. Diagonal string piecing adds movement and gives the quilt a more contemporary appearance without increasing the difficulty of construction.
If your quilt blocks contain busy prints, choose calmer fabrics for the sashing. Conversely, colorful string sashing can add excitement to quilts made from simple or low-volume blocks. Balancing these design elements helps every part of the quilt shine.
Before quilting, choose batting that complements the intended use of the quilt. Cotton batting provides a traditional look with excellent stitch definition, while polyester batting offers additional loft and warmth. Select quilting thread that blends well with both the blocks and the sashing.
Once the quilt is finished, wash it according to the fabric manufacturer’s recommendations. Dry it carefully and enjoy the soft texture and beautiful crinkled appearance that develops after the first wash. Proper care will help your handmade quilt remain beautiful for many years.
Frequently Asked Questions
1. What is string quilt sashing?
String quilt sashing is a decorative technique that uses pieced fabric strips instead of solid fabric strips to separate quilt blocks.
2. Can beginners make string quilt sashing?
Yes. The construction is simple and repetitive, making it an excellent project for beginner quilters while still offering creative opportunities for experienced makers.
3. What fabrics work best?
High-quality quilting cotton is the most popular choice because it is stable, easy to sew, and available in countless colors and prints.
4. Do I need foundation paper?
No. Foundation paper is optional. Many quilters enjoy the extra stability it provides, but string sashing can also be sewn without it.
5. What seam allowance should I use?
A consistent quarter-inch seam allowance is recommended for accurate piecing and proper block alignment.
6. Can I use leftover fabric scraps?
Absolutely. String quilt sashing is one of the best quilting techniques for using leftover strips from previous projects.
7. How wide should the sashing be?
Finished widths commonly range from 1½ to 3 inches, depending on the size of your quilt blocks and your preferred design style.
8. How should I care for the finished quilt?
Wash gently according to your fabric recommendations and dry carefully. Proper care helps preserve both the fabrics and the quilting stitches.
Conclusion
A String Quilt Sashing Tutorial is an excellent way to transform fabric scraps into a beautiful design element that enhances the overall appearance of your quilt. Throughout this guide, you learned how to choose coordinating fabrics, prepare and sew string units, trim accurate sashing strips, assemble the quilt top, and add professional finishing touches. These techniques not only improve the structure of your quilt but also introduce color, texture, and creativity that make every project truly unique.
Whether you are creating your very first quilt or adding another masterpiece to your collection, string quilt sashing offers endless opportunities for experimentation and personal expression. With careful planning, accurate cutting, and consistent sewing, you can create a quilt that is both visually stunning and built to last.
Thank you for reading this String Quilt Sashing Tutorial. I hope this guide helps you complete a beautiful quilt with confidence and enjoyment. If you found this tutorial helpful, please leave your honest opinion and share your suggestions for future quilting projects. Your feedback is always appreciated and helps inspire even more creative ideas for the quilting community.