
Crochet Christmas ball pattern is a wonderful way to create a handmade decoration that adds warmth, color, and texture to your holiday celebrations.
One of the most enjoyable things about making a crochet Christmas ornament is watching a simple circle gradually become a three-dimensional decoration.
This Crochet Christmas ball pattern makes a soft, fiberfill-stuffed ornament rather than a cover for a rigid Christmas bauble. With DK-weight yarn and an appropriately sized hook, the finished ball may measure approximately 2½–3 inches across, depending on your tension and filling. Treat this measurement as a guide rather than an exact result, and measure your own ornament after finishing. The basic design looks attractive in a single color, but you can also add stripes or embroidered details once you understand the construction. This tutorial explains the materials, stitch key, complete round sequence, stuffing, hanging loop, and finishing methods. You will also find answers to common questions about yarn choices, shaping, and visible stuffing. Begin with one simple ball, then use your experience to create a coordinated collection.
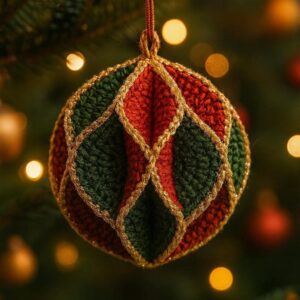
Materials and Stitch Key for the Crochet Christmas Ball Pattern
For one crochet Christmas ball, gather approximately 25–40 yards of smooth DK-weight yarn, allowing extra for decoration and the hanging loop. Cotton produces clearly defined stitches, while acrylic gives a softer finish. Choose a yarn that feels comfortable in your hands and suits your intended color palette. Light or medium shades are easier to work with than very dark yarn when learning to identify stitches.
Prepare a 3 mm crochet hook, a locking stitch marker, scissors, a yarn needle, and polyester fiberfill. The hook size is a starting point: adjust it if your fabric has large gaps or feels excessively stiff. Your goal is a dense but workable surface that holds the stuffing inside. A blunt yarn needle helps with closing the final opening and securing the hanging loop.
The crochet stitch key uses these abbreviations: MR means magic ring, ch means chain, sc means single crochet, sl st means slip stitch, and st/sts means stitch/stitches. Inc means work two single crochets into the same stitch. Dec means combine two stitches into one. For the decreasing rounds, an invisible decrease creates a tidier appearance than a standard decrease.
Instructions inside braces indicate a repeated sequence. For example, {sc 2, inc} × 6 means work one single crochet into each of the next two stitches, then work two single crochets into the following stitch. Repeat that complete sequence six times. The number in parentheses at the end of an instruction is the total stitch count for the completed round.
To make an invisible decrease, insert your hook under the front loop of the next stitch and then under the front loop of the following stitch. Yarn over and pull through both front loops. Yarn over again and pull through the two loops remaining on the hook. You have reduced two stitches to one while keeping the decrease less noticeable on the outside.
This Crochet Christmas ball pattern is worked in continuous rounds without joining or turning. Place the stitch marker in the first stitch of each round and move it as you progress. Keep your tension comfortable and consistent. Exact gauge is not essential for this decorative project, but your fabric should be closely packed enough to prevent the filling from showing through.
Step-by-Step Instructions for Crocheting the Ball
Begin with Round 1: 6 sc into MR (6). Pull the starting tail gently but firmly to close the center, then place the stitch marker in the first stitch. Make sure the ring is fully closed before continuing. While the inside remains accessible, weave the starting tail securely through several stitches so the center does not loosen during stuffing or handling.
Work Round 2: inc in each st around (12). Continue with Round 3: {sc 1, inc} × 6 (18) and Round 4: {sc 2, inc} × 6 (24). Each increasing round adds six stitches. Count your stitches before moving on, especially if the small center is difficult to see. Correcting an error immediately is easier than adjusting the shape several rounds later.
Continue with Round 5: {sc 3, inc} × 6 (30) and Round 6: {sc 4, inc} × 6 (36). The piece should begin to curve naturally into a shallow bowl. Do not stretch or block it flat, since that curve contributes to the finished ball. Work into both loops of each stitch unless the instructions specifically tell you otherwise.
Complete the widening section with Round 7: {sc 5, inc} × 6 (42) and Round 8: {sc 6, inc} × 6 (48). This is the maximum circumference for the pattern. Confirm that you have exactly 48 stitches before starting the middle rounds. If your count is incorrect, return to the mistake rather than adding an extra increase elsewhere.
Work Rounds 9–16: sc in each st around (48 stitches in every round). These eight rounds form the middle of the crochet Christmas ornament. Keep moving the marker and checking your count. Make sure the right side faces outward; if the piece has turned inside out while you work, gently turn it before you add the stuffing.
For an optional stripe, use your main color through Round 10, a contrasting color for Rounds 11–12, and the main color again from Round 13 onward. Change colors during the final yarn-over of the stitch immediately before the new color begins. Secure the yarn ends inside. Because this is spiral crochet, the stripe will have a small step at the color transition.
Decreasing, Stuffing, and Adding the Hanging Loop
Start shaping the upper half with Round 17: {sc 6, dec} × 6 (42) and Round 18: {sc 5, dec} × 6 (36). Use invisible decreases for a smoother finish. Keep the decrease stitches close in size to your ordinary single crochets. Pulling them unusually tight can distort the fabric and make the next round difficult to work.
Continue with Round 19: {sc 4, dec} × 6 (30) and Round 20: {sc 3, dec} × 6 (24). Pause before proceeding so you can add stuffing through the remaining opening. Inspect the fabric for gaps, loose ends, or missed stitches. Make any repairs now, while you can still reach the inside comfortably.
Add small pieces of polyester fiberfill, distributing them around the inside walls before filling the center. Rotate the ball as you work to keep the shape balanced. The ornament should feel gently firm without being stretched. Too much stuffing can expose gaps between stitches, while too little may leave the ball looking hollow or uneven.
Work Round 21: {sc 2, dec} × 6 (18) and Round 22: {sc 1, dec} × 6 (12). Add a little more filling if needed, taking care not to push fiberfill into your working stitches. Finish with Round 23: dec × 6 (6). Cut the yarn, leaving an approximately 8-inch tail, and pull the tail through the final loop.
Thread the tail onto a yarn needle and pass it through the front loops of the six remaining stitches. Pull gently to close the opening, then secure the tail through nearby stitches without flattening the top. Weave the remaining yarn through the body and trim it. Gently roll the finished ball between your palms to redistribute the filling and soften any uneven areas.
For the hanging loop, use a separate strand of yarn to make ch 24, leaving a sewing tail at each end. Adjust the chain length if you prefer a different loop size. Fasten off, then sew both ends securely to the top through several stitches. Lift the ornament over a soft surface to check the attachment before placing it on your tree.
Decorating and Caring for Your Crochet Christmas Ornament
A plain crochet Christmas ball can be beautiful without additional decoration. Traditional red, forest green, ivory, and gold-colored yarn create a familiar holiday palette. Soft blue, cream, or muted pink offer a different seasonal style. For a coordinated collection, repeat two or three colors across several ornaments rather than changing every detail from one ball to the next.
Simple embroidery adds character without hiding the crochet texture. Try small stars, scattered dots, or short snowflake branches in a contrasting color. If you plan to embroider, doing so before stuffing makes the inside easier to reach. Keep the embroidery relaxed enough to avoid puckering, and secure every yarn end before you close the ornament.
To change the size of this Crochet Christmas ball pattern, first try a different yarn weight with a hook that produces dense stitches. Finer yarn generally makes a smaller ornament, while thicker yarn usually creates a larger one. Keep the same round sequence for your first variation. Measure the finished result, since different yarns and individual tension affect both width and height.
If your ornament looks lumpy, check the stuffing distribution before adding more filling. Small pieces are easier to position evenly than one large clump. A pointed top may result from tightly worked decreases or excess stuffing near the opening. Check the stitch counts and gently reshape the finished ball, avoiding strong pulling that could stretch the stitches.
Follow the yarn label when deciding how to clean your handmade Christmas ornament. Spot-cleaning is often practical for a small decoration. If washing is suitable for both the yarn and filling, reshape the ball carefully and allow it to dry completely before storage. Keep ornaments in a dry container where heavier decorations cannot squash them or catch their hanging loops.
After finishing your first ball, record the yarn, hook size, approximate diameter, and any changes you made. These notes help you reproduce a result you like. Use your ornaments on a Christmas tree, in a seasonal arrangement, or as decorative gift toppers. Keep hanging loops and detachable embellishments away from babies and pets, and treat the finished piece as a decoration.
Frequently Asked Questions
Is this Crochet Christmas ball pattern suitable for beginners?
Yes, it is suitable for beginners who can work single crochet stitches and follow simple repeats. The magic ring and invisible decrease may require a little practice first. Work slowly, keep the stitch marker in place, and check the count after each round. These habits help you complete the shaping without losing track of your progress.
Which yarn should I use for a crochet Christmas ornament?
Smooth cotton or acrylic are useful choices for this project. Cotton gives crisp stitch definition, while acrylic produces a softer surface. Avoid very fuzzy yarn for your first ball because it can make counting difficult. Choose your hook according to the fabric you produce rather than relying only on the size suggested on the yarn label.
Why can I see stuffing through the stitches?
Visible stuffing usually means the fabric is too loose or the ball is overfilled. Use a slightly smaller hook on your next attempt if the stitches have large spaces between them. Add filling gradually instead of packing it tightly. Invisible decreases can also reduce noticeable openings in the final shaping rounds.
Can I use a foam ball instead of fiberfill?
This pattern is designed for loose fiberfill, which lets you adjust the shape as you work. A rigid foam insert needs a crochet cover that matches its exact size. You can experiment with that adaptation, but check the fit before starting the decreases and expect to adjust the yarn, hook, or round sequence.
Do I need to join the rounds with slip stitches?
No. The Crochet Christmas ball pattern uses a continuous spiral, so you work directly into the next round without joining. The stitch marker identifies where each round begins. Adding slip-stitch joins would change the construction and create a visible seam, so follow the spiral method for the instructions provided here.
How can I make my crochet ball look more rounded?
Check that you completed the increasing rounds, eight middle rounds, and decreasing rounds exactly as written. Then examine the filling. Distribute small pieces evenly around the interior, including the upper and lower sections. Gently roll the closed ornament between your palms to help it settle into a balanced shape.
How do I prevent the hanging loop from coming loose?
Sew each end through several stitches at the top rather than attaching it to a single loop. Weave the tails through the fabric in more than one direction to strengthen the attachment. Test the loop gently over a soft surface and repair any movement before hanging the ornament.
Conclusion
This Crochet Christmas ball pattern guides you through making a magic ring, increasing to 48 stitches, crocheting the middle section, and decreasing to close the top.
You have also learned how to read stitch repeats, distribute stuffing, secure a hanging loop, and personalize the ornament with color or embroidery. Careful counting and consistent tension will help you create a neat decoration that reflects your own style.
Start with a simple version, then use your experience to make a collection of handmade crochet Christmas ornaments in your favorite colors. Please leave your honest opinion about this tutorial and share your suggestions for improving it. Your feedback can help make the instructions clearer, and your creative ideas may inspire beautiful variations of the pattern.