
Crochet Holly Pattern projects offer a lovely way to add handmade greenery to Christmas decorations without needing a large amount of yarn.
The term Crochet Holly Pattern describes instructions for recreating the recognizable appearance of holly using yarn and crochet stitches. In this version, the leaves are worked around both sides of a foundation chain to create an oval shape.
There is something especially satisfying about creating a small decoration that can be used in several ways throughout the holiday season. One holly motif can embellish a fabric gift bag, while several matching motifs can decorate a garland or a handmade wreath. This tutorial uses US crochet terminology, and the stitch key explains the abbreviations before you begin. Stitch counts are included where they help you maintain the correct shape, and the assembly instructions describe how to secure the pieces neatly. Finished measurements depend on your yarn, hook, and personal tension, so the suggested dimensions are approximate. Read through the complete pattern first, gather your supplies, and enjoy turning a few simple materials into a cheerful Christmas detail.
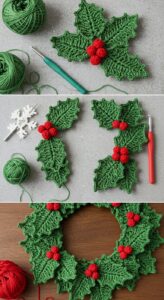
Materials and Stitch Key for the Crochet Holly Pattern
For this Crochet Holly Pattern, gather approximately 10–15 grams of green DK yarn, a small amount of red DK yarn, and a 3 mm crochet hook. You will also need a tapestry needle, scissors, a removable stitch marker, and a little polyester stuffing. These quantities should be sufficient for two leaves and three small berries, although yarn consumption varies.
Smooth yarn makes the stitch placement easier to see and helps the pointed edges remain defined. Cotton yarn is useful for a crisp decorative motif, while smooth acrylic creates a softer result. Use the same yarn weight for the leaves and berries so the components remain proportionate. Choose a hook that produces firm stitches without making your hands strain.
The crochet stitch key uses these US abbreviations: ch means chain; sl st means slip stitch; sc means single crochet; hdc means half double crochet; and dc means double crochet. The abbreviation st means stitch, while sts means stitches. MR means magic ring, the adjustable starting loop used for the berries.
An inc, or increase, means working two single crochet stitches into one stitch. A dec, or decrease, means turning two stitches into one. For the berries, use an invisible single crochet decrease: insert the hook through the front loops of the next two stitches, yarn over and pull through both front loops, then yarn over and finish the single crochet.
A picot is a small pointed loop used to decorate an edge. In this tutorial, make a picot by chaining three, then working a slip stitch into the first of those three chains. Instructions inside brackets are repeated as indicated. For example, [sc in next 2 sts, picot, sc in next 2 sts] × 6 creates six pointed accents around the leaf.
With DK yarn and a 3 mm hook, each finished leaf may measure approximately 6–8 cm long, including its decorative edging. Exact gauge is unnecessary, but the berries need dense fabric to contain their filling. If stuffing shows through your stitches, use a smaller hook for the berries. Record your materials if you want to reproduce matching motifs later.
Crochet the Holly Leaves Step by Step
Begin the first crochet holly leaf with ch 12. The chain nearest your hook is skipped, leaving 11 foundation chains to work into. Keep the chains even and reasonably relaxed, since you will crochet into both sides of them. Working into one loop initially leaves the opposite loops available for the return side of the leaf.
For the first side, work sc in the second ch from the hook, hdc in the next ch, dc in each of the next 7 chs, hdc in the next ch, and 3 sc in the last ch. The three single crochet stitches turn the work around the far end. This first side contains 13 stitches.
Continue around the opposite side of the foundation chain without turning the piece over. Work hdc opposite the previous hdc, dc in each of the next 7 available chains, hdc in the next chain, and 2 sc in the final available chain, opposite the first single crochet. This return side adds 11 stitches. Join with a sl st to the first sc, giving 24 sts around the oval.
For the pointed edging, ch 1, which does not count as a stitch. Work [sc in next 2 sts, picot, sc in next 2 sts] × 6 around the oval. Each repeat uses four stitches from the previous round, so six repeats use all 24 stitches. The picots sit above the edge and are not counted as additional base stitches.
Join the edging with a sl st to its first single crochet. Fasten off, leaving a 25–30 cm tail for assembly. Gently spread the six picots with your fingers so their points become visible. The result is a stylized holly leaf with an oval center and pointed outline. Make a second leaf using the same instructions.
For a subtle leaf vein, thread a separate length of matching or slightly lighter green yarn onto your tapestry needle. Embroider a line of short backstitches along the foundation-chain center, stopping before the outer edging. Secure the ends on the reverse without pulling tightly. Excess tension can make the leaf fold or shorten, so keep the embroidery relaxed.
Crochet the Red Berries and Assemble the Holly
Each crochet holly berry is made in continuous rounds. With red yarn, work Round 1: 6 sc in an MR (6 sts). Close the ring firmly and place a stitch marker in the first stitch. Do not join the rounds or add beginning chains. Move the marker as you begin each new round.
Continue with Round 2: inc in every st around (12 sts). Then work Round 3: sc in each st around (12 sts) and Round 4: sc in each st around (12 sts). These rounds form a small rounded cup. Keep the right side facing outward and tuck the starting tail inside after securing it.
Place a tiny amount of polyester stuffing inside the berry before closing it. Use just enough to support the rounded shape; too much filling can stretch the stitches and make assembly difficult. Work Round 5: dec × 6 (6 sts). Count carefully so you finish with six stitches around the remaining opening.
Fasten off with a 25 cm tail and thread it onto your tapestry needle. Pass the needle through the front loop of each of the six remaining stitches, then pull gently to close the opening. Secure the closure while preserving the tail for sewing. Repeat the berry instructions twice more to create a cluster of three red berries.
Arrange the two leaves with their bases overlapping and their tips pointing outward in a shallow V shape. Before sewing, place the berries over the overlap to check the composition. Use a green tail to join the leaves with several small stitches through both layers. Keep those stitches near the center, where the berry cluster will cover them.
Sew each berry securely over the leaf overlap using its red tail. Take several stitches through the underside of the berry and the joined leaves, checking that the components do not wobble. Position the closures against the leaves to hide them. Secure and weave in all remaining ends on the reverse, keeping the visible surface neat.
Finish, Personalize, and Use Your Crochet Holly
To shape the finished Crochet Holly Pattern motif, smooth the leaves with your fingers and separate the pointed edges gently. If the yarn benefits from blocking, dampen the leaves lightly and pin them into shape before assembly, following the yarn’s care instructions. Let them dry completely. Avoid pressing the stuffed berries flat or applying excessive heat.
Traditional holly colors are easy to recognize, but different yarn shades can create a distinctive decoration. Combine forest green leaves with deep red berries for a classic arrangement, or choose sage green and burgundy for a softer appearance. A slightly contrasting embroidered vein adds detail. Keep the color changes simple enough that the leaf shape remains the main feature.
To adjust the overall size, change the yarn weight and use an appropriate hook while following the same stitch counts. Finer yarn generally makes a smaller motif, while thicker yarn creates a larger one. Maintain firm stitches for the berries. Changing only the hook substantially can alter the fabric density without giving you a balanced size adjustment.
For a hanging holly ornament, attach a short yarn loop to the reinforced overlap on the reverse. Secure it through several stitches rather than relying on one strand of the edging. Alternatively, sew the motif onto a fabric ribbon or gift bag. Test the attachment gently before use, and keep hanging cords out of young children’s reach.
Several motifs can become a crochet Christmas garland when sewn securely to a crocheted cord at regular intervals. They can also decorate a wreath or fabric stocking. This arrangement includes small stuffed components, so use it as decoration and keep it out of reach of babies and young children. Avoid placing yarn decorations near candles or other heat sources.
Clean the finished piece according to the yarn label and the item it is attached to. Gentle spot cleaning is often convenient for a small stuffed decoration. Allow everything to dry fully before storage, and keep the leaves from being crushed under heavy objects. A little reshaping before display will help the pointed edges look tidy again.
Frequently Asked Questions
Is this Crochet Holly Pattern suitable for beginners?
This pattern suits beginners who already know single crochet, half double crochet, and double crochet. It also introduces working around a foundation chain, making picots, and crocheting small stuffed shapes. Make one leaf first to practice the edging, then move on to the berries when you feel comfortable with the instructions.
How many stitches should the leaf have before adding the edging?
The oval should contain 24 stitches. The first side contributes 13 stitches, including the three single crochet stitches at the far end. The return side contributes 11 stitches. Count before starting the picot round, because its six repeats each use four stitches from the oval.
Do the picot chains count toward the next stitch total?
No. The picots create decorative points above the edging. Each edging repeat still uses only four stitches from the oval beneath it. After making a picot, continue into the next unworked oval stitch. There is no additional round worked into the picots in this pattern.
Why are my holly leaves curling?
Curling can result from tight foundation chains, uneven tension, or embroidery pulled too firmly. Check that the foundation chain remains relaxed and that the vein has not shortened the leaf. Gentle blocking may improve minor curling, but a counting error or very tight foundation chain may require remaking the leaf.
Can I make the berries without stuffing?
Yes, although they may flatten rather than remain rounded. For a fuller berry, a very small amount of polyester stuffing is enough. Avoid inserting hard objects as substitutes. Keep the closure secure and check that the filling does not show through the stitches.
Can I use UK crochet terminology?
Yes, with the correct conversions. US single crochet is UK double crochet, US half double crochet is UK half treble crochet, and US double crochet is UK treble crochet. Chain and slip stitch instructions remain the same. Convert consistently so the leaf proportions stay as intended.
How can I make a flatter holly appliqué?
Keep the leaves as written and replace the stuffed berries with embroidered red circles or firmly stitched decorative spots. This produces a flatter motif for fabric projects. Consider how the finished item will be washed, and choose yarn and attachment methods that suit its care requirements.
Has this pattern been physically sample-tested?
The written stitch counts are consistent, but this version has not been physically sample-tested. Leaf proportions and finished dimensions depend on your yarn, hook, tension, and shaping. Make one complete motif before preparing a large batch, and note any adjustments that improve your preferred result.
Conclusion
This Crochet Holly Pattern explains how to crochet two pointed leaves, add embroidered center veins, make three rounded berries, and sew the components into a festive arrangement.
You have also learned the stitch abbreviations, how to work around both sides of a foundation chain, and how to use picots to create decorative points. Careful counting and secure assembly will help you achieve a neat handmade finish.
Use your completed holly to personalize ornaments, gift bags, garlands, or other Christmas decorations. After trying the tutorial, please leave your honest opinion about the instructions and your finished project. Share your suggestions, favorite color combinations, and any practical adjustments that helped you create a result you love.