
One of the best things about a Crochet Christmas Stocking Pattern for Decoration is that it can be customized to match your personal style.
This crochet Christmas stocking decoration is designed primarily for decorative purposes rather than for holding heavy gifts. You will learn how to crochet the stocking body, shape the heel and toe, create a contrasting cuff, and add a sturdy hanging loop. The instructions use basic crochet techniques and include practical suggestions for choosing materials, maintaining an attractive shape, and finishing your project neatly. By following this guide, you can create a handmade Christmas decoration that looks lovely on a tree, a fireplace mantel, a festive garland, or a holiday gift display.
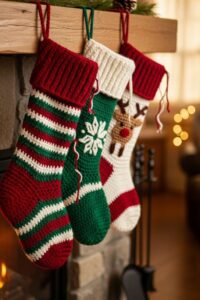
Materials, Crochet Stitches, and Preparation for Your Christmas Stocking
Before beginning your Crochet Christmas Stocking Pattern for Decoration, gather all your materials and choose the colors you want to use. Medium-weight yarn is a practical choice because it creates a stocking with visible stitches and enough structure to hold its shape. Acrylic yarn is affordable and available in many festive colors, while cotton yarn offers a firmer texture and clear stitch definition. Choose a yarn that feels comfortable to work with and follow its care instructions when selecting materials for your finished decoration.
You will need red yarn for a traditional stocking, white yarn for the cuff, a crochet hook suitable for your yarn, scissors, a yarn needle, and stitch markers. Green, gold, cream, or other contrasting yarns can be added for decorative stripes and embellishments. If you want a slightly fuller stocking, you can use a small amount of fiberfill in the toe, although stuffing is optional. A tape measure is also useful for checking the dimensions as you work.
This pattern uses US crochet terminology, making it easier to follow the instructions consistently. The abbreviation ch means chain, sc means single crochet, hdc means half double crochet, sl st means slip stitch, inc means increase by working two stitches into the same stitch, and dec means decrease by combining two stitches into one. The abbreviation MR means magic ring, although this pattern begins with a chain for the foot section. Numbers in parentheses indicate the total number of stitches at the end of a round.
For this decorative stocking, you will work the foot from the toe toward the heel, then create the upper leg section and finish with a contrasting cuff. This construction is straightforward and allows you to see the stocking shape develop gradually. The toe begins with a small number of stitches and expands through increases. The foot is then worked evenly, followed by a heel section that helps establish the familiar stocking silhouette.
Before starting, decide on the approximate size of your finished stocking. A small decoration measuring around 12–18 cm in height is suitable for a Christmas tree or gift display, although the final dimensions will depend on your yarn, hook, and tension. If you prefer a larger mantel decoration, use thicker yarn and a larger hook or work additional rounds. Keeping your stitch tension consistent will help the stocking look even and prevent the fabric from becoming too loose or stiff.
Step-by-Step Crochet Christmas Stocking Pattern for Decoration
Begin the Crochet Christmas Stocking Pattern for Decoration with red yarn to create the toe. Make a chain of 6 stitches and join the ends with a slip stitch to form a small ring, taking care not to twist the chain. Work 1 single crochet into each chain around, then join with a slip stitch. You should have 6 stitches. If you find working into a small chain ring difficult, you can use a magic ring with 6 single crochet stitches instead.
For Round 2, work 2 single crochet stitches into each stitch around, giving you 12 stitches. For Round 3, work 1 single crochet into the first stitch, then 2 single crochet stitches into the next stitch. Repeat this sequence around to reach 18 stitches. For Round 4, work 1 single crochet into each of the first 2 stitches, then increase in the next stitch. Repeat this sequence around to reach 24 stitches. These gradual increases create a rounded toe that forms the front of the stocking.
Continue with the foot section by working 1 single crochet into each stitch for approximately 5–7 rounds, maintaining 24 stitches per round. The exact number of rounds depends on the size you want and the thickness of your yarn. As you work, gently shape the toe with your hands and check that the crochet fabric lies smoothly. If the toe becomes too pointed, you may need a few more increase rounds; if it looks too wide, use fewer increase rounds or adjust your hook size.
To form the heel, identify the stitches along one side of the foot. Flatten the toe and foot gently so you can see the side where the heel will be positioned. Attach the red yarn near the back edge and work 12 single crochet stitches across the selected half of the opening. Chain 1 and turn. Work 12 single crochet stitches across the next row. Repeat for approximately 3–4 rows to create a small heel flap. Fold the flap so its side edges meet, then sew or slip stitch them together to form the heel corner. Keep the seam neat and avoid pulling the yarn too tightly.
Next, continue working around the opening of the foot to create the ankle and leg. Attach red yarn at the back of the heel and work single crochet stitches evenly around the opening, including the heel flap. Aim for a consistent stitch count of approximately 24 stitches, adjusting slightly if needed to keep the fabric flat. Work 1 single crochet into each stitch for about 6–10 rounds, depending on the desired stocking height. This section forms the long upper part of the crochet Christmas stocking, so you can add more rounds for a taller decoration or fewer rounds for a miniature version.
When the leg is the height you want, change to white yarn for the cuff. Join the white yarn at the back seam and work 1 round of single crochet around the opening. For the next 3–5 rounds, continue with single crochet stitches or use half double crochet stitches for a slightly taller texture. If you want a ribbed cuff, work half double crochet stitches in the back loop only for each round. Finish with a slip stitch, fasten off, and weave in the loose ends using a yarn needle. Your basic stocking shape is now complete and ready for decoration.
Finishing, Decorative Details, and Hanging Your Crochet Stocking
The finishing details can transform a simple Crochet Christmas Stocking Pattern for Decoration into a distinctive handmade holiday accessory. Begin by checking the toe, heel, leg, and cuff for uneven stitches. Use your fingers to shape the stocking gently, and make sure the heel seam is secure. If you notice a small gap around the heel, use the yarn needle and a matching strand of yarn to close it carefully. Neat finishing gives your stocking a more polished appearance and helps it maintain its shape.
For a classic Christmas look, add stripes to the leg using white, green, or cream yarn. You can change colors at the beginning of a round and carry the unused yarn inside the stocking if the color changes are frequent and the carried strands remain hidden. Alternatively, fasten off one color and attach the next for cleaner stripes. Two narrow white stripes against a red background create a traditional candy-cane effect, while green and cream stripes offer a more rustic appearance.
You can also decorate your stocking with crocheted snowflakes, tiny stars, hearts, or miniature Christmas trees. Small motifs can be made separately and sewn securely onto the front. If you prefer a simpler finish, embroider snowflake shapes or small decorative dots directly onto the stocking with contrasting yarn. Keep the decorations proportionate to the stocking size so the main shape remains easy to recognize. For a cohesive display, repeat the same motif across several stockings.
To create a hanging loop, attach white or red yarn at the back edge of the cuff. Chain approximately 15–20 stitches, depending on how large you want the loop to be. Slip stitch into the same area where you started, then fasten off and weave the ends through several stitches. For additional strength, sew the loop securely to the cuff with a yarn needle. A firm attachment helps the stocking hang upright when placed on a Christmas tree branch, hook, or decorative garland.
If you want a fuller-looking stocking, you can add a small amount of polyester fiberfill to the toe before closing any remaining gaps. Keep the stuffing light and distribute it evenly to preserve the shape. Because this project is intended for decoration, stuffing is optional and should not make the stocking excessively bulky. You can also insert a small piece of clean felt into the foot area if you want additional structure, provided it fits neatly and does not stretch the crochet fabric.
Finally, weave in all loose ends, trim excess yarn, and inspect the hanging loop and decorative motifs. Make sure the cuff sits evenly around the opening and the heel does not pull the stocking to one side. If your work looks slightly curled, gently reshape it with your hands and follow the yarn manufacturer’s care guidance before considering any blocking method. Avoid applying excessive heat, particularly to acrylic yarn, which can be damaged by high temperatures. Your handmade crochet Christmas stocking decoration is now ready to display.
Creative Decorating Ideas, Customization, and Common Crochet Tips
One of the greatest advantages of the Crochet Christmas Stocking Pattern for Decoration is how easily it can be adapted to different holiday themes. Traditional red-and-white stockings look beautiful on evergreen trees and rustic mantels, while cream stockings with gold accents suit a more elegant Christmas display. For a playful style, use bright pink, mint green, blue, or multicolored yarn. You can also make a coordinated set in which each stocking has a different cuff color but the same basic shape.
Personalized stockings can add a thoughtful touch to seasonal decorating. Consider embroidering a first initial, a small heart, or a simple star onto the leg. You can also create different motifs for each family member or use matching stockings as part of a handmade gift presentation. When making several stockings, write down the number of rounds and stitches you use so each piece remains approximately the same size. Small differences can add handmade character, but consistent proportions help a collection look coordinated.
If your stocking curls or refuses to lie flat, first check your stitch count. Too many stitches can cause the fabric to flare, while too few may make the stocking narrow or curl inward. Make sure increases are evenly spaced and avoid changing tension suddenly between rounds. If your stitches are very tight, try a slightly larger hook; if the fabric has large gaps, try a smaller hook. A small test swatch can help you determine which combination works best with your chosen yarn.
Another common challenge is creating a heel that looks balanced. The heel flap should be positioned along one side of the foot rather than directly at the toe. If the stocking looks twisted, lay it flat before sewing the heel seam and check that the leg rises naturally from the back of the foot. You can use stitch markers to identify the heel area and keep the front and back sections aligned. Taking time to position the heel correctly will improve the overall silhouette.
For a more textured cuff, try working half double crochet stitches in the back loop only. This technique creates visible horizontal ridges that resemble knitted ribbing. You can also use a simple scalloped edge by working small groups of stitches into selected spaces, although a straight cuff is often easier for beginners. If you add a decorative border, make sure it does not become too tight, as a tight edge can pull the top of the stocking inward.
When the holiday season ends, store your crochet Christmas stocking decoration in a clean, dry container away from direct sunlight, dust, and moisture. Avoid placing heavy items on top of it because this may flatten the toe or distort the cuff. If the stocking needs cleaning, follow the yarn care instructions and test a gentle cleaning method when appropriate. Let it dry completely before storage. With proper care, your handmade stocking can be reused for many Christmas seasons and become a treasured part of your holiday decorations.
Frequently Asked Questions About the Crochet Christmas Stocking Pattern for Decoration
1. Is this crochet Christmas stocking pattern suitable for beginners?
Yes. The pattern uses basic crochet techniques, including chains, single crochet, increases, slip stitches, and simple sewing. Beginners may need extra practice when shaping the toe and heel, but working slowly and checking stitch counts after each round makes the process manageable. The decorative details can be kept simple until you feel comfortable with more advanced techniques.
2. What yarn is best for a decorative crochet Christmas stocking?
Medium-weight acrylic or cotton yarn is a good choice. Acrylic yarn is lightweight, affordable, and available in many festive shades. Cotton yarn creates a firmer fabric with well-defined stitches. Choose a yarn that holds its shape and is comfortable to crochet with, and use a suitable hook to achieve an even fabric.
3. How much yarn do I need for one stocking?
A small decorative stocking generally requires a relatively modest amount of yarn. The quantity depends on the finished size, yarn weight, hook size, cuff height, and decorative details. If you are using leftover yarn, make the toe and leg first, then check that you have enough contrasting yarn for the cuff and hanging loop.
4. Can I make a larger Christmas stocking with this pattern?
Yes. You can use thicker yarn and a larger hook, add more increase rounds to widen the toe, and work additional rounds to lengthen the leg. Keep in mind that increasing only the height will produce a taller but not necessarily wider stocking. Adjust the width and height according to the proportions you want.
5. How do I make the heel look neat?
Position the heel flap along one side of the foot, work the rows evenly, and join the side edges carefully. Avoid pulling the seam too tightly, because excessive tension can distort the stocking. Use stitch markers to identify the heel area and check the shape before fastening off.
6. Can I crochet this stocking without a heel flap?
Yes. For a simplified decorative design, you can crochet the foot as a rounded shape and continue directly into a narrow leg. This produces a stylized stocking with a less defined heel. It is a useful option for beginners or for miniature ornaments where the shape does not need to be highly detailed.
7. How do I attach a hanging loop that will not come loose?
Create a chain loop and sew both ends securely to the back of the cuff. Weave the yarn through several stitches rather than relying on a single knot. Reinforcing the attachment helps the loop support the stocking during ordinary decorative use.
8. Can I add names or initials to the stocking?
Yes. You can embroider initials with yarn or add a small crocheted letter to the front. Choose a contrasting color so the lettering is easy to see. For a coordinated set, keep the placement and letter size consistent across all your stockings.
9. What can I use instead of red and white yarn?
Green and cream, blue and white, burgundy and gold, or pastel combinations can all work beautifully. Choose colors that complement your existing holiday decorations. Using one main color and one contrasting cuff color is a simple way to create a balanced design.
10. How do I prevent the stocking from curling?
Check that you have the correct stitch count and that your increases are evenly distributed. Tight tension can also cause curling, so consider using a larger hook if necessary. Gently reshape the stocking after finishing and follow the care instructions for your yarn.
11. Is stuffing necessary for a decorative stocking?
No. The stocking can remain flat and still look attractive on a tree or garland. A small amount of fiberfill in the toe can give it a fuller appearance, but too much stuffing may distort the shape. Choose the finish that best suits your decorating plans.
12. How should I store my crochet stocking after Christmas?
Store it in a dry, clean container away from moisture and direct sunlight. Keep it separate from sharp decorations that could catch the yarn. Make sure it is clean and completely dry before putting it away, and avoid placing heavy objects on top of it.
Conclusion
The Crochet Christmas Stocking Pattern for Decoration offers a fun and rewarding way to create handmade Christmas decorations with simple crochet techniques. In this tutorial, you learned how to choose appropriate yarn and tools, understand the essential abbreviations, crochet the toe and foot, shape the heel, build the leg, and finish the stocking with a contrasting cuff and hanging loop.
You also explored ways to personalize your stocking with stripes, embroidered details, crocheted motifs, and different color combinations. By maintaining consistent stitch counts, checking the heel placement, and securing all loose ends, you can create a neat decoration that complements your Christmas tree, mantel, or holiday gift display. Whether you make one stocking or an entire matching collection, this project allows you to express your creativity through handmade seasonal crafts.
Now it is time to choose your favorite yarn colors and start crocheting your own festive decoration! Please leave your honest opinion in the comments and share your suggestions for this Crochet Christmas Stocking Pattern for Decoration. Tell us which colors you would choose, how you would personalize your stocking, and whether you would prefer a traditional or modern design. Your ideas and feedback can inspire other crochet lovers to create beautiful handmade decorations for their own holiday celebrations.