
The Crochet Christmas tree pattern is a wonderful way to bring handmade charm, warmth, and creativity into your holiday decorations. Whether you are an experienced crocheter or someone just beginning to explore the world of crochet, creating a small Christmas tree with yarn is an enjoyable project that can add a personal touch to your festive celebrations.
These charming handmade trees can be used as Christmas ornaments, table decorations, mantel displays, handmade gifts, or even as part of a larger holiday arrangement. With a few basic crochet stitches, some green yarn, and a little patience, you can create a beautiful decorative tree that reflects your personal style.
One of the most appealing features of a Crochet Christmas tree pattern is its versatility. You can make a simple flat tree, a three-dimensional decorative tree, or a layered design with textured branches. You can also experiment with different yarn colors, decorative stitches, beads, buttons, and small crochet ornaments to create a unique result.
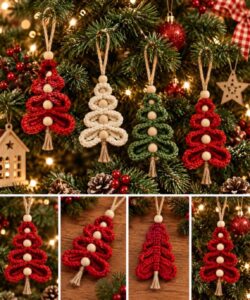
Traditional green yarn produces a classic Christmas appearance, while white, cream, red, gold, and pastel shades offer alternative styles. Handmade crochet trees are also reusable, making them lovely decorations that can be brought out year after year.
In this tutorial, you will learn how to create a three-dimensional crochet Christmas tree using beginner-friendly techniques and clearly explained instructions. The project is worked in a simple cone shape, with increases forming the wider bottom and gradual shaping creating the pointed top.
You will discover which materials to choose, how to work the stitches, how to assemble the tree, and how to add decorative details. The Crochet Christmas tree pattern is designed to be approachable, customizable, and enjoyable, allowing you to create a festive decoration while practicing useful crochet skills.
Materials and Crochet Stitches for Your Crochet Christmas Tree Pattern
Before starting your Crochet Christmas tree pattern, gather all the necessary materials. You will need green medium-weight yarn, a crochet hook appropriate for your yarn, a yarn needle, scissors, stitch markers, and polyester fiberfill for stuffing. You may also want a small cardboard circle or a firm fabric-covered base to help your finished tree stand upright. Optional decorations include small beads, embroidery thread, tiny bows, buttons, and a handmade star for the top.
Choosing the right yarn makes a noticeable difference in the final appearance. Medium-weight acrylic yarn is a practical option because it is affordable, widely available, and easy to work with. Cotton yarn creates a firmer texture and can help the stitches look more defined. If you want a softer decorative tree, choose a smooth yarn that allows you to see your stitches clearly. For beginners, avoiding very fluffy or textured yarn is recommended because it can make stitch counting more difficult.
For this project, you will use a few basic crochet stitches. The magic ring is an adjustable starting loop that allows you to close the center of a circular crochet project neatly. The single crochet (sc) is a compact stitch that creates a firm fabric suitable for stuffed decorations. The increase (inc) means working two single crochet stitches into the same stitch to expand the shape. The slip stitch (sl st) is useful for joining rounds or finishing the work neatly.
You should also understand how to work in continuous rounds. Unlike traditional joined rounds, continuous rounds are worked in a spiral without joining at the end of each round. This method creates a smooth appearance without visible joining seams. Place a stitch marker in the first stitch of each round so you can easily identify where the round begins. Move the marker upward as you complete each new round.
For the decorative branches, you can use simple increases and optional textured stitches. The main pattern uses single crochet stitches to keep the structure compact and easy to manage. If you want a more detailed appearance, you can add small surface crochet lines or decorative loops after completing the main tree. These details are optional and can be adjusted according to your skill level.
Before beginning, check your tension by crocheting a small sample. Your stitches should be firm enough to hold the stuffing without leaving large gaps, but not so tight that the hook becomes difficult to move. If the fabric looks too loose, try a smaller crochet hook. If your stitches are excessively tight, choose a slightly larger hook. Consistent tension helps create a symmetrical and attractive Crochet Christmas tree pattern.
Step-by-Step Instructions for the Crochet Christmas Tree Pattern
Step 1: Create the starting ring. Begin with green yarn and make a magic ring. Work six single crochet stitches into the ring. Pull the yarn tail gently to close the center. Place a stitch marker in the first stitch of the round. This small circle will form the top starting point of your tree. Make sure the center is closed firmly so that there is no visible hole.
Step 2: Begin increasing the stitches. In Round 2, work two single crochet stitches into each stitch around, giving you a total of 12 stitches. In Round 3, work one single crochet in the first stitch, followed by an increase in the next stitch. Repeat this sequence around, finishing with 18 stitches. These increases help establish the expanding shape of your decorative tree.
Step 3: Continue building the tree shape. In Round 4, work one single crochet in each stitch around, maintaining 18 stitches. In Round 5, work two single crochet stitches followed by one increase, repeating the sequence around to reach 24 stitches. Continue alternating increase rounds with plain single crochet rounds. This creates a gradual expansion while keeping the fabric firm and evenly shaped.
Step 4: Follow the basic round sequence. Use the following instructions as a guide for the upper and middle sections of the tree:
- Round 1: 6 sc in magic ring (6).
- Round 2: 2 sc in each stitch (12).
- Round 3: (1 sc, inc) repeat around (18).
- Round 4: 1 sc in each stitch (18).
- Round 5: (2 sc, inc) repeat around (24).
- Round 6: 1 sc in each stitch (24).
- Round 7: (3 sc, inc) repeat around (30).
- Round 8: 1 sc in each stitch (30).
- Round 9: (4 sc, inc) repeat around (36).
- Round 10: 1 sc in each stitch (36).
The stitch counts shown assume the increases are distributed evenly around each round. Use your stitch marker to keep track of the beginning of every round and count periodically to avoid mistakes.
Step 5: Continue the body of the tree. Repeat the pattern of one plain round followed by an increase round, adding another six stitches whenever you complete an increase round. For example, the next increase round will use five single crochet stitches followed by one increase, repeated around. Continue until the base reaches your preferred width. For a small tabletop tree, a base circumference of approximately 42 to 48 stitches can be a useful starting point, although the final size depends on your yarn and hook.
Step 6: Create the lower branches. To give the tree a more traditional appearance, you can add a decorative branch effect around the lower portion. One easy method is to work a round of slip stitches or single crochet stitches through the front loops only. This creates a subtle horizontal ridge. Another option is to crochet a separate short ruffle and attach it around the tree. Keep the decorative edge consistent so the tree looks balanced.
Step 7: Prepare the stuffing. Once the main cone reaches the desired height and width, begin checking its shape. Add small amounts of polyester fiberfill gradually if you are constructing a stuffed tree with a closed bottom. Spread the filling evenly using your fingers or a blunt tool. Avoid pushing too much stuffing into one area because this can create bumps and distort the cone. A small amount at a time provides better control.
Step 8: Shape the bottom. To give the tree a stable appearance, work a few rounds without increases. This helps create a short base section. If you want the tree to stand upright, you can insert a small cardboard or plastic disk covered with fabric before closing the bottom. Make sure the insert fits comfortably and does not stretch the stitches. Alternatively, attach a separately crocheted flat circular base.
Step 9: Finish the bottom opening. If your tree has an open lower edge, decrease evenly around the final rounds. Work single crochet stitches followed by invisible decreases until the opening is small enough to close. Add any remaining stuffing before completing the final stitches. Cut the yarn, leaving a long tail, and use a yarn needle to close the remaining opening neatly. Secure the yarn inside the project.
Step 10: Add the final decorative details. Use small pieces of contrasting yarn to create ornaments on the branches. You can sew tiny buttons or beads onto the surface, add embroidered stars, or make miniature crochet bows. A small handmade star placed at the top creates a traditional Christmas appearance. Secure every decoration firmly, especially if the tree will be displayed where children or pets may reach it.
Decorating, Customizing, and Displaying Your Crochet Christmas Tree Pattern
After completing the main structure, take a moment to inspect your Crochet Christmas tree pattern. Check whether the cone is symmetrical and whether the base sits evenly. If the tree leans to one side, gently adjust the stuffing or reposition the base. You can also use your fingers to shape the branches and improve the overall silhouette. Small adjustments at this stage can make a significant difference in the finished decoration.
Color selection is one of the easiest ways to personalize your crochet tree. Traditional forest green creates a classic holiday look, while lighter shades of green give the decoration a fresh appearance. White yarn can create a snow-covered effect, and cream yarn works beautifully in neutral Christmas arrangements. You can also make several trees in different colors and sizes to create a coordinated decorative display.
Adding a decorative garland is another lovely option. Use thin contrasting yarn and sew a spiral line around the tree, beginning near the top and gradually moving toward the bottom. Gold, silver, red, and white are especially attractive choices. You can also crochet a tiny chain and attach it carefully to the surface. Keep the garland lightly secured so it follows the shape of the tree without pulling the stitches.
A handmade star is a beautiful finishing detail. You can crochet a small star using yellow or gold yarn, then attach it securely to the pointed top. If you prefer a simpler finish, make a small bow or pom-pom instead. The top decoration should be proportional to the tree. A very large ornament can make a small tree look unbalanced, while a delicate detail helps preserve its overall shape.
The Crochet Christmas tree pattern can also be adapted for different uses. A smaller version can become a Christmas tree ornament by adding a hanging loop at the top. A larger version can be displayed on a shelf, table, or mantel. Several trees arranged together can create a charming miniature Christmas forest. You can also make a collection of different heights to add depth and interest to your holiday decorations.
Finally, think about how you will store your handmade tree after the holiday season. Keep it in a clean, dry container and avoid placing heavy objects on top of it. If it has delicate decorations, wrap it gently in soft tissue paper. Proper storage helps preserve its shape and allows you to enjoy your handmade creation for many Christmas seasons.
Frequently Asked Questions About the Crochet Christmas Tree Pattern
1. Is the Crochet Christmas tree pattern suitable for beginners?
Yes. This pattern uses basic stitches such as single crochet, increases, decreases, and slip stitches. Beginners who already understand how to hold a crochet hook and make basic stitches should be able to follow the instructions. Working slowly and using a stitch marker will make the process easier.
2. What yarn is best for crocheting a Christmas tree?
Medium-weight acrylic yarn is an excellent choice because it is easy to find, affordable, and available in many colors. Cotton yarn is another good option if you prefer a firmer texture. Choose a yarn that allows you to see your stitches clearly, especially if this is your first crochet decoration.
3. How much yarn do I need for this project?
A small decorative tree generally requires a relatively small amount of yarn. The exact quantity depends on the finished dimensions, yarn thickness, hook size, and stitch tension. It is always helpful to have a little extra yarn available for the base and decorative details.
4. How can I make my crochet Christmas tree stand upright?
You can add a firm base made from cardboard, plastic, or another suitable lightweight material covered with fabric. Another option is to use a small amount of firm stuffing and shape the bottom carefully. A flat crocheted base can also help improve stability.
5. Can I make a Crochet Christmas tree pattern without stuffing?
Yes. You can create a flat Christmas tree by crocheting two triangular panels and joining them around the edges. You can also make a decorative tree using layered crochet motifs. These alternatives are especially useful for hanging ornaments and wall decorations.
6. How do I make the branches look more realistic?
You can create branch-like layers using front-loop stitches, decorative ruffles, or separately crocheted strips attached around the tree. Different shades of green can also create visual depth. Arrange the layers gradually so the bottom branches are wider than the upper ones.
7. Why does my crochet tree look uneven?
Unevenness can happen because of inconsistent tension, misplaced increases, or incorrect stitch counts. Check the total number of stitches at the end of each round. Using a stitch marker and counting regularly can help prevent mistakes. If the tree is already complete, adjusting the stuffing may improve its shape.
8. Can I use different colors for my Christmas tree?
Absolutely. Green is traditional, but white, red, gold, cream, and pastel shades can create beautiful alternatives. You can also combine two shades of green to give the tree more dimension or use contrasting colors for the ornaments.
9. What decorations can I add to my crochet Christmas tree?
Popular options include small crochet stars, miniature bows, buttons, embroidered ornaments, yarn garlands, and tiny decorative flowers. Choose lightweight decorations that will not pull on the crochet fabric. If the tree will be handled frequently, secure every detail carefully.
10. How do I make a smaller Christmas tree ornament?
Simply reduce the number of increase rounds and use thinner yarn with an appropriately sized hook. Once the tree reaches your preferred height, finish the bottom and add a small hanging loop. This creates a charming handmade ornament for a Christmas tree.
11. Can I wash my crochet Christmas tree?
Cleaning depends on the yarn and decorations used. Many acrylic and cotton yarns can be gently hand washed, but always check the yarn care instructions. Remove or protect decorations that are not washable. Allow the tree to dry completely before storing it to prevent unwanted odors or moisture damage.
12. How long does it take to complete this pattern?
The time varies depending on your crochet experience, the size of the tree, and the amount of decoration you add. A small, simple tree may take only a few hours, while a larger design with multiple decorative details can take longer. Beginners may need additional time to practice the stitches and check their work.
Conclusion
The Crochet Christmas tree pattern is a delightful handmade project that combines creativity, simple crochet techniques, and festive decoration. Throughout this tutorial, you learned how to choose the right materials, understand the basic stitches, create a cone-shaped tree, work increases and decreases, prepare a stable base, and add beautiful decorative details. You also discovered how to customize the size, colors, and appearance of your Christmas tree to match your holiday style.
One of the best things about this project is that every handmade tree can be different. You can create miniature ornaments, elegant tabletop decorations, colorful holiday displays, or an entire collection of crochet trees in different sizes. With a little practice, the basic construction method can become the starting point for many creative Christmas projects.
Now it is time to choose your favorite yarn, prepare your crochet hook, and bring your own Crochet Christmas tree pattern to life! We would love to know how your project turns out. Leave your honest opinion in the comments and share your suggestions, favorite colors, or creative ideas for decorating handmade Christmas trees. Your feedback and experiences can inspire other crochet enthusiasts to enjoy this festive project too!