
The Cat Quilt Pattern is a wonderful sewing project for anyone who loves cats, handmade decorations, and creative patchwork designs. Combining the charm of feline silhouettes with the beauty of colorful fabrics, this quilting project allows you to create a unique piece that can brighten a bedroom, decorate a living room, or become a thoughtful handmade gift for someone who loves cats.
Whether you are an experienced quilter or a beginner interestedin learning patchwork techniques, making a cat-themed quilt is an enjoyable way to explore fabric combinations, geometric shapes, and creative sewing. With a little planning and patience, you can transform simple fabric pieces into a beautiful quilt filled with personality.
One of the most appealing aspects of a Cat Quilt Pattern is the opportunity to customize every detail. You can choose realistic cat colors, playful prints, floral fabrics, neutral backgrounds, or colorful combinations to create a design that reflects your personal taste.
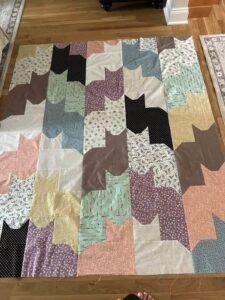
Each cat block can represent a different feline appearance, allowing you to experiment with silhouettes, ears, tails, and contrasting fabric sections. The finished quilt can be simple and elegant or colorful and playful, depending on the fabrics and layout you select. This flexibility makes cat-themed quilting suitable for many different decorating styles and occasions.
In this tutorial, you will learn how to plan, cut, assemble, and finish a beautiful cat quilt using beginner-friendly patchwork techniques. The Cat Quilt Pattern explained here uses individual cat blocks constructed from fabric squares, rectangles, and simple triangular pieces.
These components are arranged to form recognizable cat silhouettes before being joined into a larger quilt top. You will also learn how to add batting and backing fabric, create decorative quilting stitches, and finish the edges professionally. By following the instructions carefully, you can develop a charming handmade quilt while practicing important sewing skills.
Materials and Preparation for Your Cat Quilt Pattern
Before beginning your Cat Quilt Pattern, gather all the materials needed for the project. You will need cotton quilting fabric in several colors, a coordinating background fabric, fabric scissors or a rotary cutter, a cutting mat, a quilting ruler, sewing thread, pins or clips, and a sewing machine. You will also need batting and backing fabric to complete the quilt sandwich. A fabric marker or washable pencil can help you transfer measurements and mark important sewing lines.
Choosing suitable fabric is an important part of creating a beautiful cat quilt. Quilting cotton is particularly recommended because it is stable, easy to cut, and simple to sew. You can use different colors for each cat block to create a collection of unique feline designs. Black, gray, orange, cream, brown, and white fabrics are excellent choices for realistic cat-inspired blocks. Printed fabrics can also add personality without making the construction unnecessarily complicated.
For a beginner-friendly project, consider creating cat blocks measuring approximately 12 inches square before joining them together. This size provides enough space to create recognizable cat shapes while keeping the individual sections manageable. You can make four, six, or nine blocks depending on the finished quilt size you want. Remember that seam allowances must be included in your cutting measurements, and the final dimensions will become slightly smaller after the blocks are sewn together.
The main design consists of a cat silhouette placed against a contrasting background. Each cat block can include a rectangular body, a smaller head section, two triangular ears, and a narrow tail. These pieces are joined using straight seams to form a stylized feline figure. This approach is often called patchwork quilting, a sewing technique that combines smaller fabric pieces to create a larger design. It is especially useful for making themed quilts with repeated shapes.
You should also prepare the batting and backing fabric before reaching the final assembly stage. Batting is the soft middle layer that gives a quilt its warmth, thickness, and padded appearance. Cotton, polyester, and cotton-polyester blends are common options. The backing fabric forms the underside of the quilt and can be a solid color or a coordinating print. Choose materials that are compatible with the weight and intended use of your finished project.
Finally, prepare your workspace and organize the fabric pieces by color and size. Press the fabric before cutting to remove wrinkles and improve measurement accuracy. If your fabrics are new, prewashing them according to their care instructions can help prevent unwanted shrinkage later. Arrange the pieces in groups so you can easily identify the components of each cat block. Careful preparation will make the entire Cat Quilt Pattern easier to assemble.
Step-by-Step Instructions for Sewing the Cat Quilt Pattern
Step 1: Plan your cat block design. Begin by drawing a simple cat silhouette on paper. Include a square or rectangular head, two triangular ears, a rectangular body, and a curved or angled tail. You do not need to create complicated shapes. A geometric cat design made from straight fabric pieces is easier to sew and works beautifully in patchwork quilts. Decide whether all your cats will have the same appearance or whether each block will feature a different color and arrangement.
Step 2: Cut the background fabric. For a 12-inch finished block, prepare background pieces that will allow you to build the cat silhouette with accurate seam allowances. A practical method is to divide the block into smaller sections measuring approximately 4 inches to 6 inches, depending on the design. Cut additional background squares and rectangles to fill the spaces around the cat. Keep the fabric pieces organized and label them if necessary.
Step 3: Prepare the cat head. Cut one square or rectangle for the head using your chosen cat fabric. For a simple block, a head measuring approximately 4 inches square works well. To create pointed ears, cut two small triangles from the same fabric or from a contrasting material. Position the triangles at the upper corners of the head section. Sew them carefully, using a consistent quarter-inch seam allowance. Press the seams to keep the shape flat.
Step 4: Create the cat body. Cut a larger rectangular fabric piece for the body. A section approximately 4 inches wide and 5 inches long can serve as a starting point, although the dimensions may vary depending on your block layout. Place the body underneath the head section, leaving enough background fabric around the silhouette to create a balanced composition. Sew the sections together using straight seams and press the completed seam allowances.
Step 5: Add the tail. Cut a narrow strip of fabric for the tail. You can create a straight tail using a rectangular strip or make an angled tail from several small pieces. For a more decorative appearance, use a contrasting fabric color. Position the tail along one side of the body and sew it into the surrounding background sections. Make sure the tail is securely attached and does not interfere with the other block pieces.
Step 6: Assemble the individual cat sections. Join the head, body, tail, and background pieces to complete the silhouette. Work in smaller sections whenever possible instead of trying to join every piece at once. Align the raw edges carefully and pin the fabrics before sewing. Use a consistent quarter-inch seam allowance throughout the block. This will help the different components fit together and create a more professional result.
Step 7: Press and square the block. After assembling the cat design, press the seams gently using an iron suitable for your fabric. Avoid stretching the material while pressing. Place the quilting ruler over the block and trim any uneven edges. Make sure the block has the same dimensions as the other blocks in your project. Accurate squaring is important because it makes the later quilt assembly much easier.
Step 8: Repeat the process for the remaining blocks. Create additional cat blocks using different fabric combinations. You can alternate light and dark cats, use different background colors, or repeat the same design throughout the quilt. If you want a coordinated appearance, select a small group of colors and use them consistently. For a more playful design, allow each cat to have its own unique fabric combination.
Step 9: Arrange the quilt layout. Place all completed blocks on a large flat surface or design wall. Move them around until you find an arrangement that looks balanced. Alternate dark and light fabrics to create visual contrast. If you are making a nine-block quilt, arrange the blocks in three rows of three. You can also add fabric sashing between the blocks to create separation and emphasize each cat silhouette.
Step 10: Sew the quilt top together. Join the blocks into horizontal rows, keeping the edges aligned. Press the seams in alternating directions when practical to reduce bulk at the intersections. Once the rows are complete, sew them together to create the full quilt top. Measure the finished piece and trim any uneven outer edges before moving on to the quilting stage.
Step 11: Prepare the quilt sandwich. Place the backing fabric on a flat surface with the wrong side facing upward. Add the batting on top, followed by the quilt top with the right side facing upward. Smooth all three layers carefully, removing wrinkles and ensuring the edges are aligned. Use quilting pins or temporary basting stitches to hold the layers together. This three-layer arrangement is called a quilt sandwich.
Step 12: Quilt and finish the project. Sew through all three layers using straight lines, decorative patterns, or stitching that follows the outlines of the cat blocks. Start near the center and work outward to help prevent fabric shifting. Once the quilting is complete, trim the excess batting and backing. Attach binding strips around the outer edges, folding them neatly to cover the raw edges. Finish with small hand stitches or machine stitching to secure the binding.
Quilting, Decoration, and Creative Ideas for Your Cat Quilt Pattern
Once the quilt top has been assembled, you can begin thinking about the decorative details that will make your Cat Quilt Pattern special. One of the easiest ways to enhance the finished design is by adding quilting stitches around the cat silhouettes. These stitches can emphasize the ears, heads, bodies, and tails while giving the quilt additional texture. Straight-line quilting is a beginner-friendly option because it requires minimal preparation and produces a clean appearance.
Fabric selection can completely change the personality of your quilt. If you prefer a traditional look, choose neutral backgrounds and realistic cat colors such as gray, brown, cream, and black. For a cheerful design, combine bright pink, blue, yellow, and green fabrics. Floral prints and small geometric patterns can also create a charming appearance. Try to balance busy prints with solid fabrics so the cat shapes remain easy to recognize.
Another creative possibility is adding small embroidered details to the cat blocks. Simple eyes, noses, whiskers, and mouth lines can give each silhouette more personality. Use embroidery floss and a hand-sewing needle to add these details after completing the main fabric construction. You can make every cat different by changing the eye shape, whisker placement, or nose color. These small touches can transform a simple geometric quilt into a personalized decorative project.
You can also experiment with different block arrangements. A symmetrical layout creates a traditional patchwork appearance, while an alternating arrangement gives the quilt a more dynamic look. Try placing the cats in different directions or alternating blocks with simple geometric patterns. You can also add borders around the quilt to increase its finished dimensions and create a frame for the central design.
The Cat Quilt Pattern is an excellent opportunity to use leftover fabric from previous sewing projects. Small fabric scraps can become ears, tails, decorative patches, and contrasting body sections. This makes the project especially useful for quilters who enjoy making creative designs from materials they already have. Organize your scraps by color and size before beginning so you can combine them more easily.
Finally, consider how the finished quilt will be used. A smaller version can become a decorative wall hanging, a baby quilt, or a lap blanket. A larger version can be used on a bed or sofa. You can also create matching cushion covers using leftover cat blocks. If the quilt is intended for regular use, choose durable cotton fabrics and secure the quilting stitches carefully. A well-finished quilt can become a treasured handmade item that brings comfort and personality to your home.
Frequently Asked Questions About the Cat Quilt Pattern
1. Is the Cat Quilt Pattern suitable for beginners?
Yes. A simple Cat Quilt Pattern made from squares, rectangles, and triangles is suitable for beginners who have basic sewing machine experience. The project introduces important quilting techniques, including cutting fabric accurately, joining patchwork pieces, pressing seams, assembling quilt blocks, and attaching binding. Start with a small number of blocks to become familiar with the process.
2. What fabric is best for making a cat quilt?
Quilting cotton is one of the best choices because it is stable, easy to sew, and available in many colors and prints. It also works well with cotton or polyester batting. Choose fabrics with similar weights to help the quilt top remain even during construction.
3. How many cat blocks do I need for a quilt?
The number depends on the desired finished dimensions. Four blocks arranged in two rows create a small project, while nine blocks arranged in three rows create a larger decorative quilt. You can add borders or sashing to increase the overall size without making additional cat blocks.
4. What is the best size for a cat quilt block?
A 12-inch finished block is a practical starting point because it provides enough room for a recognizable cat silhouette. However, you can make smaller blocks for table runners or wall hangings, or larger blocks for bed quilts. Remember to account for seam allowances when calculating your cutting dimensions.
5. How do I make the cat shapes look more realistic?
Use contrasting fabric sections to distinguish the head, body, ears, and tail. You can also add embroidered eyes, noses, and whiskers. Different fabric colors and small decorative details help give each cat a unique appearance.
6. Can I use fabric scraps for this quilt?
Absolutely. Fabric scraps are perfect for creating cat silhouettes, especially when you want every block to have a different appearance. Make sure the scraps are large enough for the required pieces and that the fabrics have compatible weights.
7. What batting should I use for a cat quilt?
Cotton batting creates a traditional quilt texture and is suitable for many decorative projects. Polyester batting is generally lightweight and can provide a fuller appearance. Cotton-polyester blends offer characteristics of both materials. Your choice should depend on the desired thickness, warmth, and care requirements.
8. How do I keep my quilt blocks the same size?
Use a quilting ruler and cutting mat to measure every piece accurately. Maintain a consistent quarter-inch seam allowance and press the seams after sewing. Once each block is complete, square it to the same dimensions before joining it to the other blocks.
9. Should I add sashing between the cat blocks?
Sashing is optional but can improve the overall appearance of your quilt. It consists of narrow fabric strips placed between blocks to separate the designs. A solid background color can make the cat silhouettes stand out and create a more organized layout.
10. What quilting design works best for a cat quilt?
Straight-line quilting is a simple and attractive option for beginners. You can sew parallel lines across the quilt or stitch around the cat silhouettes to emphasize their shapes. Curved decorative lines can also create a softer appearance if you have more quilting experience.
11. How do I finish the edges of my cat quilt?
The most common finishing method is quilt binding. Cut fabric strips, join them together, fold them lengthwise, and attach them around the raw edges of the quilt. Fold the binding over to the back and secure it with neat stitches. This protects the edges and gives the quilt a clean finish.
12. Can I personalize the Cat Quilt Pattern as a gift?
Yes. You can choose fabrics in the recipient’s favorite colors, create different cat silhouettes, and add embroidered details. You could also include a small label with a handmade message or the date the quilt was completed. Personalized details make the finished project especially meaningful.
13. How should I wash and care for a finished cat quilt?
Always consider the care instructions for the fabrics and batting you used. In general, gentle washing with a mild detergent and avoiding excessive heat can help preserve the quilt. Test colorfastness when using unfamiliar fabrics and dry the quilt according to the materials’ recommendations. Store it in a clean, dry place when not in use.
Conclusion
The Cat Quilt Pattern is a charming and rewarding sewing project that combines patchwork techniques with the playful beauty of cat-inspired designs. Throughout this tutorial, you learned how to choose suitable materials, prepare fabric pieces, construct cat silhouettes, assemble individual blocks, arrange the quilt top, and complete the project with batting, backing, quilting stitches, and binding. You also discovered how to personalize each block with different colors, prints, and embroidered details.
One of the greatest advantages of this project is its flexibility. You can create a simple quilt with repeated cat silhouettes or develop a colorful design in which every block has a different personality. By experimenting with fabric scraps, decorative stitching, and creative layouts, you can turn a basic quilting idea into a truly unique handmade piece.
Now that you know how to make your own Cat Quilt Pattern, it is time to gather your favorite fabrics and start sewing! We would love to hear about your experience. Leave your honest opinion in the comments and share your suggestions, favorite fabric combinations, or ideas for improving this design. Your feedback can inspire other sewing enthusiasts and help everyone discover new ways to enjoy creative quilting.