
The Crochet Cookie Keychain Pattern is a fun and beginner-friendly crochet project that transforms a few simple stitches into a miniature cookie with a charming handmade appearance. This tiny amigurumi accessory is perfect for decorating keys, backpacks, handbags, pencil cases, and zipper pulls. With its round cookie shape, contrasting chocolate-chip details, and soft texture, it is an appealing project for anyone who enjoys making small crochet creations. Because it requires only a modest amount of yarn, it is also an excellent way to use leftover materials from other projects.
One of the best things about the Crochet Cookie Keychain Pattern is how easily it can be personalized. You can create a traditional golden-brown chocolate-chip cookie, a pale vanilla biscuit, a chocolate cookie with colorful sprinkles, or a sandwich cookie with a contrasting center. Different shades of brown and beige help reproduce the familiar appearance of baked treats, while embroidered details make each finished cookie unique. Whether you are crocheting for yourself, preparing handmade gifts, or creating a small collection of accessories, this pattern offers plenty of room for creativity.
This Crochet Cookie Keychain Pattern uses basic amigurumi techniques, including working in continuous rounds, increasing stitches to create a flat circle, and joining two crocheted pieces to form a lightly stuffed cookie. The instructions use US crochet terminology and include stitch abbreviations, round-by-round directions, and finishing tips. You can make a small cookie with two matching circular sides, add embroidered chocolate chips, and attach a keychain ring with a reinforced loop. Even if you are new to crochet, taking the project one step at a time will help you create a neat and attractive result.
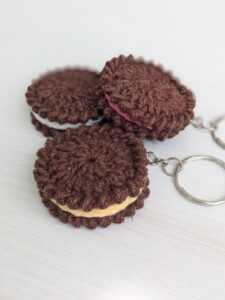
Materials, Crochet Abbreviations, and Preparation for Your Crochet Cookie Keychain Pattern
Before beginning your Crochet Cookie Keychain Pattern, gather all the supplies you need. You will need a small amount of beige, tan, or light-brown yarn for the cookie, a darker brown yarn for the chocolate chips, a crochet hook appropriate for your yarn, polyester fiberfill, a yarn needle, scissors, and a stitch marker. You will also need a metal keychain ring or lobster clasp with a small attachment loop. Cotton yarn is a good choice because it creates defined stitches, while acrylic yarn is lightweight and available in many colors.
Choose a hook that produces a dense fabric without making the stitches uncomfortable to work. For lightweight cotton yarn, a hook around 2.5 mm to 3 mm may be suitable, although the correct size depends on your yarn and personal tension. Amigurumi is generally crocheted with a smaller hook than you might use for a loose scarf or blanket because the stitches need to hold the stuffing securely. If you can see large gaps between the stitches, try a smaller hook or adjust your tension before continuing.
The main keyword, Crochet Cookie Keychain Pattern, describes a set of crochet instructions for making a miniature cookie-shaped accessory that can be attached to keys or bags. The cookie is usually constructed from two flat, rounded pieces that are joined around the edge, with a small amount of stuffing between them. Decorative details such as chocolate chips, sprinkles, or a contrasting center help the finished project resemble a real cookie. The exact size and decoration can be changed to suit your preferred style.
This pattern uses the following common crochet abbreviations:
- MR – magic ring.
- ch – chain.
- sc – single crochet.
- inc – increase, meaning two single crochet stitches worked into the same stitch.
- dec – decrease, meaning two stitches are joined into one.
- sl st – slip stitch.
- st – stitch.
- FO – fasten off.
- BLO – back loop only.
The instructions use US crochet terminology. A single crochet stitch creates a compact fabric that works well for miniature amigurumi, while an increase expands the circle evenly. A decrease reduces the stitch count and is useful for shaping rounded objects. A magic ring creates an adjustable center that can be pulled closed to minimize the hole at the beginning of each cookie piece. If you find the magic ring difficult, you can chain two and work the first round into the second chain from the hook.
For this project, you will crochet two matching circles, each approximately 5–6 cm wide depending on your yarn and hook. The circles will be joined with the right sides facing outward, leaving a small opening for stuffing. You will then close the opening, add chocolate-chip details, and attach the keychain hardware. Before making the full project, practice the first few rounds and check that your circles lie flat. If they curl into a bowl shape, you may need additional increases; if the edges ripple, check your stitch count and tension.
Step-by-Step Crochet Cookie Keychain Pattern Instructions
Step 1: Make the first cookie circle. Using your beige or tan yarn, create a magic ring and work six single crochet stitches into the ring. Pull the yarn tail to close the center, then place a stitch marker in the first stitch. This small circle forms the center of the cookie. Keep your tension even and make sure the ring closes securely so that there is no visible hole in the middle.
Round 1: MR, 6 sc. (6 sts)
Step 2: Increase the circle evenly. Work two single crochet stitches into every stitch around. These increases expand the circle and help it remain flat. Count the stitches before beginning the next round. If you are working in a continuous spiral, move the stitch marker into the first stitch of each new round so you can identify the beginning accurately.
Round 2: Inc in each st around. (12 sts)
Step 3: Continue increasing. Work one single crochet into the first stitch, followed by an increase in the next stitch. Repeat this sequence around the circle. The extra stitches create a wider shape that will become one side of your cookie. Keep the stitches uniform, and avoid pulling the yarn so tightly that the circle becomes difficult to work.
Round 3: Sc 1, inc; repeat around. (18 sts)
Step 4: Make the circle wider. Work one single crochet into each of the next two stitches, then make an increase in the following stitch. Repeat around the entire round. Your circle should now have a more recognizable cookie-sized shape. If you notice uneven edges, check that each increase is placed in the correct stitch and that you have not accidentally added extra stitches.
Round 4: Sc 2, inc; repeat around. (24 sts)
Step 5: Complete the final increase round. Work one single crochet into each of the next three stitches, followed by an increase in the next stitch. Repeat this sequence around. This creates a larger circle suitable for a small keychain cookie. If you prefer a smaller cookie, you can stop after Round 4; for a larger design, continue with another increase round using the same principle.
Round 5: Sc 3, inc; repeat around. (30 sts)
Step 6: Finish the first circle. Slip stitch into the next stitch if you prefer a defined ending, then fasten off and leave a yarn tail for sewing if needed. Alternatively, fasten off directly after the final stitch. Gently flatten the circle and check its shape. It should be relatively even around the edge, with no large gaps or pronounced waves.
Step 7: Crochet the second circle. Repeat Rounds 1–5 using the same cookie-colored yarn. Try to maintain the same tension and use the same hook so both circles have matching dimensions. Lay the pieces on top of each other to compare their size. If one circle is slightly larger, check the stitch count and tension before joining the pieces together.
Step 8: Add chocolate-chip details. Use dark-brown yarn and a yarn needle to embroider several small chocolate chips onto the front circle. Make each chip with a few short stitches, varying the size and spacing to create a natural appearance. You can also crochet tiny raised dots using small yarn loops if you prefer a textured finish. Keep the details relatively flat so they do not catch easily on clothing, bags, or other objects.
Step 9: Position the two circles. Place the circles together with the decorated sides facing outward. Align the edges and secure them with stitch markers or clips. If you want a more defined cookie edge, you can join the circles using the same yarn color. A contrasting brown joining round can resemble a darker baked crust, but the simplest version uses the main cookie color.
Step 10: Join the cookie pieces. Insert the hook through the corresponding stitches of both circles and work one single crochet into each pair of stitches around the edge. Keep the stitches evenly spaced so the cookie remains flat. Stop when approximately one-third of the edge remains unjoined. At this stage, the two circles should be securely connected along most of their circumference.
Step 11: Add a little stuffing. Insert a small amount of polyester fiberfill through the opening. Spread the stuffing evenly between the two circles, using only enough to give the cookie a slightly padded appearance. Too much stuffing may distort the circular shape or stretch the stitches. A cookie keychain generally looks best when it is soft but not overly thick.
Step 12: Finish joining the edge. Continue single crocheting around the remaining opening until the two circles are completely joined. Keep the stuffing inside and check that no fiberfill is caught in the stitches. When you reach the beginning of the joining round, slip stitch to finish neatly, then fasten off and weave in the yarn tail. Gently shape the edge with your fingers.
Step 13: Create a secure attachment loop. Use the main yarn to make a small loop at the top of the cookie. You can crochet a short chain of approximately 8–10 stitches, fold it into a loop, and sew both ends securely to the upper edge. Reinforce the attachment by passing the yarn through several stitches on the cookie rather than relying on one stitch alone. The loop should be large enough to accommodate your keychain ring without being excessively long.
Step 14: Attach the keychain hardware. Thread the metal ring or lobster clasp through the crocheted loop. Check that the loop is firmly secured and that the hardware does not pull the cookie out of shape. Give the ring a gentle tug to test the attachment before using the keychain. If you notice movement at the seam, reinforce it with additional stitches.
Step 15: Inspect and finish your cookie. Weave in any remaining yarn ends and check the embroidered chocolate chips for loose strands. Trim excess yarn carefully without cutting the crochet fabric. Make sure the joining edge is secure and the stuffing is not visible. Your Crochet Cookie Keychain Pattern is now complete, ready to decorate your keys, backpack, handbag, or pencil case.
Creative Variations, Troubleshooting, and Finishing Your Crochet Cookie Keychain Pattern
One of the easiest ways to personalize your Crochet Cookie Keychain Pattern is to change the cookie color. Use pale cream yarn for a vanilla biscuit, warm tan for a classic sugar cookie, or medium brown for a chocolate cookie. You can also combine two shades of brown to create the appearance of a baked edge. If you want a colorful design, add embroidered sprinkles in pink, blue, yellow, or green. Small changes in color can make several cookies look like a coordinated collection while allowing each one to have its own character.
You can create a sandwich-cookie variation by crocheting two darker circles and adding a narrow strip of white or pastel yarn between them. The center strip can be made with a simple round of single crochet or a small crocheted band, depending on the desired thickness. Another option is to make a chocolate-chip cookie with a pale center and darker edge. These variations use the same basic circular construction, making them useful ways to practice your skills without learning an entirely new pattern.
If you want the cookie to look more realistic, vary the placement of the chocolate chips instead of arranging them in a perfect circle. Use a combination of tiny straight stitches and short diagonal stitches to create irregular chip shapes. Avoid making every detail identical, since slight differences help the decoration look more natural. You can also use a darker brown yarn to embroider a few small spots near the edge, suggesting areas where the cookie has browned during baking.
A common problem is a circle that curls upward instead of lying flat. This can happen when there are too few increases, when the yarn tension is too tight, or when the hook is too small for the chosen yarn. Count the stitches at the end of every round and compare the result with the instructions. If the circle continues to curl, check whether your stitch gauge is unusually tight and consider trying a slightly larger hook. If the edge ripples, verify that you have not added too many increases.
Another challenge is getting the two circles to match in size. Even when you follow the same round instructions, changes in tension can cause one piece to become larger than the other. Use the same hook and yarn for both pieces, and check the dimensions before joining them. If the difference is small, you may be able to adjust the tension slightly during assembly, but avoid stretching one circle excessively. Consistent measurements will help your finished cookie maintain a neat outline.
If the cookie looks too thick, remove some stuffing before closing the edge. The goal is to create a lightly padded shape rather than a firm ball. Distribute the fiberfill evenly, keeping it away from the joining stitches. If the cookie looks too flat, add a little more stuffing before completing the seam. Working slowly during this stage gives you greater control over the final shape and prevents the edges from becoming stretched or distorted.
For everyday use, the attachment loop deserves particular attention. A keychain is pulled and moved frequently, so a loop made from only a few loosely secured stitches may wear out. Sew the loop into a reinforced area, use multiple passes of yarn, and check the connection before attaching the metal ring. Inspect the hardware occasionally and repair loose stitches promptly. If the accessory will be used by a child, remember that small metal parts and detached decorations can pose choking hazards.
The Crochet Cookie Keychain Pattern also works well as a small handmade gift or craft-fair item. You can make several cookies in different colors and package them as a matching set, or create a themed collection featuring sugar cookies, chocolate cookies, and sandwich biscuits. If you are making multiple pieces, keep notes about your yarn, hook size, and stitch counts so that each cookie has a similar finished size. Consistent construction makes the collection look polished and helps you reproduce your favorite designs.
Crochet Cookie Keychain Pattern FAQ and Conclusion
What is a Crochet Cookie Keychain Pattern?
A Crochet Cookie Keychain Pattern is a set of instructions for making a miniature cookie-shaped crochet accessory. It usually includes directions for crocheting a round or oval shape, adding decorative details, joining the pieces, and attaching a keychain ring. The cookie can be styled as a chocolate-chip biscuit, sugar cookie, sandwich cookie, or another small treat-inspired design.
Is this crochet cookie keychain suitable for beginners?
Yes. This pattern uses basic stitches, including single crochet, increases, slip stitches, and simple joining techniques. Beginners should be comfortable counting stitches and working in continuous rounds. If you are new to amigurumi, start slowly and use a stitch marker to track the beginning of each round. Making one practice circle before starting the full project can also help you become familiar with the construction.
How much yarn do I need for a crochet cookie keychain?
Only a small amount of yarn is required. The exact quantity depends on the size of the cookie, the yarn weight, and whether you add a contrasting edge or decorative details. A small amount of beige or brown yarn is generally enough for the two circles, while a few short scraps of dark yarn can be used for chocolate chips. Keeping leftover yarn from larger projects is a practical way to prepare for miniature crochet accessories.
What is the best yarn for a crochet cookie keychain?
Cotton yarn is a popular choice because it creates defined stitches and a firm surface. Acrylic yarn can also work well and offers many color options. Choose smooth yarn that is easy to crochet and use a hook that produces dense stitches. Avoid very fluffy yarn if you want clearly visible chocolate-chip details and a neat circular edge.
Why is my crochet cookie curling?
Curling usually occurs when the circle does not have enough increases, the stitches are too tight, or the hook is too small for the yarn. Check the stitch count at the end of each round and make sure the increases are evenly distributed. If the circle still curls, experiment with a slightly larger hook or adjust your tension on a sample piece.
How do I make the cookie bigger or smaller?
To make a smaller cookie, stop increasing after an earlier round. To make a larger cookie, continue adding increase rounds using the same principle: each new round adds one more single crochet between increases. For example, a round that follows sc 4, inc expands the circle beyond the round that follows sc 3, inc. Make two matching circles of the same size and check their dimensions before joining them.
How do I attach chocolate chips?
Embroidery is a simple way to add chocolate chips. Use dark-brown yarn and a yarn needle to make a few short stitches in different directions. Keep the stitches compact and secure the yarn ends inside the crocheted fabric. You can also crochet tiny raised details, but embroidered chips usually create a flatter surface that is less likely to snag.
Can I make a sandwich-cookie version?
Yes. Crochet two circles in a darker color and join them with a narrow contrasting band to represent the filling. You can use white, cream, pink, or another color that complements the outer cookie. Keep the band even around the circumference and avoid adding too much stuffing if you want a neat sandwich-cookie shape.
How do I attach the keychain ring securely?
Make a small crochet loop and sew it firmly to the upper edge of the cookie. Reinforce the loop by passing the yarn through several stitches and securing the ends carefully. Attach the metal ring or clasp through the loop, then test the connection with a gentle pull. Check the loop and hardware periodically for signs of wear, especially if you use the keychain every day.
Can I wash a crochet cookie keychain?
Care depends on the yarn, stuffing, and metal hardware. If the materials are washable, gentle hand washing may be suitable. Avoid prolonged soaking of metal parts, and let the crocheted piece dry completely before using it again. Follow the yarn manufacturer’s care guidance, and test colorfastness if you have combined several shades.
Can I sell the finished crochet cookies?
You may be able to sell items you make, but any restrictions depend on the terms of the specific pattern you use and other applicable rules. If you are working from someone else’s instructions, review their licensing terms. When making items for sale, account for yarn, hardware, labor, packaging, and other costs so you can set a reasonable price.
How can I make my crochet cookie look more realistic?
Choose warm, natural shades and use irregularly spaced chocolate-chip details. A slightly darker edge can suggest a baked crust, while a few contrasting stitches can create the appearance of chips pressed into the surface. Avoid overstuffing the cookie, since a flatter shape usually resembles a biscuit more closely than a sphere. Small differences in color and decoration can make each finished piece look distinctive.
Conclusion
The Crochet Cookie Keychain Pattern is a delightful project that combines simple crochet techniques with a playful, food-inspired design. By crocheting two matching circles, adding chocolate-chip details, joining the pieces with a little stuffing, and attaching a reinforced keychain loop, you can create a miniature accessory that is both attractive and practical. The project is small enough to use leftover yarn and simple enough to adapt with different colors, textures, and decorative details.
In this guide, you learned how to prepare your materials, understand the crochet abbreviations, work the circle increase rounds, assemble the cookie, embroider the decorations, and attach the hardware securely. You also explored variations such as sandwich cookies and colorful sprinkle designs, along with solutions for common problems like curling circles, uneven pieces, and excessive stuffing. With practice, you can use the same basic method to create a collection of handmade cookie keychains for gifts, bags, and personal accessories.
Now it is time to choose your favorite yarn colors and make your own Crochet Cookie Keychain Pattern. Enjoy experimenting with the details and take your time securing the seams and attachment loop. If you try this project, please share your honest opinion and any suggestions you have for improving the pattern. Your experience and creative ideas may inspire other crochet enthusiasts to make their own tiny, charming cookie accessories.