
The Crochet Dog Coaster Pattern is a delightful project for anyone who loves handmade decorations and adorable dog-inspired designs.
One of the best things about a crochet dog coaster is that you can customize it in countless ways. Different yarn colors can represent different dog breeds, while small details such as floppy ears, a rounded muzzle, embroidered eyes, and a tiny nose help create an expressive design.
This Crochet Dog Coaster Pattern is designed as a beginner-friendly decorative project using basic crochet stitches and simple shaping techniques. The tutorial explains the materials, abbreviations, stitch instructions, and assembly process so you can follow each stage with confidence. The design uses a rounded head, two ears, and small facial details to create a recognizable dog face. You can also adapt the size by changing your yarn and hook combination. With a little patience and attention to detail, you will have a practical handmade coaster that is both attractive and fun to make.
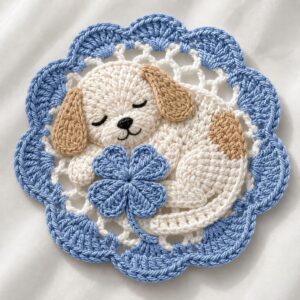
Materials, Crochet Stitches, and Preparation for the Dog Coaster
Before beginning your Crochet Dog Coaster Pattern, gather the materials needed for the project. Choose cotton yarn because it is absorbent, durable, and suitable for items that may come into contact with cups and mugs. Medium-weight cotton yarn is a practical option for a coaster with a firm texture. You will need a main color for the dog’s face, a second color for the ears, and small amounts of contrasting yarn for the muzzle, nose, and decorative details.
Select a crochet hook that works well with your yarn. For many medium-weight cotton yarns, a hook between 3.5 mm and 4.5 mm can be a useful starting point, but always check the yarn label and make a small test piece. The stitches should be firm enough to create a stable coaster without making the fabric uncomfortable to work with. You will also need a yarn needle, scissors, stitch marker, and measuring tape.
This pattern uses common crochet abbreviations. CH means chain, SL ST means slip stitch, SC means single crochet, HDC means half double crochet, DC means double crochet, INC means increase, and MR means magic ring. An increase means working two stitches into the same stitch. If you are unfamiliar with the magic ring, you can begin with a chain loop and work the first round into the center.
The main coaster is worked in joined rounds, beginning at the center of the dog’s face. Each round gradually increases the stitch count to create a flat, circular shape. Keep your tension consistent and use a stitch marker to identify the beginning of each round. If the fabric starts curling, your tension may be too tight or the increases may need adjustment. If it becomes wavy, check that you are not adding too many stitches.
For this tutorial, the dog’s face is designed as a rounded base approximately 4 to 4.5 inches wide, depending on your yarn and tension. The ears are crocheted separately and attached to the upper sides of the face. A small muzzle is added to the lower center, followed by embroidered eyes and a nose. These pieces create the recognizable appearance of a puppy while keeping the coaster practical and easy to use.
Before starting the full project, consider making a small crochet swatch to check your stitch size. This is especially helpful if you want several coasters to have matching dimensions. Cotton yarn may feel slightly different depending on its thickness and twist, so testing your hook and tension can save time later. Once you are happy with the fabric, you are ready to begin crocheting the dog’s face.
Step-by-Step Crochet Dog Coaster Pattern Instructions
Round 1: Begin with a magic ring. Chain 1, then work 6 SC into the ring. Pull the yarn tail to close the center and join with a SL ST to the first SC. You should have 6 stitches. If you prefer not to use a magic ring, chain 2 and work the 6 SC into the second chain from the hook. Keep the center neat because this will be the middle of the dog’s face.
Round 2: Chain 1 and work 2 SC into every stitch around. Join with a SL ST to the first SC. You should now have 12 stitches. The increases help the circle expand evenly. If you notice the center beginning to form a small bowl shape, gently flatten it with your fingers and check your tension before continuing.
Round 3: Chain 1, then repeat the sequence of 1 SC in the next stitch and 2 SC in the following stitch. Continue around and join with a SL ST. You should have 18 stitches. This round creates a wider base for the dog’s face. Keep your stitches even so the circle remains flat and symmetrical.
Round 4: Chain 1, work 1 SC in each of the next 2 stitches, then make 2 SC in the following stitch. Repeat this sequence around and join. You should have 24 stitches. The face should now look like a small, flat circle. If you want a slightly larger coaster, you can continue increasing with the same general principle, spacing the increases evenly.
Round 5: Chain 1, work 1 SC in each of the next 3 stitches, then make 2 SC in the following stitch. Repeat around and join with a SL ST. You should have 30 stitches. Fasten off and weave in the yarn end if you want to finish the base at this size. For a larger face, add another increase round by working 1 SC in each of the next 4 stitches and 2 SC in the following stitch, repeating around for 36 stitches.
To create a clean outer edge, you can work one additional round of SC without increases. Join with a SL ST and fasten off. This finishing round helps the coaster maintain its shape and gives the face a more defined border. If you prefer a decorative edge, use a contrasting yarn and work a round of SL ST or SC around the outside. Avoid making the border too tight, as this can pull the coaster out of shape.
Crocheting the Dog Ears, Muzzle, and Facial Details
The ears are essential for giving your Crochet Dog Coaster Pattern its personality. You can make two floppy ears using the same yarn color or choose a contrasting shade. To create a simple ear, chain 8. Starting in the second chain from the hook, work 1 SC, 1 HDC, 3 DC, 1 HDC, and 1 SC along the chain. This creates a gently rounded shape. Fasten off, leaving a long yarn tail for sewing. Repeat the instructions to make the second ear.
If you prefer rounded puppy ears, make a slightly wider version by chaining 10 and adjusting the stitches to create a soft oval shape. For pointed ears, use fewer stitches and shape the outer edge with SC. The style of the ears can change the overall appearance of the dog, so feel free to experiment with different shapes. Place the ears on the upper left and upper right sides of the face, checking their position before attaching them.
Next, crochet the muzzle using a contrasting color such as cream, beige, or white. Make a magic ring and work 6 SC into it. In the next round, increase in every stitch to create 12 SC. Join with a SL ST and fasten off, leaving a long tail. This small circular muzzle can be positioned near the lower center of the face. If you want a wider muzzle, add another round of evenly spaced increases.
For the nose, use black or dark brown yarn. You can embroider a small triangular shape at the top center of the muzzle using several short stitches. A simple horizontal line below the nose can represent the dog’s mouth. Keep the embroidery secure and avoid leaving loose yarn ends on the back of the coaster. If you prefer a minimalist design, a small embroidered nose alone can look charming.
Add the eyes above the muzzle, placing them symmetrically on either side of the center line. Use embroidery thread to create small horizontal or slightly rounded stitches. Make sure both eyes are positioned at approximately the same height. Embroidered facial details are especially practical for a coaster because they avoid hard plastic components that could interfere with cups or become detached during use.
Once all the pieces are positioned, sew the ears and muzzle securely to the circular base using the yarn tails and a yarn needle. Work through the edges of each piece with small, even stitches. Check the front regularly to make sure the details remain centered and balanced. Weave in all remaining ends carefully, keeping the back of the coaster as smooth as possible. Your dog face is now complete and ready for its final finishing touches.
Finishing, Customizing, and Caring for Your Crochet Dog Coaster
After assembling the main pieces, inspect the coaster to make sure the outer edge is even and the face is properly shaped. If the circle looks slightly uneven, gently adjust it with your fingers. You can also block the coaster according to the yarn manufacturer’s care instructions. For cotton yarn, light wet blocking may help the stitches relax and the edges lie flatter. Allow the piece to dry completely before using it.
A decorative border is an optional way to make your crochet dog coaster look more polished. You can work a round of SC in a contrasting color around the entire face. Another option is to use a simple crab stitch border for a slightly raised finish. If you want a softer appearance, use the same color as the main face so that the border blends naturally into the design.
There are many ways to personalize the dog. Use brown and cream yarn for a puppy-inspired design, black and white for a classic spotted appearance, or golden yellow for a cheerful dog face. You can also create a set of coasters representing different dog breeds by changing the ear shape and color placement. Long floppy ears create a different look from short upright ears, even when the main circular base remains the same.
If you want to make the coaster more absorbent, use 100% cotton yarn rather than acrylic. Cotton is generally a practical choice for items that sit beneath cups because it absorbs small amounts of moisture and tolerates regular use. Avoid using very fluffy yarn, as it may collect lint and make the facial details less visible. A firm, smooth yarn usually produces the neatest results.
For care, follow the washing instructions for your chosen yarn. Many cotton crochet coasters can be gently hand-washed or machine-washed on a delicate cycle, but check the yarn label first. Use mild detergent and reshape the coaster while it is damp. Let it dry flat to help preserve the circular shape. Avoid placing a wet coaster directly on delicate furniture until it has been cleaned and dried properly.
This Crochet Dog Coaster Pattern is also a lovely idea for handmade gifts. You can make a matching set of four or six coasters, using different dog colors while keeping the same basic design. Stack them together and tie them with a simple cotton ribbon for a thoughtful presentation. Handmade coasters are suitable for birthdays, housewarming gifts, holiday presents, or small surprises for friends who love dogs and crochet.
Frequently Asked Questions About the Crochet Dog Coaster Pattern
1. Is this crochet dog coaster pattern suitable for beginners?
Yes. The pattern uses basic stitches such as chain, slip stitch, single crochet, half double crochet, and double crochet. Beginners should be comfortable working in the round and making simple increases. The ears and muzzle are small pieces that can be completed separately and attached afterward.
2. What is the best yarn for a crochet dog coaster?
Cotton yarn is generally the best option because it is durable, absorbent, and easy to wash. Medium-weight cotton creates a firm fabric that works well beneath cups and mugs. Choose smooth yarn so the dog’s facial details remain visible.
3. How do I stop my crochet coaster from curling?
Curling can happen when the stitches are too tight or the increases are not distributed evenly. Check your tension and make sure each round follows the correct stitch count. If necessary, use a slightly larger hook or add an evenly spaced increase round. Gentle blocking can also help flatten the finished coaster.
4. Can I make the dog coaster larger or smaller?
Yes. To make it smaller, stop after fewer increase rounds. To make it larger, continue increasing evenly by adding one additional SC between increases in each new round. You can also change the yarn weight and hook size, although this will affect the finished texture and dimensions.
5. Can I create different dog breeds with this pattern?
Absolutely. The easiest way to create different styles is by changing the ear shape, yarn color, and facial details. Floppy ears, pointed ears, contrasting patches, and different muzzle colors can help give each coaster a distinct appearance.
6. How do I attach the muzzle without making the back messy?
Use the long yarn tail left after fastening off the muzzle. Sew around its edge with small stitches, keeping the needle close to the border. Secure the yarn on the back and weave in the remaining tail through several stitches. Avoid leaving long loose strands.
7. Can I use acrylic yarn instead of cotton?
You can use acrylic yarn for a decorative coaster, but cotton is usually more practical for regular use beneath drinks because it absorbs moisture better. If you choose acrylic, remember that it may not provide the same absorbency and heat-handling characteristics as cotton.
8. How many coasters should I make for a matching set?
A set of four is a convenient starting point for a small table or coffee area. You can make six for a larger collection or create several different dog designs. Using the same yarn weight and hook helps keep the coasters consistent in size.
Conclusion
The Crochet Dog Coaster Pattern is a fun and practical way to combine crochet skills with a love of dogs. By creating a circular face with simple increase rounds, crocheting two ears and a small muzzle, and adding embroidered eyes and a nose, you can make an adorable coaster with plenty of personality. Cotton yarn, consistent tension, and careful finishing help produce a durable piece that can be enjoyed every day.
You can personalize the design with different dog colors, ear shapes, decorative borders, and facial expressions. Whether you make one coaster for yourself or a complete matching set as a handmade gift, this project offers a wonderful opportunity to practice basic crochet techniques and create something useful.
If you try this Crochet Dog Coaster Pattern, leave your sincere opinion in the comments and share your suggestions. Tell us which dog colors or styles you would like to see in another version. Your ideas and experiences can inspire other crochet lovers to create their own adorable handmade dog coasters!