
A Turtle Pattern Made with Denim is a charming sewing project that transforms leftover jeans and recycled denim fabric into an adorable handmade decoration. With its rounded shell, small flippers, and friendly appearance, a fabric turtle can become a lovely addition to your home, a thoughtful handmade gift, or a playful accessory for someone who appreciates creative crafts. This project is also a wonderful opportunity to reuse fabric that might otherwise be discarded, giving old denim a completely new purpose.
One of the most appealing features of a denim turtle pattern is the opportunity to experiment with different shades, textures, and decorative details. You can use dark blue denim for the shell, lighter denim for the flippers, or combine several small fabric pieces to create a patchwork effect. The contrast between the traditional denim texture and the soft, rounded shape of a turtle makes the finished project especially attractive. Even small details, such as embroidered eyes, decorative shell stitching, and a contrasting fabric belly, can give your turtle a distinctive personality.
In this tutorial, you will learn how to make a fabric turtle using a simple pattern, recycled denim, basic sewing supplies, and soft stuffing. The instructions cover the preparation of the template, cutting the fabric, assembling the shell and body, attaching the flippers, and adding the final decorative details. This Turtle Pattern Made with Denim can be adapted to different sizes, depending on whether you want a small decorative turtle or a larger soft fabric creation. With patience and careful stitching, you can turn simple denim scraps into a beautiful handmade project.
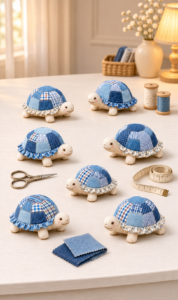
Materials and Preparation for the Turtle Pattern Made with Denim
Before beginning your Turtle Pattern Made with Denim, prepare all the materials needed for the project. The main material is denim fabric, which can come from old jeans, jackets, skirts, or leftover sewing pieces. Choose clean fabric that is still strong enough to hold stitches. Medium-weight denim is generally easier to work with than very thick material, especially when sewing small curves and attaching the turtle’s flippers.
You will also need polyester fiberfill for stuffing, sewing thread, fabric scissors, pins or sewing clips, a ruler, and tailor’s chalk or a washable fabric marker. A sewing machine can make the process faster, but you can complete the project by hand if you prefer. If you are using a machine, choose a needle suitable for denim and test it on a small scrap before sewing the actual pieces.
Start by creating a paper template for the turtle. Draw a rounded oval or circular shape for the shell, a slightly larger or matching shape for the underside, four small flippers, and a simple head. You can also include a small tail if you want a more detailed design. Keep the shapes relatively simple, particularly if this is your first attempt at making a stuffed fabric animal.
For a balanced turtle, the shell should be the largest part of the design. The four flippers should be wide enough to remain visible after assembly, while the head should be proportionate to the body. You can draw rounded flippers with gently curved edges and a small neck section that connects the head to the shell. Remember that the final dimensions will be slightly smaller after sewing, so include a seam allowance around every piece.
Once your template is ready, separate the denim according to the parts you want to create. You might choose dark denim for the upper shell, faded blue denim for the flippers, and cotton fabric for the underside. If you prefer an entirely denim turtle, use different shades to create visual contrast. Press the fabric gently to remove wrinkles before tracing the pieces.
Place each paper template on the appropriate fabric and trace around it using tailor’s chalk. Cut two shell pieces, four flipper pieces if you are making them separately, and the necessary pieces for the head and underside. Check the number of pieces before moving forward. Careful preparation helps prevent mistakes and makes the sewing process more organized.
Step-by-Step Instructions for Sewing Your Denim Turtle
Begin by preparing the turtle’s flippers. Place each pair of matching denim pieces together with the right sides facing inward. Secure the edges with pins or clips, then sew around the curved outline, leaving a small opening at the base. This opening will allow you to turn the pieces and attach them to the body. Repeat the process for all four flippers.
After sewing the flippers, trim away excess fabric around the curves while keeping the seam allowance intact. Make small clips in the seam allowance where necessary, being careful not to cut through the stitches. Turn each flipper right side out and gently shape the rounded edges. If you want a softer appearance, add a very small amount of fiberfill, but avoid overstuffing because the flippers should remain flexible.
Next, prepare the turtle’s head using the same basic technique. If your pattern has two separate head pieces, place them with the right sides together and sew around the outline, leaving an opening for turning and stuffing. Trim the excess fabric, turn the piece right side out, and add a little fiberfill. Keep the neck area relatively flat so it can be attached neatly beneath the shell.
Now prepare the upper shell. This is the most noticeable part of your denim turtle sewing pattern, so take extra care when cutting and stitching it. If you want a plain shell, use one large piece of denim. For a patchwork shell, sew several smaller denim pieces together first to create a larger fabric panel. Press the seams flat before cutting the shell shape from the finished panel.
Place the upper shell and lower body pieces together according to your chosen construction method. Position the head, four flippers, and tail between the two main body layers, with the unfinished edges pointing outward and the finished sections facing inward. Make sure the limbs are spaced evenly around the body. Secure everything with pins or clips, checking that no piece has shifted before sewing.
Sew around the outer edge of the turtle, leaving a suitable opening for turning and stuffing. Use a consistent seam allowance and move slowly around the curved sections. Once the seam is complete, trim excess fabric carefully and clip the curves where needed. Turn the turtle right side out through the opening, shape the shell and body, and gradually fill the main section with polyester fiberfill. Distribute the stuffing evenly to create a rounded appearance, then close the opening with a neat ladder stitch.
Decorating the Denim Turtle and Creating a Beautiful Shell
The shell is the most recognizable feature of a turtle, making it the perfect place to add creative details. One simple option is to use decorative topstitching to divide the shell into several sections. Draw a few curved or geometric lines with tailor’s chalk, then sew along them using contrasting thread. This creates the appearance of individual shell plates and gives your Turtle Pattern Made with Denim a more detailed finish.
Another attractive idea is to create a patchwork shell. Combine small pieces of dark blue, medium blue, and faded denim to form a coordinated design. You can use squares, triangles, or irregular fabric shapes, depending on your preferred style. Sew the pieces together before cutting the final shell shape. This technique is especially useful when you have several small denim scraps that are too small for larger sewing projects.
If you prefer a more decorative appearance, add embroidery to the shell. Small flowers, stars, leaves, or simple geometric shapes can create a charming handmade effect. Use embroidery thread in colors that stand out against the denim, such as cream, yellow, red, or green. Keep the designs relatively small so that the turtle’s overall shape remains the main focus.
The turtle’s face is another important detail. Use embroidery thread to create two small eyes and a simple curved mouth. You can add a few stitches to suggest a nose or cheeks if desired. Embroidered facial details are a practical choice because they do not require small plastic components. If the turtle is intended for a young child, avoid loose buttons, beads, or other small decorations that could detach.
You can also decorate the flippers with a little contrasting stitching. A few curved lines can suggest the natural shape of the limbs without making them look too crowded. If you want a softer design, attach small cotton or felt details to the flippers before assembling the turtle. Make sure every decorative piece is securely stitched and appropriate for the intended use.
Finally, inspect the entire turtle and check that the stuffing is evenly distributed. Adjust the shape gently with your fingers, paying attention to the shell, head, and flippers. Remove loose threads and reinforce any stitches that appear weak. A carefully finished turtle should have a balanced silhouette, a rounded shell, and securely attached body parts. These final details help turn a simple recycled fabric project into a polished handmade decoration.
Creative Variations, Care Tips, and Ideas for Your Handmade Denim Turtle
One of the best things about a Turtle Pattern Made with Denim is that you can adapt it to different decorative styles. For a classic look, combine dark blue denim with a lighter blue underside and simple embroidered details. For a more playful appearance, use colorful cotton fabric for the belly, head, or flippers. Small floral prints, polka dots, and cheerful patterns can create an interesting contrast with the denim shell.
A patchwork turtle is another wonderful variation. Instead of using a single piece of denim for the shell, combine different shades and textures to create a unique design. You can arrange the pieces in a symmetrical pattern or use an intentionally irregular composition. This approach allows you to reuse smaller fabric leftovers while giving each turtle an individual appearance. Press the seams carefully to keep the shell from becoming unnecessarily bulky.
You can also experiment with the size of your project. A small turtle can be used as a decorative ornament, while a larger version can become a soft cushion or a charming handmade display piece. If you increase the dimensions of the pattern, remember to adjust the amount of stuffing and reinforce the seams where necessary. A larger turtle may require stronger thread and a slightly wider seam allowance.
For a more realistic appearance, consider adding a small tail and shaping the head so that it extends naturally from the front of the shell. You can use subtle embroidery to suggest the divisions between the shell plates and add a few stitches to the flippers. However, you do not need complicated details to create an attractive result. A simple silhouette with well-chosen fabric combinations can be just as beautiful.
Because denim is a durable material, the finished turtle can last a long time when handled and stored properly. Keep it away from excessive moisture and direct heat. If the fabric becomes dusty, use a soft brush or gently wipe the surface with a slightly damp cloth. For more noticeable stains, test a mild cleaning solution on a hidden area first. Avoid soaking the entire project if it contains stuffing or decorative materials that may be affected by water.
Your finished denim turtle can be displayed on a shelf, placed in a craft room, or given as a handmade gift. You can also create a small collection using different denim shades and shell designs. Each turtle can have its own combination of colors, embroidery, and decorative details. This makes the project especially enjoyable for anyone who likes sewing, recycling, and creating personalized fabric decorations.
Frequently Asked Questions About the Turtle Pattern Made with Denim
1. Is the Turtle Pattern Made with Denim suitable for beginners?
Yes. This project is suitable for beginners who have basic sewing knowledge. The main techniques include tracing a template, cutting fabric, sewing curved edges, turning small fabric pieces, stuffing, and closing openings by hand. If you are new to sewing stuffed animals, begin with a simple turtle design and avoid complicated shell details.
2. What type of denim is best for making a fabric turtle?
Medium-weight denim is usually a good choice because it provides structure without being too difficult to sew. Recycled jeans, denim skirts, and jackets can all work well. Avoid extremely thick sections with bulky seams, as they can make small curves difficult to sew and turn.
3. Can I make a denim turtle without a sewing machine?
Yes. You can complete the project by hand using a strong thread and small, secure backstitches. Hand sewing takes more time, but it gives you control over the curved sections and smaller details. Make sure the seams are strong enough to hold the stuffing securely.
4. How much stuffing should I use for the turtle?
The amount depends on the size of your pattern. Add small portions of polyester fiberfill until the body and shell have a soft, rounded shape. Avoid filling the turtle too tightly because excessive stuffing can stretch the seams and make the finished project look uneven.
5. How can I create a realistic turtle shell with denim?
You can create a realistic shell effect using decorative topstitching, embroidery, or patchwork. Divide the upper shell into sections with curved or geometric lines. Contrasting thread makes these details more visible and gives the shell a distinctive appearance.
6. Can I use different fabrics with denim?
Absolutely. Cotton, felt, and other suitable fabrics can be combined with denim to create the underside, head, flippers, or decorative details. Choose materials that are compatible in weight and easy to sew together. Combining textures and colors can make the finished turtle more interesting.
7. How do I keep the turtle’s flippers in the correct position?
Position the flippers between the upper and lower body pieces before sewing the main outline. The unfinished edges should point inward, while the finished sections remain inside the fabric layers. Secure them with pins or clips and check their placement before stitching around the body.
8. Can I wash a stuffed denim turtle?
Cleaning depends on the materials used. Gentle spot cleaning is often a practical option for stuffed fabric decorations. Avoid soaking the turtle if the stuffing, embroidery, or other components could be damaged. Always allow the fabric to dry completely before storing or displaying it.
9. Can I use leftover denim scraps for the shell?
Yes. Small denim pieces can be sewn together to create a patchwork panel before cutting the shell shape. This is an excellent way to reuse fabric scraps and make every turtle unique. Just make sure the seams are pressed flat and that the finished panel is large enough for your template.
Conclusion
The Turtle Pattern Made with Denim is a creative and rewarding sewing project that gives old denim a new purpose. By preparing a simple template, cutting the shell and body pieces, sewing the flippers and head, assembling the turtle, and adding soft stuffing, you can create a charming handmade decoration. Decorative topstitching, patchwork, embroidery, and contrasting fabrics provide countless opportunities to personalize the finished design.
Whether you choose a simple blue denim turtle or a colorful patchwork version, the most important part is to work carefully and enjoy each step. This project is a lovely way to practice sewing techniques, reuse leftover materials, and create something special with your own hands.
If you try this tutorial, leave your sincere opinion in the comments and share your suggestions. Which colors, fabrics, or shell decorations would you choose for your turtle? Your ideas may inspire other readers to create their own beautiful denim turtles!