
Crochet monster-shaped earphone holder pattern is a playful and practical crochet project designed to keep wired earphones neatly stored while turning a simple accessory into a charming handmade creation.
One of the best features of this Crochet monster-shaped earphone holder pattern is that you do not need a large yarn supply or advanced crochet experience to get started.
This project is also a wonderful way to use leftover yarn from previous crochet projects. Small amounts of bright green, purple, orange, blue, pink, yellow, or red yarn can become the monster body, while scraps of white and black yarn can be used for eyes and facial features. You can adjust the finished dimensions depending on the size of the earphones you want to store, and the same basic concept can even be adapted for charging cables or other small cords. Throughout this crochet earphone holder tutorial, you will learn the basic stitch abbreviations, how to build the monster body, how to create decorative features, and how to assemble everything securely for a neat handmade finish.
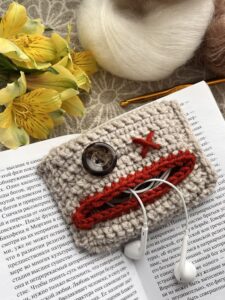
Materials, Crochet Stitch Key, and Preparation
Before beginning the Crochet monster-shaped earphone holder pattern, gather a small amount of medium-weight cotton or acrylic yarn. Cotton creates excellent stitch definition and a firm structure, while acrylic is soft, affordable, and available in many bright colors. Approximately 20 to 35 yards of the main color should normally be enough for a small holder, although the exact quantity depends on yarn thickness, hook size, and your preferred finished dimensions. You will also need small scraps in contrasting colors for the monster’s eyes, mouth, teeth, horns, or other decorative details.
A crochet hook between approximately 3.0 mm and 4.0 mm works well for many medium-weight yarns. For this particular crochet monster pattern, using a hook slightly smaller than the yarn label recommendation can create tighter stitches. A dense fabric is useful because the holder needs enough structure to protect and contain the earphone cable. You will also need scissors, a yarn needle, stitch markers, and either a small button, snap, or crocheted loop if you want the holder to close securely.
Understanding the crochet abbreviations makes the pattern easier to follow. MR means magic ring, ch means chain, sl st means slip stitch, sc means single crochet, hdc means half double crochet, dc means double crochet, inc means increase by working two single crochet stitches into one stitch, and dec means decrease by combining two stitches. The notation FO means fasten off. These basic crochet terms appear frequently in small amigurumi and accessory patterns.
The most important stitch in this project is single crochet (sc). Single crochet creates a compact surface that works particularly well for a small pouch or holder. Insert your hook into the indicated stitch, yarn over, pull up a loop, yarn over again, and pull through both loops on the hook. Try to maintain consistent tension throughout the project because even tension helps the monster body keep a balanced shape.
For a holder approximately 3 to 4 inches tall, start by creating a base wide enough to accommodate loosely coiled earphones. You can work the monster as two flat panels that are later joined together, which is an approachable construction method for beginners. Alternatively, experienced crocheters can work the body in continuous rounds. The two-panel technique described here provides a straightforward way to control the final dimensions and create a defined opening.
Before crocheting the complete body, consider making a small gauge sample. Exact gauge is not essential for this handmade earphone holder, but checking your stitch density helps you estimate the final size. If your stitches are very loose, switch to a smaller hook. If the fabric feels excessively stiff and difficult to crochet, move up slightly in hook size. The goal is a firm but flexible fabric that comfortably holds a coiled pair of earphones.
Step-by-Step Crochet Monster Body Pattern
Begin the first panel by making a foundation chain of approximately 13 stitches. This number can be increased or decreased depending on your yarn and the desired size. For Row 1, work one sc into the second chain from the hook and continue working one sc in every chain across. You should have 12 single crochet stitches. Chain 1 and turn your work. The turning chain does not count as a stitch unless you prefer a different construction method.
For Row 2, work one sc into each stitch across for a total of 12 stitches. Chain 1 and turn. Repeat this simple row until the rectangle measures approximately 3 to 3.5 inches tall. Depending on your gauge, you may need approximately 14 to 18 rows. This rectangle becomes the front panel of your Crochet monster-shaped earphone holder pattern, so check that a loosely coiled pair of earphones fits comfortably against it.
Create the back panel using exactly the same method. Chain 13, work 12 sc across, and continue crocheting rows until the second rectangle matches the first. Place both panels together and compare their dimensions before fastening off. Small differences can often be corrected during assembly, but panels that are approximately equal will create a cleaner and more professional-looking holder.
Now you can begin shaping the monster’s personality. If you want small horns, attach yarn near one upper corner of the front panel. Chain 4, work a slip stitch into the second chain from the hook, then sc into the next chain and hdc into the final chain. Slip stitch back into the body and fasten off. Repeat on the opposite corner. For a softer monster appearance, replace horns with rounded crocheted ears or simply leave the top smooth.
To create a simple closing flap, attach the main-color yarn near the center of the upper edge of the back panel. Work approximately 4 to 6 sc stitches across the center section. Chain 1, turn, and continue working these stitches for 3 or 4 rows. On the final row, create a small chain loop that fits over a button attached to the front panel. This provides a practical closure while maintaining the handmade character of the crochet earphone pouch.
Before joining the panels, weave in unnecessary yarn tails using a yarn needle. Leave any tails that you intend to use for sewing decorative pieces. Place the wrong sides of the panels together and align the edges carefully. You can sew the sides and bottom using a whip stitch, or crochet them together with single crochet. Leave the top open so the earphones can easily be inserted and removed.
Adding Monster Eyes, Mouth, Teeth, and Details
The face is where this Crochet monster-shaped earphone holder pattern becomes especially creative. A monster can have one large eye, two traditional eyes, three tiny eyes, or even several different-sized eyes. For a simple crocheted eye, use white yarn and make a magic ring. Work 6 sc into the ring and pull it closed. For a larger eye, work 2 sc into every stitch of the following round, creating 12 stitches. Fasten off and leave a long tail for sewing.
Create the pupil with black yarn. Make a magic ring and crochet 5 or 6 sc into the ring, then close it tightly and fasten off. Sew the black pupil onto the white eye. Positioning the pupil slightly away from the center can give the monster a funny or surprised expression. Sew the completed eye securely onto the front panel before final assembly whenever possible because this makes handling the stitches easier.
For the mouth, you have several options. A simple embroidered smile works well for a friendly monster, while a wide black crocheted mouth creates a more expressive design. To make a small mouth piece, chain approximately 7 stitches and work sc across. Crochet another row if you want a thicker mouth, then fasten off. Sew the mouth horizontally across the lower half of the front panel.
Tiny white teeth can make the crochet monster earphone holder especially charming. Attach white yarn along the edge of the mouth, chain 3, slip stitch into the second chain from the hook, sc into the next chain, and slip stitch back into the mouth. Repeat wherever you want another tooth. You can create two symmetrical teeth or several irregular teeth for a humorous handmade appearance.
Optional arms and legs are another way to customize the design. For a simple arm, chain 6 or 7 stitches, then work slip stitches back along the chain. Fasten off and sew the arm to the side of the monster. Small feet can be created with short chains or tiny crocheted circles. Keep these embellishments compact so they do not interfere with the practical function of the earphone storage pouch.
You can also personalize the monster through color combinations and facial expressions. A purple monster with yellow horns, a bright green creature with three eyes, or a blue monster with oversized white teeth can all be made from the same basic pattern. This flexibility is one reason the Crochet monster-shaped earphone holder pattern works well for using leftover yarn. Instead of trying to reproduce one exact character, allow your available yarn colors to inspire a completely original monster.
Assembly, Finishing, and Using Your Crochet Earphone Holder
Once all facial features are attached, place the front and back panels together with the correct sides facing outward. Starting near one upper corner, attach the main-color yarn and work single crochet stitches through both layers along the first side. Continue across the bottom and up the opposite side. This crocheted seam gives the holder a defined border while securely connecting the panels.
At each lower corner, you can work 3 sc into the same corner space to help the edging turn smoothly. Continue maintaining even tension as you join the pieces. When you reach the opposite upper corner, fasten off and weave the yarn tail securely into the inside stitches. The top edge should remain open except for the closure flap.
Attach a small button to the front of the holder in alignment with the flap loop. Sew it firmly using strong thread or yarn. If you prefer not to use a button, you can crochet two short ties or add a snap closure. Whatever method you choose, make sure the closure opens easily but holds the coiled earphones securely inside.
Before using the finished Crochet monster-shaped earphone holder pattern, inspect all decorative pieces. Tug gently on the eyes, mouth, button, horns, and other features to make sure they are firmly attached. This is particularly important if the holder will be carried frequently inside a handbag or backpack. Secure stitching helps the accessory maintain its shape and appearance over time.
To store earphones, loosely coil the cable around your fingers rather than wrapping it extremely tightly. Place the coil inside the monster holder and close the flap. Avoid sharply bending the cable near the connector because gentle storage can help reduce unnecessary stress on the wire. The compact crochet pouch also makes earphones easier to locate among other small items.
Care for your handmade crochet earphone holder according to the yarn you selected. Cotton and many acrylic yarns can be gently hand washed with mild soap and cool or lukewarm water. Remove the earphones and any electronic accessories before cleaning the holder. Reshape the crochet piece while damp and allow it to dry completely before using it again.
Frequently Asked Questions About the Crochet Monster-Shaped Earphone Holder Pattern
Is this crochet monster earphone holder suitable for beginners?
Yes. The project primarily uses basic stitches such as chain, single crochet, slip stitch, increase, and half double crochet. Beginners can simplify the design by making two rectangular panels and adding basic embroidered facial details.
What yarn is best for an earphone holder?
Cotton yarn is an excellent option because it provides good stitch definition and creates a durable fabric. Acrylic can also work very well and offers many bright color choices. Choose yarn that produces a relatively dense fabric when crocheted.
How much yarn do I need?
A small holder usually requires only a modest amount of yarn. Approximately 20 to 35 yards of the main color is often sufficient, plus small scraps for the eyes, mouth, teeth, and decorations. Actual yarn usage depends on the dimensions, yarn weight, hook size, and tension.
Can I make the holder larger?
Absolutely. Add more foundation chains to increase the width and crochet additional rows to increase the height. You can place the item you plan to store against the panel while working to determine whether the dimensions are appropriate.
Can this pattern hold charging cables instead of earphones?
Yes. The same basic crochet cable holder pattern can be adapted for short charging cables and other small cords. For bulkier cables, simply make wider and taller panels before joining them.
Do I need safety eyes?
No. Crocheted or embroidered eyes are excellent alternatives and keep the project completely yarn-based. They also provide greater freedom when designing different monster expressions.
Why is my crochet holder too loose?
Loose stitches can result from a hook that is too large or from naturally relaxed tension. Try using a slightly smaller crochet hook and maintain consistent tension. Dense single crochet stitches generally produce a better structure for this type of project.
How can I make each monster look different?
Experiment with yarn colors, eye numbers, horn shapes, mouths, teeth, arms, and expressions. One monster could have a single oversized eye, while another might have three small eyes and crooked teeth. These small variations can completely transform the finished design.
Can I add a keyring or clip?
Yes. A small crocheted loop can be added near one upper corner and attached to an appropriate keyring or clip. Reinforce the loop with several secure stitches so it can handle normal everyday use.
How long does this crochet project take?
The time varies according to experience and the number of decorative details. The simple rectangular body can be completed relatively quickly, while additional eyes, teeth, horns, arms, and embroidery will add more crafting time.
Conclusion
The Crochet monster-shaped earphone holder pattern combines practical organization with the playful possibilities of handmade crochet. Starting with two simple single crochet panels, you can create a compact pouch and gradually transform it into a colorful monster using crocheted eyes, teeth, horns, mouths, arms, and other creative details. The project requires only basic crochet techniques and small quantities of yarn, making it approachable for beginners while still providing enough customization to entertain more experienced crocheters.
Throughout this tutorial, you learned the essential crochet stitch key, how to crochet the front and back panels, how to create a closure flap, how to join the edges, and how to decorate the holder with an original monster face. You also learned how to adjust the size so the same basic pattern can accommodate different earphones or small cables. The most important idea is to maintain a firm fabric and secure assembly while allowing yourself plenty of freedom with the decorative elements.
Now you can choose your favorite yarn colors and turn the basic Crochet monster-shaped earphone holder pattern into a character that reflects your own creative style. Try changing the number of eyes, experimenting with unusual color combinations, or giving your monster a completely different expression. If you make this project, leave your sincere opinion about the pattern and share your suggestions. Your ideas about different colors, features, sizes, or improvements can inspire even more creative versions of this fun and practical crochet accessory.