
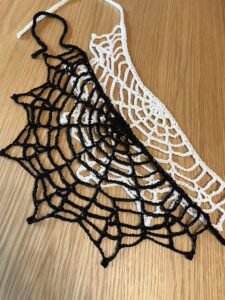
Crochet spiderweb pattern for a clothing accessory is a creative way to transform the classic spiderweb motif into a lightweight, wearable detail that can add texture and personality to jackets, tops, shawls, scarves, collars, sleeves, bags, and other fabric or crochet pieces.
The construction of this Crochet spiderweb pattern for a clothing accessory begins at the center and gradually expands outward in rounds.
Another advantage of this crochet spiderweb accessory is that it can be customized without complicated alterations. The number of rounds controls the final diameter, while yarn weight and hook size influence both scale and drape. For a delicate clothing embellishment, lightweight cotton or cotton-blend yarn generally creates clearly defined stitches without excessive bulk. A slightly larger hook can make the web more flexible and airy. In the tutorial below, the pattern is written using standard crochet abbreviations, with clear instructions for building the web, shaping the outer rounds, finishing the motif, and attaching it securely to clothing while allowing the garment to remain comfortable.
Materials, Crochet Abbreviations, and Preparing the Center
For this Crochet spiderweb pattern for a clothing accessory, choose a lightweight yarn that complements the garment you plan to decorate. Fingering, sport, or lightweight DK yarn can work well, depending on how bold you want the web to appear. A crochet hook around 3.0 mm to 4.0 mm is a practical starting range. You will also need scissors, a yarn needle, rust-resistant pins for blocking, and matching sewing thread if you prefer to sew the finished motif onto fabric rather than attach it with yarn.
The main crochet abbreviations used throughout the pattern are: MR = magic ring, ch = chain, sl st = slip stitch, sc = single crochet, dc = double crochet, tr = treble crochet, sp = space, st/sts = stitch/stitches, and rep = repeat. The chain spaces form the open sections of the spiderweb, while the taller stitches create the radial lines that travel from the center toward the outer edge. If your tension is naturally tight, consider increasing the hook size slightly so the chain loops remain relaxed.
Begin with the center: {Make MR, ch 3, work 11 dc into MR, pull ring closed, sl st into top of beginning ch-3 to join.} The beginning chain counts as the first double crochet, giving you 12 structural points around the center. Keep the magic ring secure but avoid pulling it so aggressively that the stitches overlap. This compact circle becomes the central hub from which the web expands.
For Round 2, create the first visible spaces: *{Ch 4, dc in next st, ch 2, dc in next st; rep from * around, ch 2, sl st into 2nd ch of beginning ch-4.} You should have a ring of evenly distributed chain-2 spaces. These openings establish the web-like structure. Check the round before continuing and make sure none of the chains are twisted or accidentally caught under neighboring stitches.
Round 3 expands the design: *{Sl st into first ch-2 sp, ch 5, dc in same sp, ch 3, dc in next ch-2 sp; rep from * around, ch 3, sl st into 2nd ch of beginning ch-5.} The additional chain gives the web more breathing room as its circumference grows. Spread the work gently with your fingers after completing the round. It should begin to lie flatter, although slight curling is normal before blocking.
For Round 4, continue increasing the open spaces: *{Sl st into next ch-sp, ch 6, dc in same sp, ch 4, dc in next ch-sp; rep from * around, ch 4, join with sl st.} At this point, the repeating combination of tall anchor stitches and increasingly long chains should make the spiderweb crochet motif clearly recognizable. Count your structural sections before proceeding because maintaining the same number of radial points is essential for a balanced web.
Building the Spiderweb Rounds and Creating the Open Lace Shape
Round 5 adds more width while preserving the lightweight structure: *{Sl st into first ch-4 sp, ch 7, dc in same sp, ch 5, dc in next ch-4 sp; rep from * around, ch 5, sl st to join.} Keep each chain relaxed and consistent. Tight chains can pull the outer edge inward, while extremely loose chains may make the web appear uneven. Consistent tension matters more than making every stitch exceptionally tight.
For Round 6, work: *{Sl st into next ch-sp, ch 8, dc in same sp, ch 6, dc in next ch-sp; rep from * around, ch 6, join with sl st.} This gradual increase in chain length allows the circumference to expand naturally. If the motif begins forming a bowl shape, your chains may be too tight. If the fabric becomes excessively wavy, they may be too loose. Adjusting hook size is often easier than consciously changing your normal tension.
To create more pronounced radial strands, the next round can use treble crochet stitches. Work Round 7 as follows: *{Sl st into first ch-sp, ch 9, tr in same sp, ch 7, tr in next ch-sp; rep from * around, ch 7, join with sl st.} The treble crochet provides additional height, visually emphasizing the lines extending from the center. It also keeps the larger web flexible enough to follow the movement of a garment.
If you want a medium-sized clothing accessory, Round 7 may already provide sufficient diameter. For a larger design, continue the established progression: {For each additional round, sl st to the next chain space, increase the chain section by approximately 1 ch, place one tall anchor stitch in each corresponding space, and join the round.} Lay the motif against the garment after every new round to evaluate its size rather than relying exclusively on a predetermined measurement.
A decorative outer round can make the web look more intentional. Try: *{Sl st into first outer ch-sp, 3 sc in ch-sp, ch 3, 3 sc in same sp, 1 sc around anchor st; rep from * around, join with sl st.} The small chain-3 points create subtle tips along the perimeter. For a cleaner and less decorative result, simply work several single crochet stitches into each outer chain space instead.
Fasten off while leaving a tail long enough for weaving. Use a yarn needle to pass the tail through several stitches on the wrong side, reverse direction, and pass through another short section before trimming. Repeat with the center tail if necessary. Your Crochet spiderweb pattern for a clothing accessory is now structurally complete, but blocking will greatly improve the spacing and definition of the finished motif.
Blocking, Shaping, and Attaching the Spiderweb to Clothing
Blocking is particularly important for an open crochet lace spiderweb because it establishes the spaces between the radial strands. Lightly dampen the finished motif using a method appropriate for the yarn fiber. Place it on a blocking surface and begin pinning the outer structural points. Work around the motif gradually rather than stretching one side completely before addressing the opposite side.
For a circular web, measure from the center to several outer points to keep the radius reasonably consistent. For a garment accessory, however, perfect symmetry is not always necessary. A web positioned over a shoulder or near a neckline may look better when slightly elongated. Shape it according to the area where it will eventually sit, remembering that the motif should complement the garment rather than distort it.
Allow the piece to dry completely while pinned. When the pins are removed, the crochet spiderweb clothing accessory should have noticeably cleaner chain spaces and straighter radial lines. Place it temporarily on the garment and experiment with positioning. Interesting locations include one shoulder, the upper back, a pocket area, the corner of a scarf, the end of a sleeve, or across a plain fabric panel.
Before permanently attaching the web, put the garment on or place it on a dress form if available. This helps reveal how the fabric behaves when worn. A motif that looks perfectly positioned on a flat table can shift considerably once the garment follows the shape of the body. Use removable clips or a few pins to hold the web temporarily and confirm that it does not interfere with seams, closures, pockets, or normal movement.
For a removable accessory, attach the web only at several structural points using small hand stitches. For a permanent embellishment, secure more of the outer edge and selected internal intersections. Use matching thread for a subtle finish. Avoid sewing continuously around every chain because doing so can eliminate the flexible quality that makes the crochet spiderweb applique attractive.
When attaching the motif to knitted or crocheted clothing, use extra care because the base material may stretch. Anchor the spiderweb at several evenly distributed points rather than pulling the web tightly across the garment. Both layers should be able to move naturally. After attachment, try on the garment again and check the drape, especially around shoulders, sleeves, and other areas that experience frequent movement.
Customizing Your Crochet Spiderweb Clothing Accessory
Color is one of the easiest ways to change the personality of this Crochet spiderweb pattern for a clothing accessory. Black creates the familiar Halloween or gothic aesthetic, while ivory produces a softer vintage-lace appearance. Gray can feel understated and modern, and bright colors transform the spiderweb into a playful graphic motif. You can even change yarn colors between rounds to emphasize the circular structure.
Yarn texture also changes the final effect. Smooth cotton provides excellent stitch definition and makes each chain section easy to see. A slightly fuzzy yarn softens the lines, although excessive texture can hide the web structure. Metallic or subtly shimmering yarn can be used sparingly for decorative occasions, but always consider comfort when the accessory will touch the skin.
You can customize the size simply by stopping earlier or continuing additional rounds. A small crochet spiderweb applique can measure only a few inches across and decorate a pocket, hat, or bag. A larger motif may cover a significant section of a jacket or top. When enlarging the pattern, continue increasing the chain spaces gradually so the motif remains flat.
Another variation is a partial web rather than a complete circle. Crochet the motif normally, block it, and use only a portion as a design reference for a triangular or corner-shaped accessory. More experienced crocheters can also work back and forth across selected structural sections instead of completing every round. This creates a web that fits naturally into the corner of a collar, shawl, pocket, or neckline.
Small decorative details can be added without overwhelming the design. A tiny crocheted spider, a bead at selected intersections, or contrasting stitching around the perimeter can emphasize the web theme. Keep embellishments lightweight, especially when decorating clothing. Heavy beads or charms can pull the open crochet downward and alter its shape after repeated wear.
The finished Crochet spiderweb pattern for a clothing accessory should balance decoration, flexibility, and comfort. Before considering the project complete, inspect all woven ends and attachment stitches. Gently move and stretch the garment to make sure the motif remains secure. Thoughtful finishing is especially important for wearable crochet because the piece will experience much more movement than a stationary decoration.
FAQ: Frequently Asked Questions About the Crochet Spiderweb Pattern for a Clothing Accessory
Is this crochet spiderweb pattern beginner-friendly?
Yes, particularly for crocheters who already know chains, slip stitches, and double crochet. The repetitive construction makes the pattern easier to understand after the first few rounds. The most important skill is maintaining reasonably even tension across the increasingly long chain spaces.
What yarn is best for a crochet spiderweb clothing accessory?
Lightweight cotton, cotton blends, and smooth acrylic yarns are practical options. A thinner yarn creates a delicate lace-like web, while thicker yarn produces a stronger graphic appearance. Choose a fiber that works comfortably with the garment and its intended use.
How do I make the spiderweb larger?
Continue adding rounds while gradually increasing the number of chains between the structural stitches. Check the motif after each round. The web should remain relatively flat rather than becoming heavily ruffled or forming a bowl shape.
Why is my crochet spiderweb curling?
Curling usually indicates that the outer rounds do not have enough space to accommodate their increasing circumference. Try loosening the chain stitches, increasing the hook size slightly, or adding another chain to each repeated section. Blocking can correct minor curling but cannot always fix severe tension problems.
Why is my spiderweb becoming too wavy?
Excessive waviness usually means there is too much length around the outer circumference. Reduce the number of chains in each space or use a slightly smaller hook. Mild waviness can often be corrected during blocking.
Do I need to block the spiderweb?
Blocking is strongly recommended. It opens the chain spaces, improves the definition of the radial strands, and allows you to control the final shape. For a clothing accessory, blocking also makes it easier to evaluate exactly where the motif should be attached.
Can I attach the crochet web to a denim jacket?
Yes. Denim provides a stable base for crochet appliqués. Hand stitching through selected structural points usually gives good control over placement. Use a sturdy needle and thread appropriate for the thickness of the denim.
Can I put this spiderweb on a sweater?
Yes, but remember that sweaters stretch. Avoid securing every part of the web rigidly. Attaching selected points allows the sweater and the crochet motif to move more naturally together.
Can I make the spiderweb removable?
Yes. Instead of permanently sewing the entire outer edge, create a removable version using carefully positioned attachment points appropriate for the garment. This can be useful when the spiderweb is intended primarily as a seasonal accessory.
How can I make the spiderweb look more delicate?
Use thinner yarn, a suitable small hook, and longer open chain spaces. A light neutral color can further emphasize the lace appearance. Avoid overly bulky finishing stitches around the outer edge.
How can I adapt the pattern for Halloween clothing?
Black, charcoal, purple, orange, or combinations of these colors can create a seasonal effect. The motif can be positioned on a shoulder, sleeve, jacket back, scarf, or collar. A small crocheted spider can also be added as a decorative detail.
How do I keep the center from opening after use?
When beginning with a magic ring, pull the center closed firmly and weave the starting tail securely in multiple directions. Do not simply trim the tail immediately beside the center stitches. Properly securing the yarn helps prevent the ring from loosening over time.
Conclusion
The Crochet spiderweb pattern for a clothing accessory combines straightforward crochet techniques with an unusual openwork design that can completely change the appearance of a simple garment. In this tutorial, you learned how to establish the center with a magic ring, build structural points with double and treble crochet, expand the web using increasingly larger chain spaces, create an optional decorative border, and finish the yarn ends securely.
You also learned why blocking plays such an important role in a crochet spiderweb pattern, especially when the motif will become part of clothing. Correct blocking opens the lace, defines the radial lines, and allows the final shape to be adjusted before attachment. Careful placement and strategically positioned hand stitches then help the accessory remain secure without unnecessarily restricting the movement of the garment.
Most importantly, this pattern can serve as a foundation for your own variations. Experiment with different yarn weights, colors, sizes, borders, and garment placements to create a crochet spiderweb clothing accessory that reflects your personal style. If you try this project, leave your sincere opinion about the pattern and share your suggestions. Your ideas about colors, sizes, placement, or creative variations can inspire even more ways to transform this simple spiderweb motif into a unique handmade accessory.