
Denim wallet pattern projects are a wonderful way to transform sturdy denim fabric or old jeans into a practical handmade accessory that can be used every day.
Working with a Denim wallet pattern is also a practical introduction to sewing multiple fabric layers, creating card pockets, adding a lining, and producing clean finished edges.
Another advantage of this Denim wallet pattern is its flexibility. The measurements can be adapted according to the cards, cash, or small documents you normally carry. For a beginner-friendly version, the wallet can be constructed as a simple folding rectangle with internal card slots and a larger compartment behind them. More experienced makers can customize the basic structure with extra pockets or decorative features. Throughout this tutorial, the focus is on creating a functional wallet using straightforward sewing techniques rather than unnecessarily complicated construction. Accurate cutting, sensible seam allowances, careful pressing, and secure topstitching are the main elements that give the project its professional appearance. Once those fundamentals are understood, the same method can inspire many variations.
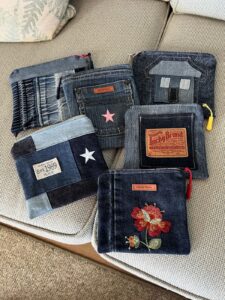
Materials, Measurements, and Preparation for the Denim Wallet
Begin your Denim wallet pattern by choosing medium-weight denim that feels firm but remains flexible enough to fold comfortably. Recycled jeans are ideal when the fabric is still strong and free from excessively worn areas. You will also need cotton fabric for the lining, matching or contrasting polyester thread, scissors or a rotary cutter, pins or sewing clips, a ruler, fabric marker, iron, and sewing machine. A denim or jeans sewing-machine needle is particularly useful because it is designed to penetrate heavier woven fabrics more reliably.
For a practical starting size, cut one denim exterior rectangle approximately 9 x 5 inches (23 x 13 cm) and one lining rectangle of the same size. These dimensions can be adjusted, but they provide enough room for a compact folding wallet. Use a 3/8-inch (1 cm) seam allowance unless your preferred construction requires a slightly different allowance. Before cutting, straighten the fabric and check the grain so the finished wallet does not twist. If you are recycling jeans, avoid cutting directly through bulky original seams.
Next, prepare the card pockets. Cut two or three lining or lightweight denim rectangles approximately 4.5 x 3 inches (11.5 x 7.5 cm). Each pocket should be wide enough to hold a standard card comfortably after seam allowances are considered. Fold the upper edge of every pocket approximately 1/4 inch twice toward the wrong side, press carefully, and topstitch close to the folded edge. This creates a neat opening while preventing the raw fabric from fraying during regular use.
If your denim feels soft or stretches too easily, add lightweight fusible interfacing to the wrong side of the exterior piece. Cut the interfacing slightly smaller than the denim so adhesive does not reach the iron or ironing board. Follow the appropriate temperature for your materials and press rather than sliding the iron aggressively across the fabric. Interfacing should support the wallet without making it rigid. Very thick denim may not require additional stabilization at all.
Before assembly, arrange all pocket pieces on the lining and test them using an actual card. The card should slide into each pocket without excessive resistance while remaining secure enough that it does not fall out easily. When stacking multiple card slots, offset the upper edges by approximately 3/4 to 1 inch so each card remains visible. Baste or clip the sides of the pockets in place. This small preparation step makes final assembly considerably easier and helps maintain consistent spacing.
Finally, mark the center fold of the wallet without cutting the fabric. Fold the exterior piece gently in half and finger-press the center or use a removable fabric marker. Repeat this process on the lining. The center reference helps you position the internal components symmetrically. At this stage, place the pieces together temporarily and confirm that the proportions suit your intended use. Making measurement corrections now is much easier than changing the wallet after the final seams have been sewn.
How to Sew the Card Pockets and Interior
Start assembling the interior of the Denim wallet pattern with the lowest card pocket. Position it on the right side of the lining, making sure its lower and side edges align with the planned pocket area. Pin or clip the pocket securely. Stitch along the sides and bottom using a straight stitch, leaving the finished upper edge open. Backstitch briefly at the beginning and end of each seam to strengthen these stress points.
Place the second card pocket over the first, keeping its top edge approximately 3/4 inch lower or higher according to your chosen arrangement so the card openings remain clearly separated. Check the spacing with a ruler before sewing. Stitch the sides and bottom securely. If you are adding a third pocket, repeat the same process. Keeping the pocket edges parallel is important because uneven card slots can make an otherwise carefully constructed wallet appear crooked.
To create individual card compartments across a wider pocket, mark vertical dividing lines with a removable fabric marker. Sew carefully along each marked line using a straight stitch. Reinforce the upper end of every dividing seam because this area receives repeated stress whenever cards are inserted or removed. This detail is particularly useful when adapting the Denim wallet pattern into a larger wallet that carries several cards side by side.
A larger compartment can be positioned behind the card pockets for folded cash or receipts. To create it, leave an accessible opening between the pocket assembly and the lining instead of stitching every layer completely flat. Test the depth with folded paper money before completing the seams. A useful wallet should provide enough space for contents without forcing the fabric to stretch. Remember that the final seam allowance will slightly reduce the usable dimensions.
Once the interior sections are attached, inspect the reverse side of the lining. Trim long thread tails and check that all stitching lines are secure. Press the pocket assembly gently using a temperature appropriate for the fabric. Avoid pressing directly over bulky denim seams for too long. If necessary, use a pressing cloth. A neat interior at this stage contributes significantly to the finished appearance because correcting distorted pockets after the exterior has been attached is difficult.
Before proceeding, fold the lining in half along the previously marked center. Insert a few cards into the slots and check how the wallet closes. The contents should remain inside the edges and the pockets should not pull excessively. If everything sits comfortably, remove the cards before continuing. Testing the handmade denim wallet during construction provides an opportunity to catch sizing problems before the final assembly.
Assembling and Sewing the Denim Wallet
Place the finished lining and denim exterior right sides together. Align all four edges carefully and secure them with sewing clips or pins. Because denim can shift while sewing, clips are particularly useful around thicker areas. Leave an opening of approximately 3 inches (7.5 cm) along one relatively straight edge. This opening will allow the entire wallet to be turned right side out after stitching.
Sew around the perimeter using the planned 3/8-inch seam allowance, remembering to leave the turning opening unstitched. Sew slowly when approaching areas containing several layers. Never force thick fabric aggressively beneath the presser foot. If the machine struggles at a bulky seam, stop with the needle down, lift the presser foot, reposition the material carefully, and continue. Consistent stitching is more valuable than sewing quickly.
After completing the perimeter seam, trim the seam allowance slightly, especially around the corners. Cut diagonally across each corner without cutting through the stitches. Removing this excess fabric helps the corners turn more sharply and reduces unnecessary bulk. If the denim is particularly thick, grade the seam allowances by trimming one layer slightly narrower than another. This prevents all the fabric edges from stacking at exactly the same location.
Turn the wallet right side out through the opening. Work gradually rather than pulling aggressively on the fabric. Once the project has been completely turned, use a blunt turning tool to shape the corners carefully. Avoid sharp objects that might puncture the denim or lining. Roll the seams gently between your fingers so the exterior and lining meet evenly around the edges.
Fold the raw edges of the turning opening toward the inside, following the existing seam allowance. Press the entire wallet carefully, making sure the opening aligns with the surrounding finished edge. Topstitch approximately 1/8 inch from the edge around the complete perimeter. This closes the opening while giving the wallet a crisp, professional-looking border. Use a slightly longer stitch length if your machine produces very tiny stitches on heavy denim.
Fold the completed wallet along the center line and press lightly to establish its shape. At this stage, you can add a snap, magnetic closure, button and loop, or simply leave the wallet as a traditional folding design. When adding hardware, make sure it does not interfere with the card pockets. Your basic Denim wallet pattern is now structurally complete and ready for finishing details and personalization.
Finishing, Customization, FAQ, and Care Tips
Decorative topstitching is one of the easiest ways to give a denim wallet a more polished appearance. Traditional golden-brown thread can create a classic jeans-inspired look, while bright contrasting thread produces a more playful result. Keep decorative stitching simple if this is your first denim project. Straight parallel lines, small geometric shapes, or stitching that follows the wallet edges can add interest without making construction unnecessarily difficult.
You can also reuse original details from old jeans. A small section of an existing pocket, belt loop, embroidered area, or decorative seam can become part of the exterior. When using recycled details, plan their placement before cutting the main rectangle. Avoid positioning very thick factory seams where the wallet must fold because excessive bulk can make the finished project difficult to close.
Fabric selection can dramatically change the personality of the same Denim wallet pattern. Dark indigo denim combined with neutral cotton creates a classic accessory, while faded denim paired with floral or geometric lining feels more casual. Patchwork can also be used for the exterior, provided the joined pieces are reinforced adequately. Whatever style you choose, prioritize durability in areas that receive frequent handling.
For everyday care, avoid overfilling the card compartments. Too many cards in one slot can stretch the fabric and place unnecessary pressure on the seams. If the wallet becomes dirty, follow the care requirements of the denim, lining, interfacing, and any installed hardware. Spot cleaning is often sufficient for small marks. If washing is appropriate for all materials used, reshape the wallet while damp and allow it to dry completely before storing cards inside.
Beginners sometimes worry about imperfect topstitching, but small variations are normal in handmade sewing. The most important qualities are secure seams, practical pockets, and a wallet that folds comfortably. Accuracy improves naturally with practice. Sewing slowly around thick areas, measuring before cutting, and testing each pocket before final assembly will generally produce better results than trying to complete the project quickly.
The basic construction method can also be adapted for future denim sewing projects. Once you understand how the exterior, lining, pockets, and turning opening work together, you can experiment with larger wallets, card holders, coin pouches, passport covers, or small organizers. Keep notes about the measurements you used and any adjustments you would make next time. Those notes can become your personalized Denim wallet pattern for future projects.
Frequently Asked Questions About a Denim Wallet Pattern
What type of denim is best for making a wallet?
Medium-weight denim is usually a practical choice because it provides durability without creating excessive bulk. Very heavy denim can be more difficult to turn at the corners and may challenge some domestic sewing machines, especially when several layers overlap.
Can I make this wallet from old jeans?
Yes. Recycling jeans is an excellent way to obtain fabric for a Denim wallet pattern. Choose areas that are still strong, such as sections from the legs. Avoid fabric that has become extremely thin around the knees, thighs, or other heavily worn areas.
Do I need interfacing for a denim wallet?
Not always. Medium or heavy denim may already provide enough structure. Lightweight denim can benefit from fusible interfacing because it helps the wallet maintain its shape. The goal is stability rather than stiffness.
What sewing-machine needle should I use?
A denim or jeans needle is designed for tightly woven, heavier fabrics and is usually suitable for this type of project. Select the needle size according to the thickness of your fabric and follow the recommendations for your sewing machine.
How large should the card pockets be?
Always measure an actual card before finalizing your pattern. The pocket should accommodate the card plus appropriate seam allowances and a little ease. Making a quick fabric test pocket can prevent sizing mistakes.
Why is my sewing machine struggling with the denim layers?
The problem may occur because several thick seams overlap. Check that you are using an appropriate needle and thread, sew slowly, and reduce unnecessary bulk by trimming and grading seam allowances. Avoid pulling the fabric through the machine.
Can I add a zipper to this Denim wallet pattern?
Yes, but adding a zipper changes the construction sequence. A zippered coin section should normally be assembled as part of the interior before the exterior and lining are joined. Beginners may find it easier to complete the basic version first.
How can I make the wallet look more professional?
Accurate cutting, straight topstitching, consistent seam allowances, neatly shaped corners, and careful pressing make a major difference. Coordinating the lining with the denim and using clean finishing techniques also improves the overall appearance.
Can I make a smaller version as a card holder?
Absolutely. Reduce the exterior and lining dimensions while preserving enough room for the card pockets and seam allowances. Always test the dimensions using actual cards before sewing the final perimeter seam.
Is a handmade denim wallet suitable for beginners?
Yes. A basic Denim wallet pattern is a useful beginner sewing project because it teaches cutting, pocket construction, lining, turning, topstitching, and working with thicker fabric. Starting with medium-weight denim keeps the process manageable.
How can I prevent the wallet from becoming too bulky?
Use lightweight cotton for the lining and internal pockets, trim seam allowances, avoid unnecessary layers, and keep thick original jeans seams away from the edges and center fold. These choices help create a slimmer finished wallet.
Can this project be made entirely from fabric scraps?
Yes. Small denim and cotton remnants are often sufficient. Scrap-based construction can also create an attractive patchwork effect, making each handmade denim wallet unique while giving leftover materials a practical new purpose.
Conclusion
Creating your own Denim wallet pattern is a satisfying way to combine practical sewing skills with creative fabric reuse. Throughout this tutorial, you learned how to choose suitable denim, determine useful measurements, cut the exterior and lining, prepare card pockets, arrange the interior compartments, and assemble the main wallet structure. These fundamental techniques can be used for many other small denim sewing projects as well.The most important part of the process is careful preparation. Measuring the cards before sewing, maintaining consistent seam allowances, reducing bulk at the corners, and testing the wallet before final assembly can prevent many common problems. Even a simple design can look polished when the stitching is secure and the edges are neatly finished.
This project is also easy to personalize. Different lining fabrics, contrasting topstitching, recycled jeans details, closures, embroidery, and patchwork can transform the basic Denim wallet pattern into something completely individual. Instead of treating the measurements as strict rules, use them as a practical starting point and adjust the design according to what you want to carry.Most importantly, enjoy the handmade process. A wallet does not need to look factory-made to be useful or attractive; thoughtful construction and personal details are part of what makes handmade sewing special. With practice, each version can become cleaner, stronger, and more customized to your preferences.
If you make this Denim wallet pattern, leave your sincere opinion about the project and share what worked best for you. Your experience may help inspire other sewing enthusiasts who are learning how to work with recycled denim.Suggestions are welcome too. Share the colors, pocket arrangements, closures, or creative details you would add to your next denim wallet. There are countless ways to adapt this simple project, and your ideas can inspire new versions and future handmade creations.