
Denim crossbody bag pattern is a practical sewing project that transforms durable denim into a comfortable, stylish, and useful everyday accessory.
Making your own Denim crossbody bag pattern also gives you complete control over the dimensions, pockets, strap length, lining, and decorative details.
This tutorial explains the complete construction process for a compact denim crossbody bag, from preparing the pattern pieces to finishing the strap and final seams. The suggested finished size is approximately 9 inches wide by 7 inches tall (23 x 18 cm), although the dimensions can easily be adapted to your needs. The instructions focus on creating a lined zippered bag with an optional exterior pocket and an adjustable or fixed-length shoulder strap. Accurate cutting, consistent seam allowances, careful pressing, and patient sewing through bulky areas will help produce a polished result. You do not need an advanced sewing machine or complicated equipment, but using the correct needle and working slowly through thick sections can make a noticeable difference. Once you understand the basic construction, the same method can be adapted into many other denim bags.
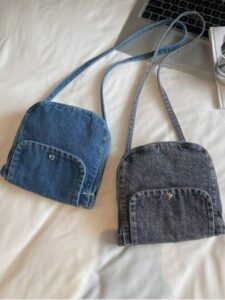
Materials, Measurements, and Preparing the Denim Pieces
Start your Denim crossbody bag pattern by selecting denim that is strong but flexible enough to sew comfortably. Medium-weight denim is an excellent choice because it provides natural structure without creating excessive bulk at the seams. If you are recycling jeans, inspect the fabric carefully and avoid sections that have become very thin from wear. The legs usually provide large usable areas, while an original back pocket can be saved and incorporated into the front of the bag as a convenient exterior compartment.
For the main bag, cut two denim rectangles measuring approximately 10 x 8 inches (25.5 x 20.5 cm). These pieces will become the front and back panels. Cut two identical rectangles from cotton lining fabric. The extra dimensions include room for seam allowances and zipper installation, resulting in a finished bag close to the suggested 9 x 7-inch size. Always square the fabric with a ruler before cutting because accurately matched panels make assembly significantly easier.
You will also need a zipper approximately 9 to 10 inches long, polyester sewing thread, a denim sewing-machine needle, scissors or a rotary cutter, ruler, fabric marker, sewing clips, iron, and a yarn or hand-sewing needle for small finishing tasks. For the strap, prepare a strip of denim approximately 3 to 4 inches wide and 45 to 55 inches long, depending on your preferred drop. A shorter person may prefer a shorter strap, so testing the length against your body before sewing is useful.
If the denim feels too soft for the desired bag shape, apply fusible interfacing to the wrong side of the front and back exterior panels. Lightweight or medium-weight interfacing usually provides sufficient support. Avoid extremely heavy stabilizer unless you specifically want a rigid bag because several layers of denim already create considerable thickness. Follow the instructions appropriate for your interfacing and allow the pieces to cool completely before continuing.
An exterior pocket is optional but adds useful storage and character. Cut a denim rectangle approximately 7 x 6 inches, or reuse a pocket carefully removed from an old pair of jeans. If making the pocket yourself, fold the upper edge toward the wrong side twice by approximately 1/2 inch, press, and topstitch. Fold the remaining raw edges inward by approximately 1/2 inch and press them carefully before positioning the pocket on the front bag panel.
Before sewing, arrange every component on a flat surface. You should have two exterior panels, two lining panels, the zipper, strap fabric, optional interfacing, and any pocket pieces. Mark the center of the upper edge on both exterior panels and both lining pieces. This simple organization step prevents mistakes later and makes the Denim crossbody bag pattern easier to assemble in a logical sequence.
Sewing the Pocket, Zipper, and Lining
If you are including an exterior pocket, sew it before assembling the main bag. Center the prepared pocket on the right side of the front denim panel, positioning it at least 1 to 1.5 inches above the lower raw edge. Pin or clip it securely. Topstitch along both sides and the bottom, leaving the upper edge open. Reinforce the upper corners with a few additional stitches because these areas experience the greatest amount of stress during everyday use.
The zipper is the next important element of this Denim crossbody bag pattern. Place the front denim panel right side up. Position the zipper along the upper edge with the zipper teeth facing downward toward the right side of the denim. Then place one lining piece over the zipper with its right side facing the denim. The zipper will be sandwiched between the exterior and lining fabrics. Align all upper edges carefully and secure them with clips.
Using a zipper foot, sew along the upper edge approximately 1/4 inch from the zipper tape, adjusting slightly according to your zipper construction. Sew slowly and keep the layers aligned. When approaching the zipper pull, stop with the needle down, raise the presser foot, move the slider behind the foot, lower the presser foot, and continue sewing. This prevents the zipper pull from pushing the stitching line away from the zipper teeth.
Fold the denim and lining away from the zipper and press them carefully. Topstitch close to the folded fabric edge to keep the material from catching in the zipper during use. Repeat the same process with the back exterior panel and second lining piece on the opposite side of the zipper. After sewing, open both sets of fabric away from the zipper and add another line of topstitching.
At this stage, test the zipper several times. It should open and close smoothly without catching the lining. If the fabric is too close to the zipper teeth, additional topstitching can hold it farther away. Check that the exterior front and back panels align when the zipper is closed. Small corrections are much easier now than after the bag has been completely assembled.
Open the zipper approximately halfway before proceeding. This step is extremely important because the opening will later allow you to turn the finished bag right side out. Arrange the exterior panels right sides together and the lining panels right sides together. The zipper should sit naturally between the two sections. Carefully match the side edges and zipper ends, then clip everything securely before sewing the body of the denim crossbody bag.
Making the Crossbody Strap and Assembling the Bag
A comfortable strap is an essential part of a successful Denim crossbody bag pattern. If you cut a denim strip approximately 4 inches wide, fold it lengthwise with the wrong sides together and press to mark the center. Open it again, fold each long raw edge toward the center crease, and press. Fold the entire strip in half once more. The raw edges should now be enclosed inside a strap approximately 1 inch wide.
Topstitch along both long sides of the strap approximately 1/8 inch from the edges. A slightly longer stitch length often produces attractive topstitching on denim. If the strap contains bulky seams from recycled jeans, trim unnecessary seam allowances before folding. For a softer strap, you can use a cotton fabric strip reinforced with lightweight interfacing instead of multiple layers of heavy denim.
For a fixed strap, test the length by positioning it across your body before attaching it. A finished length of approximately 45 to 50 inches works for many adults, but personal height and preferred bag position vary considerably. For an adjustable strap, use appropriate bag hardware such as a slider and rectangular rings. Follow the hardware dimensions when determining strap width so the finished strap moves smoothly through the fittings.
To attach a simple fixed strap, position one end against each side of the exterior bag with the strap extending inward between the exterior panels. The ends should extend approximately 1 inch beyond the raw side edges. Baste them securely within the seam allowance. Check carefully that the strap is not twisted before sewing the bag together. Reinforcing these attachment points with additional stitching provides greater durability.
With exterior pieces right sides together and lining pieces right sides together, sew around the entire perimeter using approximately a 3/8-inch seam allowance. Leave an opening about 4 inches wide along the bottom of the lining. Do not sew through the zipper opening incorrectly; work carefully around its ends. Reinforce the areas where the strap joins the bag by stitching across them twice. Trim excessive bulk around the zipper ends and corners without cutting the main seam.
Reach through the opening in the lining and carefully pull the entire bag right side out. Push the exterior corners into shape using a blunt turning tool or your fingers. Avoid sharp objects that could puncture the fabric. Fold the raw edges of the lining opening inward and stitch them closed with a narrow machine seam or invisible hand stitches. Push the lining into the bag, shape the corners, and press the finished Denim crossbody bag carefully.
Professional Finishing, Customization, FAQ, and Care
Once the main construction is finished, inspect all seams and topstitching. Trim visible thread tails and check the strap attachment points. A professional-looking Denim crossbody bag pattern depends heavily on these small finishing details. If any section of topstitching appears weak, reinforce it before using the bag. The zipper should operate freely, the lining should sit smoothly inside, and the strap should feel secure when gently pulled.
Decorative topstitching can enhance the classic denim appearance. Golden-brown thread creates a traditional jeans-inspired effect, while cream, red, pink, or another contrasting shade can make the design more distinctive. Double rows of parallel topstitching around the pocket or strap can also provide visual interest. Keep decorative stitching consistent so it looks intentional rather than accidental.
Recycled jeans offer many opportunities for personalization. Original pockets can become exterior compartments, belt loops can hold small accessories, and contrasting faded sections can create a patchwork effect. You can even combine different shades of blue denim for the front and back panels. When mixing denim weights, consider adding interfacing to lighter sections so the bag maintains a balanced structure.
You can also customize the lining. Floral cotton, geometric prints, neutral solids, or brightly colored fabric can completely change the personality of the finished handmade denim bag. A light-colored lining makes small items easier to locate inside the bag, while patterned fabric adds an unexpected decorative element whenever the zipper is opened. Prewashing cotton and denim before cutting can reduce unexpected shrinkage later.
To care for the finished bag, avoid overloading it with excessively heavy objects. Although denim is durable, the strap attachment points and zipper still experience stress. Spot cleaning is often sufficient for everyday marks. If the materials and hardware are washable, gentle cleaning may be possible, but always consider the requirements of every component, including interfacing and zipper hardware.
The completed project can also serve as a starting point for other designs. Increase the dimensions for a larger everyday bag, reduce them for a phone pouch, add interior pockets for organization, or incorporate boxed corners for additional depth. Once you understand the basic Denim crossbody bag pattern, you can modify the proportions and features to create a collection of practical accessories from new or recycled fabric.
Frequently Asked Questions About the Denim Crossbody Bag Pattern
What type of denim is best for a crossbody bag?
Medium-weight denim is generally a practical option because it offers durability and structure without becoming excessively difficult to sew. Very heavy denim can create bulky seams, particularly around the zipper and strap attachment points.
Can I make this Denim crossbody bag pattern from old jeans?
Yes. Old jeans are excellent for this project when the fabric remains strong. The leg sections provide useful larger pieces, while back pockets, belt loops, labels, and decorative seams can be reused as design elements.
Do I need interfacing?
It depends on the denim. Structured medium-weight denim may not need additional support, while lightweight or soft denim can benefit from fusible interfacing. The finished bag should hold its shape without becoming unnecessarily rigid.
What sewing-machine needle should I use?
A denim or jeans needle is recommended for heavier woven fabrics. The appropriate needle size depends on the thickness and number of layers being sewn. Replace a dull or damaged needle if stitches become inconsistent.
How large should a denim crossbody bag be?
There is no single correct size. A compact bag around 9 x 7 inches is convenient for a phone, small wallet, keys, and basic essentials. Measure the items you plan to carry before deciding on your final dimensions.
How long should the crossbody strap be?
Many crossbody straps fall somewhere around 45 to 55 inches, but the ideal measurement depends on height, body shape, and personal preference. Test the strap against your body before permanently attaching it.
Can I make the strap adjustable?
Yes. A strap slider and suitable rings can create an adjustable design. Make sure your finished strap width matches the dimensions of the hardware so it can pass through smoothly while remaining secure.
Why is my sewing machine struggling with thick denim?
Several layers may be accumulating around seams or strap areas. Use an appropriate denim needle, sew slowly, reduce unnecessary seam bulk, and avoid pulling the fabric. A longer stitch length can also work better for certain denim topstitching applications.
Can I add interior pockets?
Yes. Sew interior pockets onto the lining before assembling the zipper and main bag. You can create simple patch pockets for cards, keys, or a phone, depending on the intended use.
Can I make the bag without a zipper?
Yes. The pattern can be adapted with a magnetic snap, button closure, flap, or open top. However, changing the closure may require modifying the upper construction and lining sequence.
How can I make the corners less bulky?
Trim and grade seam allowances carefully, especially near the zipper ends. Avoid placing original thick jeans seams directly at the bag corners. Medium-weight denim is also easier to manage than extremely heavy fabric.
How do I make my handmade denim bag look professional?
Accurate measurements, straight cutting, consistent seam allowances, neat topstitching, careful pressing, properly installed lining, and reinforced strap attachments all contribute to a cleaner finished appearance.
Conclusion
Creating a Denim crossbody bag pattern is a practical way to develop sewing skills while making an accessory that can become part of your everyday routine. The project combines durable denim, a neat fabric lining, a secure zipper, useful storage, and a comfortable shoulder strap in one approachable construction.Throughout this tutorial, you learned how to select suitable denim, prepare the main exterior and lining panels, determine useful measurements, and add optional interfacing. Careful preparation provides the foundation for a bag that holds its shape and remains comfortable to carry.
You also learned how to prepare and attach an exterior pocket, sandwich the zipper between the denim and lining, topstitch the zipper edges, and check the alignment before completing the bag. Taking time during these stages can prevent many common sewing problems.The strap is another important part of the Denim crossbody bag pattern. Folding the raw edges inside creates a clean finish, while secure attachment points help the finished bag withstand everyday use. The strap can be fixed or adjustable depending on your preferences and available hardware.
Finally, details such as contrasting topstitching, recycled jeans pockets, colorful lining, patchwork denim, and additional compartments allow you to personalize the project. The basic construction can easily become a starting point for larger shoulder bags, small phone pouches, travel organizers, and other creative denim sewing projects.If you make this Denim crossbody bag pattern, leave your sincere opinion about the project and share how the construction worked for you. Suggestions are welcome too—tell us what colors, pockets, closures, strap styles, or other creative details you would add to your own version. Your ideas can inspire new variations and help other sewing enthusiasts discover even more possibilities for working with denim.