
Crocheted witch hat shaped bookmark pattern is a charming way to combine practical crochet with a playful handmade design that works especially well for autumn reading, Halloween décor, small gifts, and craft collections.
One of the advantages of this crochet witch hat bookmark is that it offers plenty of visual character without requiring a large amount of material.
Before beginning the Crocheted witch hat shaped bookmark pattern, choose yarn that creates clear stitch definition and does not become excessively bulky when the book is closed. Cotton yarn is particularly useful because it tends to produce firm, neat stitches, although smooth acrylic yarn can also work well. A crochet hook around 2.5 mm to 3.5 mm is suitable for many lightweight yarns, but your hook should ultimately match your chosen yarn and preferred tension. You will also need scissors, a yarn needle, and optional contrasting yarn for the hatband or decorative buckle. The approximate finished hat can measure about 3 to 4 inches (7.5 to 10 cm) from tip to brim, while the bookmark tail can measure approximately 8 to 12 inches (20 to 30 cm). These measurements are flexible and can easily be customized for different books.
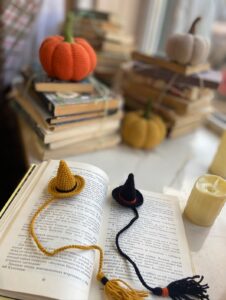
Materials, Crochet Keys, and Preparation for the Witch Hat Bookmark
For this crocheted witch hat shaped bookmark pattern, gather approximately 15 to 25 yards of lightweight cotton or acrylic yarn for the main hat color and a small quantity of contrasting yarn for decoration. A 3 mm crochet hook is a practical starting point. Keep scissors and a tapestry needle nearby for finishing. If you crochet tightly, moving up one hook size can prevent the bookmark from becoming overly stiff. If your stitches are naturally loose, a slightly smaller hook can help the miniature hat maintain a defined shape.
The crochet keys used throughout the pattern are straightforward. CH = chain, SC = single crochet, HDC = half double crochet, DC = double crochet, SL ST = slip stitch, ST = stitch, INC = increase, and FO = fasten off. When an instruction says INC, work two stitches into the same stitch unless another method is specified. These abbreviations keep the written pattern compact while allowing every stage of the bookmark to be followed systematically.
Begin with the pointed crown of the witch hat. Row 1: CH 2, work 2 SC into the second CH from the hook, CH 1, turn. Row 2: SC across (2 ST), CH 1, turn. Row 3: INC in the first ST, SC in the remaining ST (3 ST), CH 1, turn. Row 4: SC across (3 ST), CH 1, turn. Row 5: INC, SC across (4 ST), CH 1, turn. This gradual increase creates the characteristic narrow tip while preventing the hat from becoming too wide too quickly.
Continue shaping the crown with controlled increases. Row 6: SC across (4 ST). Row 7: INC in first ST, SC across (5 ST). Row 8: SC across (5 ST). Row 9: INC in first ST, SC across (6 ST). Row 10: SC across (6 ST). Row 11: INC in first ST, SC across (7 ST). Row 12: SC across (7 ST). If you want a taller witch hat, simply add several even rows before continuing with the final widening. Keeping the increases mainly along one edge can also give the hat a slightly curved, whimsical appearance.
To make the lower crown wider, continue with Row 13: INC, SC across (8 ST). Row 14: SC across. Row 15: INC in the first and last ST, working SC between them (10 ST). Row 16: SC across (10 ST). At this stage, the triangular silhouette should be obvious. Do not worry if the fabric curls slightly; gentle blocking at the end can flatten the bookmark. Avoid aggressive stretching because that can distort the pointed tip.
Before moving to the brim, check the proportions. The crown should be narrow at the top and approximately 2 to 2.5 inches (5 to 6.5 cm) wide near its base. If it seems too small, add another increase row. If you are making the witch hat bookmark pattern for a smaller paperback, keeping the hat compact prevents it from overwhelming the book. This ability to modify the dimensions is one of the reasons the project works well as a customizable handmade accessory.
Step-by-Step Crochet Pattern for the Hat Brim and Decorative Band
The brim gives the project its unmistakable witch-hat appearance. After finishing the final crown row, CH 4, then work back toward the crown using SC in the second CH from hook and in the next 2 CH. Continue working SC across the bottom edge of the crown, then CH 4 again. Turn and work SC into the second CH from hook and across the remaining chains. This extends the brim beyond both sides of the crown and creates a broader horizontal silhouette.
For a more substantial brim, work another row across the entire width. CH 1, turn, SC in each ST across. At both outer corners, you may work 2 SC in the corner ST to produce a gently flared appearance. Keep your tension consistent so the brim remains flat. If the edge begins to ripple excessively, reduce the number of increases. If it curls upward, adding a small increase at each end can provide additional width.
Now create the contrasting hatband. Attach purple, orange, green, gold, or another accent color near the bottom of the crown, just above the brim. CH 1, SC evenly across the front of the crown, FO, leaving enough yarn to weave securely into the back. Alternatively, crochet a separate chain long enough to cross the hat, then sew it into position. A contrasting stripe helps visually separate the crown from the brim and adds a recognizable Halloween-inspired detail.
A miniature buckle can be added if desired. Using yellow or gold yarn, CH 6 and SL ST into the first CH to form a tiny ring. Shape the ring into a small square with your fingers and stitch it over the center of the hatband. Because a bookmark should remain relatively flat, avoid large beads, buttons, or thick embellishments. Flat crochet decorations are more suitable because they are less likely to create unnecessary pressure between pages.
For a slightly crooked witch-hat appearance, gently bend the upper third of the crown toward one side while blocking. You can also create the curve directly in the crochet by placing increases unevenly during the upper rows. This does not need to be perfectly symmetrical. In fact, a subtle curve often gives a handmade crocheted witch hat shaped bookmark more personality and makes the silhouette immediately recognizable.
Once the brim and band are complete, weave in loose ends using a tapestry needle. Pass each yarn tail through several stitches on the back of the work, reverse direction, and pass it through a few additional stitches before trimming. Secure finishing is especially important for bookmarks because repeated movement in and out of books can gradually loosen poorly woven yarn ends. Keep all finishing work as flat as possible.
Creating the Bookmark Tail and Achieving a Clean Professional Finish
The long tail is the functional part of the Crocheted witch hat shaped bookmark pattern. Attach the main yarn to the center underside of the brim and CH 45 to 60, depending on the desired length. A chain of approximately 50 stitches generally works well for many standard books, although stitch size and yarn weight will affect the final measurement. Before fastening off, place the hat at the top of a book and test whether the chain extends comfortably toward the bottom.
A plain chain produces the thinnest possible bookmark tail, but you can strengthen it by working SL ST back through each CH. This creates a narrow cord that resists stretching while remaining fairly flat. Another option is to work SC into each CH, although this creates a wider strip. For books with delicate pages, a soft chain or slip-stitched cord is often preferable because it adds very little thickness.
At the bottom of the tail, consider adding a tiny decorative element. For a simple tassel effect, cut three or four strands of yarn approximately 3 inches (7.5 cm) long, fold them in half, and pull the folded section through the final chain. Pass the loose ends through the loop and tighten gently. Trim the strands evenly. This provides a decorative finish without changing the basic structure of the bookmark.
You can also finish the tail with a miniature crochet circle or star. For a small circle, make a magic ring and work 6 SC into the ring, SL ST to the first SC, FO. Sew the circle securely to the end of the chain. A small pumpkin-colored circle can introduce another autumn detail, while a purple or green circle can coordinate with the hatband. Keep any lower embellishment relatively thin so the bookmark remains practical.
Blocking significantly improves the appearance of this small project. Lightly dampen the finished crochet bookmark, place it on a clean towel or blocking surface, and gently arrange the crown, brim, and tail into the desired shape. Pin the edges if necessary and allow the piece to dry completely. Cotton yarn generally responds particularly well to this process. The objective is to straighten the edges and define the pointed hat rather than stretch the stitches.
Finally, inspect the bookmark for loose fibers, uneven ends, or bulky knots. Trim only after confirming that every tail has been woven securely into the fabric. A clean back is almost as important as an attractive front because both sides may be visible when the bookmark is used. Careful finishing transforms a simple beginner-friendly crochet project into something that looks polished enough for gifting, craft displays, or seasonal reading baskets.
Customization Ideas, Size Adjustments, FAQ, and Final Tips
Color is one of the easiest ways to personalize a Crocheted witch hat shaped bookmark pattern. Traditional black with a purple band creates a classic Halloween appearance, while charcoal with orange offers a warm autumn palette. Purple and lime green produce a playful fantasy look, and burgundy with gold can make the same design feel more elegant. Using leftover yarn also makes each bookmark unique without requiring additional supplies.
The size can be modified by changing the number of crown rows and tail chains. For children’s books or smaller paperbacks, reduce the crown by two to four rows and make approximately 35 to 45 chains for the tail. For large hardcover books, extend the tail to 60 or 70 chains. Instead of relying only on stitch counts, measure the bookmark against the type of book where it will most often be used.
Yarn weight also changes the final result. Fine cotton creates a delicate, flat crochet witch hat bookmark, while DK yarn produces a slightly thicker and more noticeable piece. Very bulky yarn is generally less practical because it can create too much thickness between pages. Whatever yarn you choose, maintaining consistent tension is more important than matching one exact gauge because the project is decorative and does not require fitted dimensions.
Beginners should focus on recognizing the structure rather than worrying about absolute perfection. The project is essentially a gradually widening triangle, a horizontal brim, and a long chain. If one side looks slightly uneven, careful blocking can often improve it. Counting stitches at the end of each row is one of the simplest ways to avoid accidental increases or decreases, particularly while forming the crown.
FAQ: Frequently Asked Questions
Is the crocheted witch hat shaped bookmark pattern suitable for beginners? Yes. The design mainly uses chains, single crochet, slip stitches, and basic increases. A beginner who is comfortable turning rows and counting stitches should be able to complete the project. The small size also makes it convenient for practicing shaping techniques without committing to a large amount of yarn.
What yarn is best for a crochet bookmark? Lightweight cotton is an excellent option because it provides stitch definition, durability, and a relatively flat finished fabric. Smooth acrylic can also work. Avoid extremely fuzzy or bulky yarn if the bookmark will be placed inside books regularly.
How long should the bookmark tail be? Approximately 8 to 12 inches, or 20 to 30 cm, works for many books. However, the ideal length depends on the size of the book. Testing the chain before fastening off is the easiest way to determine the correct length.
How can I keep the witch hat from curling? Consistent tension and proper blocking are the main solutions. Lightly dampen the finished hat, shape it on a flat surface, and allow it to dry completely. If the brim curls strongly, check whether your stitches are too tight or whether additional corner increases are needed.
Can I make the witch hat larger? Yes. Add additional rows to the crown while continuing gradual increases. You can also use slightly thicker yarn and a larger hook. Remember that a very thick hat may be better suited to decoration than regular bookmark use.
Can I sell bookmarks made from this type of project? Handmade bookmarks can be attractive items for craft collections and seasonal product ranges. When creating pieces for sale, focus on neat finishing, durable yarn, consistent sizing, and your own decorative combinations. Pricing should account for materials, production time, packaging, and other business expenses.
The final paragraph of this section is about experimentation. Once you understand the basic construction, try changing the band, brim, crown curve, tassel, or color combination. A small embroidered star, moon, or stitched accent can create additional personality without making the piece bulky. The Crocheted witch hat shaped bookmark pattern works particularly well as a foundation because its simple shape can be adapted while keeping the bookmark functional.
Conclusion
Creating a Crocheted witch hat shaped bookmark pattern is a simple way to turn basic crochet stitches into a useful seasonal accessory. Throughout this tutorial, you learned how to build the pointed crown with controlled increases, widen the lower portion of the hat, crochet a recognizable brim, add a contrasting decorative band, and create a long bookmark tail that fits comfortably between book pages. The project uses accessible techniques such as CH, SC, SL ST, INC, and FO, making it suitable for crocheters who want to practice shaping on a manageable scale.
The most important details are consistent tension, careful stitch counting, a reasonably lightweight yarn, and neat finishing. Small adjustments to the number of rows or chains allow the pattern to fit different books, while color combinations and flat embellishments make every version feel personal. Once you have completed the basic design, you can experiment with curved crowns, tiny buckles, tassels, stars, or different Halloween-inspired palettes.
Whether you make one bookmark for yourself or create several as handmade gifts, this little witch hat is a fun way to combine crochet and reading in the same project. Try the pattern with your favorite yarn colors and make the design your own. If you create this crocheted witch hat shaped bookmark, leave your sincere opinion about the pattern and share any suggestions or creative variations you would add. Your ideas can inspire new color combinations, finishing techniques, and imaginative versions of this charming crochet project.