
A Crocheted Christmas tree pattern is a wonderful way to bring warmth, creativity, and handmade charm to your holiday decorations.
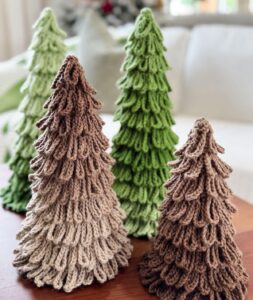
One of the best things about a Crocheted Christmas tree pattern is its versatility. You can make a simple flat tree for ornaments and gift tags, a small stuffed tree for tabletop displays, or a layered design with textured branches that resemble the natural shape of an evergreen.
This step-by-step tutorial explains how to prepare your materials, understand the basic crochet stitches, shape the tree, and assemble a finished decoration. The instructions describe a small, three-dimensional Christmas tree with a cone-shaped body, a simple trunk, and optional decorative details. The project uses accessible techniques, including the magic ring, single crochet, increases, and decreases, making it suitable for crocheters who want to practice shaping a three-dimensional object. Before beginning, remember that crochet tension varies from person to person, so the final dimensions may differ slightly from the example. Take your time, count your stitches carefully, and enjoy creating a festive decoration that reflects your own creativity.
Materials and Basic Techniques for a Crocheted Christmas Tree Pattern
Before starting your Crocheted Christmas tree pattern, gather your materials in one place. You will need green yarn for the main tree, a small amount of brown yarn for the trunk, a crochet hook appropriate for your yarn, scissors, a yarn needle, and stitch markers. If you want a freestanding decoration, prepare a small amount of polyester fiberfill and a little firm cardboard or another suitable lightweight support for the base. Choosing your materials in advance makes the process easier and helps you maintain consistent stitches throughout the project.
For a compact tree, medium-weight yarn and a crochet hook around 3.5 mm to 4.5 mm are useful starting points, although the recommended hook size on the yarn label is also a helpful guide. When making stuffed crochet decorations, many crocheters choose a slightly smaller hook than usual to create firm fabric with minimal gaps. This is important because loose stitches can allow the stuffing to show through. If your stitches look too open, try a smaller hook or adjust your tension before continuing.
The main stitch used in this Crocheted Christmas tree pattern is the single crochet stitch (sc). To make it, insert your hook into the designated stitch, yarn over, and pull up a loop. Yarn over again and pull through both loops on the hook. This creates a compact stitch that works well for amigurumi-style decorations. Practice a few stitches before beginning if you are unfamiliar with the technique, because consistent tension will help your finished tree look smooth and evenly shaped.
You will also use increases (inc) and decreases (dec) to shape the tree. An increase usually means working two single crochet stitches into the same stitch, which expands the circumference of a round. A decrease combines two stitches into one, reducing the number of stitches and helping the fabric narrow. For a neater stuffed decoration, an invisible decrease is particularly useful because it reduces gaps in the finished surface. Stitch markers are valuable for keeping track of the beginning of each round, especially when working in a continuous spiral.
The magic ring is a useful starting technique for crocheting a closed circular top or base. Wrap the yarn into a loop, insert your hook through the loop, pull up a strand, and make the chain needed to secure the working loop. Then crochet the required stitches into the ring and pull the yarn tail to close the center. If you find the magic ring difficult, you can instead chain two stitches and work the first round into the second chain from the hook, depending on the structure of your design.
Finally, consider the finished size and purpose of your tree before choosing the yarn and accessories. A small tree intended for a desk may require only a few rounds, while a larger centerpiece will need more yarn and a sturdier base. For your first Crocheted Christmas tree pattern, a height of approximately 10 to 15 centimeters is a manageable goal. Keep decorations simple until the basic shape is complete, and make sure any embellishments are securely attached, particularly if the decoration will be handled by children or displayed around pets.
Step-by-Step Instructions for the Crocheted Christmas Tree Pattern
Start the tree by creating a magic ring with your green yarn. Work four single crochet stitches into the ring and gently tighten it. This small opening forms the top of your tree. Place a stitch marker in the first stitch so you can identify the beginning of each round. Because this pattern is worked in continuous rounds, you generally do not need to join the end of every round with a slip stitch or chain unless you prefer that method.
In Round 2, work one single crochet into each stitch around, giving you four stitches. In Round 3, increase in each stitch to reach eight stitches. This begins to establish the shape of the tree. In Round 4, work one single crochet into every stitch, keeping the count at eight. The combination of increase rounds and regular rounds creates a gradual shape rather than a flat circle. Keep your stitches firm but not so tight that inserting the hook becomes difficult.
Continue with Round 5 by repeating the sequence of one single crochet followed by an increase around the round, producing approximately twelve stitches. In Round 6, work one single crochet in every stitch. For Round 7, repeat two single crochet stitches followed by an increase around, resulting in approximately sixteen stitches. Work Round 8 evenly without increasing. These instructions establish a simple widening shape. Count your stitches after each increase round to ensure the number matches the expected total.
For Round 9, repeat three single crochet stitches followed by one increase around, producing approximately twenty stitches. Work Round 10 with one single crochet in each stitch. For Round 11, repeat four single crochet stitches followed by an increase around, giving approximately twenty-four stitches. Work Round 12 evenly. Your crochet piece should now resemble a small cone that gradually expands from its narrow top toward its wider lower section. If your tree is becoming too tall or wide for your intended display, you can adjust the number of plain rounds.
To give the tree a fuller shape, continue alternating increase rounds with plain rounds. For example, Round 13 can contain five single crochet stitches followed by an increase, repeated around, while Round 14 is worked evenly. This produces approximately twenty-eight stitches. Round 15 can use six single crochet stitches followed by an increase, creating approximately thirty-two stitches, followed by another plain round. Depending on your yarn, hook, and tension, these rounds will form a wider lower section. Use the stitch marker to avoid losing your place.
Once the tree reaches the desired width, work two or three plain rounds to create a slightly fuller lower edge. If you are making a stuffed tree, begin adding small amounts of fiberfill through the open base as needed, distributing it evenly without stretching the stitches. Do not pack the stuffing too tightly, because excessive pressure may distort the cone or make the fabric look uneven. If you want a firmer structure, place a suitably sized support inside the lower section before closing the base, ensuring that no sharp edges can damage the yarn.
To finish the main body, decrease gradually around the lower opening if your particular construction requires a narrower base. For this simple tree, you may instead leave the wider opening and attach a flat circular base, which makes stuffing and assembly easier. To create a flat base, crochet a small circle in green yarn using a magic ring and evenly spaced increases until it matches the opening. Sew the circle to the lower edge with a yarn needle, making sure the seam is secure. Weave in the ends carefully so they remain hidden inside the finished piece.
The trunk is made separately using brown yarn. Create a magic ring and work six single crochet stitches into it. Increase evenly in the next round to make twelve stitches, then work several rounds without increasing to form a short cylinder. The exact height depends on your preference, but three to five rounds are often sufficient for a small decoration. Add a little stuffing if desired, then sew the trunk securely to the center of the tree’s base. Check that the tree stands upright and adjust the placement before tightening the final stitches.
Finishing, Decorating, and Customizing Your Crocheted Christmas Tree Pattern
Once the main structure is complete, examine the entire tree for loose ends, uneven stitches, and areas that need additional shaping. Use a yarn needle to weave the tails through several stitches on the inside or underside of the project. Avoid cutting the yarn too close to the fabric before securing the end, as this may cause it to loosen over time. Gently shape the cone with your hands, distributing the stuffing evenly and checking that the bottom sits flat. These finishing steps can make a simple handmade decoration look much more polished.
A classic green tree can be decorated with small embroidered stars, French knots, or tiny stitched garlands. Use contrasting yarn in white, red, gold, or silver to create the appearance of miniature ornaments. Embroidery is especially useful because the decorative details become part of the fabric rather than hanging loosely from the surface. If you choose beads, buttons, or other small embellishments, attach them securely and consider whether the finished tree will be accessible to young children or pets. Embroidered details are generally a practical choice for decorations that will be handled frequently.
You can also experiment with different yarn textures to change the appearance of your Crocheted Christmas tree pattern. Smooth cotton yarn creates a defined stitch pattern, while soft acrylic yarn offers a lightweight finish and a wide range of colors. Slightly textured yarn can make the tree look fuller, although very fuzzy yarn may hide the stitches and make it harder to count them. For a first project, a smooth, medium-weight yarn is often the easiest option because the individual stitches remain visible as you work.
If you want a more elaborate design, add separate crochet layers that resemble evergreen branches. Make small scalloped strips or leaf-shaped pieces and sew them around the cone, starting near the lower edge and working upward. Overlapping the layers creates depth and gives the tree a fuller silhouette. You can use the same green yarn throughout or combine two shades to create subtle contrast. Test the placement of each layer before sewing it permanently, ensuring that the finished decoration remains balanced.
The base can also be customized to suit your holiday display. A small crocheted circular base gives the tree a coordinated handmade appearance, while a flat, firm support concealed inside the bottom can improve stability. For a rustic look, choose natural colors and understated decorations. For a more playful style, use bright yarn and colorful embroidered accents. You can even create several trees in different heights and arrange them together as a small seasonal village, provided each piece has a stable base and securely attached details.
Proper care will help your Crocheted Christmas tree pattern remain attractive for future holiday seasons. Remove dust with a soft brush or a gentle shake, and follow the yarn manufacturer’s care instructions if the piece needs cleaning. Avoid soaking a stuffed decoration unless you know that its materials and internal support can tolerate washing. Store the tree in a clean, dry container away from excessive heat, moisture, and direct sunlight. Before packing it away, inspect the seams and embellishments and repair any loose stitches so the decoration is ready for the next Christmas season.
Frequently Asked Questions About the Crocheted Christmas Tree Pattern
1. Is a crocheted Christmas tree pattern suitable for beginners?
Yes. This Crocheted Christmas tree pattern is suitable for beginners who already know how to make a chain, single crochet, and basic increases. The cone shape is built gradually, so you can practice counting stitches and working in continuous rounds. If the magic ring feels challenging, start with a chain-based alternative and focus on maintaining consistent tension. Beginners may also find it helpful to make a small sample before beginning the full project.
2. What yarn is best for a crocheted Christmas tree?
Medium-weight cotton or acrylic yarn is a practical choice for most small crochet trees. Cotton offers clear stitch definition and a firm finish, while acrylic is lightweight, widely available, and easy to find in festive colors. Choose a yarn that works comfortably with your crochet hook and produces fabric dense enough to conceal the stuffing. The best option depends on whether you want a soft ornament, a firm tabletop decoration, or a layered tree with distinct branches.
3. How much yarn do I need to make a crochet Christmas tree?
A small tabletop tree generally requires only a modest amount of yarn, often less than one small ball. The exact quantity depends on the height, width, stitch pattern, and yarn thickness. Larger trees, layered designs, and matching bases will require more material. If you plan to make several trees, purchase enough yarn in the same color lot to help maintain consistent color throughout the project.
4. How do I make my crocheted tree stand upright?
A stable base is essential for a freestanding decoration. Use firm, even stitches and distribute the stuffing without creating lumps. You can also add a lightweight, smooth support inside the base or create a flat crocheted circle that fits the bottom opening. Make sure the trunk is centered and securely attached. If the tree leans, adjust the stuffing and check whether the bottom is level before adding more decorations.
5. Can I make a crocheted Christmas tree without stuffing?
Yes. A flat tree can be crocheted as a triangular motif, made from separate decorative panels, or constructed from a long strip of crochet that is folded into a tree shape. These versions are useful for ornaments, garlands, gift decorations, and wall displays. If you prefer a three-dimensional appearance without fiberfill, consider using a firm internal support, but ensure that it is fully covered and safe for the intended display.
6. How can I make my crochet Christmas tree look fuller?
You can create a fuller appearance by adding more increase rounds, using layered scalloped branches, or sewing small crocheted leaves around the cone. Slight variations in green yarn can also give the tree more visual depth. Avoid adding too much stuffing, because overfilling can stretch the stitches and distort the shape. A combination of carefully placed layers and balanced shaping usually creates a more natural-looking silhouette.
7. What can I use instead of a magic ring?
If you have difficulty making a magic ring, chain two and work the first round into the second chain from the hook. This alternative can be easier for beginners, although it may leave a slightly more noticeable opening in the center. Pull the starting tail firmly and weave it in securely if the opening needs to be closed. The best starting method depends on the stitch pattern and how tightly you want the top of the tree to close.
8. How do I adjust the size of a crocheted Christmas tree?
To make a smaller tree, use finer yarn, a smaller hook, or fewer increase rounds. To make a larger tree, use thicker yarn or continue the established increase pattern for additional rounds. Remember that increasing the height and width changes the proportions, so check the silhouette as you work. For the most balanced result, add plain rounds between increase rounds and compare the width of the base with the overall height.
9. Can I sell Christmas trees made with this pattern?
You can generally sell handmade items that you personally crochet, subject to any applicable pattern-license terms, local requirements, and marketplace rules. If you use a pattern created by another designer, check the designer’s specific conditions before selling finished products. Write your own product descriptions and use original photographs of your finished work. These practices help present your handmade items accurately and professionally.
10. How should I store my crocheted Christmas tree after the holidays?
Clean the decoration gently according to the yarn’s care instructions and allow it to dry completely if it becomes damp. Store it in a dry container that protects it from dust and crushing. Avoid placing heavy objects on top, especially if the tree contains fiberfill or delicate embroidered details. A little care before storage will help preserve its shape, colors, and stitching for future holiday displays.
Conclusion
Creating a Crocheted Christmas tree pattern is a rewarding way to combine basic crochet skills with festive creativity. Throughout this tutorial, you learned how to choose suitable yarn and tools, practice the essential stitches, shape a cone using increases and plain rounds, create a simple trunk, and assemble a three-dimensional tree. You also explored decorating ideas, customization options, finishing techniques, and practical care tips that can help your handmade decoration last for many Christmas seasons.
The most important part of this project is to work patiently, count your stitches, and adjust the pattern to suit your preferred size and style. You can keep your tree simple with embroidered details or create a more elaborate decoration with layered branches and contrasting colors. Each version offers an opportunity to develop your crochet skills while making something personal for your home or as a thoughtful handmade gift.
Now it is your turn to share your experience! What did you think of this Crocheted Christmas tree pattern? Leave your honest opinion in the comments and tell us which yarn colors, decorative details, or alternative techniques you would like to try. Your sincere feedback and suggestions can inspire new ideas and help other crochet enthusiasts discover enjoyable ways to create their own handmade Christmas decorations.