
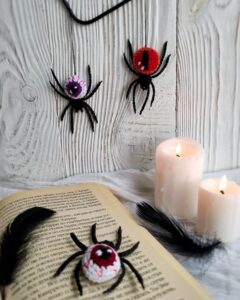
Eyed spider crochet pattern projects are a fun and creative way to celebrate Halloween, decorate your home, or make adorable handmade gifts.
One of the greatest advantages of making an Eyed spider crochet pattern is that it requires only a small amount of yarn, making it an excellent stash-busting project.
Throughout this guide, you will learn each stage of the crochet process using clear stitch instructions, practical tips, and beginner-friendly explanations. From selecting materials to crocheting the body, adding expressive eyes, shaping the legs, and assembling the final spider, every step is designed to help you create a polished handmade piece. By the end of this tutorial, you will have the confidence to personalize your own Eyed spider crochet pattern with unique colors, facial expressions, and decorative details.
Materials and Crochet Stitch Guide
Before beginning your Eyed spider crochet pattern, gather all of your supplies to ensure a smooth crochet experience. Using quality materials makes the finished spider more durable and gives it a neat, professional appearance.
Choose medium-weight cotton yarn or lightweight acrylic yarn depending on your preferred texture. Cotton provides crisp stitch definition, while acrylic creates a softer and fluffier finish.
Use the crochet hook recommended for your yarn, although many amigurumi makers prefer using a hook one size smaller to create tight stitches that prevent stuffing from showing through.
You will also need polyester fiberfill, a yarn needle, stitch markers, scissors, and safety eyes or black embroidery thread if you prefer embroidered eyes.
The basic crochet abbreviations used throughout this project include:
ch = chain
mr = magic ring
sc = single crochet
inc = increase (2 sc in one stitch)
dec = invisible decrease
sl st = slip stitch
FO = fasten off
Always count your stitches after each round. Consistent stitch counts are one of the easiest ways to achieve a symmetrical and well-shaped crochet spider.
Crocheting the Spider Body
Begin your Eyed spider crochet pattern by making a magic ring.
Round 1: Work 6 sc into the magic ring. Pull the ring closed securely. (6)
Round 2: Inc in each stitch around. (12)
Round 3: (1 sc, inc) repeat around. (18)
Round 4: (2 sc, inc) repeat around. (24)
Rounds 5–9: Sc in each stitch around. This creates the rounded center of the spider’s body. Stuff gradually as you work to maintain an even shape.
Round 10: (2 sc, dec) repeat around. (18)
Round 11: (1 sc, dec) repeat around. (12)
Round 12: Dec around until closed. Finish stuffing before closing completely, then fasten off and weave in the remaining yarn tail.
The completed body should feel firm but not overstuffed. Even stuffing helps maintain the round shape while allowing the spider to sit flat on a table or shelf.
Creating the Eyes and Crocheting the Eight Legs
The eyes are what make this Eyed spider crochet pattern especially charming. If using safety eyes, attach them before fully closing the body so the washers can be secured from inside.
For crocheted eyes, make two small white circles:
Round 1: 6 sc in a magic ring.
Round 2: Inc around (12).
Fasten off, leaving a long tail for sewing.
Create small black pupils by embroidering circles in the center of each eye or by sewing on tiny black crochet circles. Position the eyes close together for a cute cartoon appearance.
Now crochet the legs. Repeat the following pattern eight times:
Ch 18.
Beginning in the second chain from the hook, work 17 sl st back along the chain.
Fasten off, leaving a long sewing tail.
If you prefer thicker legs, substitute single crochet instead of slip stitches when working back along the foundation chain. This creates a sturdier appearance while still remaining flexible.
Sew four legs onto each side of the spider body, spacing them evenly. Bend the legs slightly after attaching them to give the spider a lively and playful pose.
Take your time during assembly. Even spacing creates a balanced appearance that makes the finished spider look much more polished.
Finishing Touches and Creative Customization Ideas
Once your Eyed spider crochet pattern is assembled, examine every seam carefully and weave in any remaining yarn ends securely.
Lightly shape the body with your hands to create a smooth rounded form. If needed, gently redistribute the stuffing before tightening the final stitches.
Add embroidered eyebrows, eyelashes, or a tiny smiling mouth if you want to give your spider additional personality. Small facial details can completely change the overall expression.
Experiment with novelty yarn for fuzzy spiders or metallic yarn for festive holiday decorations. Different textures allow you to create multiple unique versions from the same basic pattern.
This crochet spider can also become part of larger handmade projects. Attach a key ring for a keychain, sew it onto a backpack, create a hanging ornament, or combine several spiders into a seasonal garland.
Once you master this project, try making spiders in different sizes by changing your yarn weight and crochet hook. Larger spiders make wonderful home decorations, while miniature versions are perfect for party favors or gift embellishments.
Frequently Asked Questions
Is the Eyed spider crochet pattern suitable for beginners?
Yes. The project mainly uses basic amigurumi stitches such as the magic ring, single crochet, increases, decreases, and slip stitches, making it accessible for beginners with a little practice.
What is the best yarn for this project?
Cotton yarn offers excellent stitch definition, while acrylic yarn creates a softer texture. Both are suitable depending on your desired appearance.
Can I embroider the eyes instead of using safety eyes?
Absolutely. Embroidered eyes are an excellent alternative, especially for toys intended for very young children.
How much yarn does the project require?
Only a small quantity of yarn is needed, making this an ideal project for using leftover yarn from previous crochet creations.
Why are my legs curling?
Slip stitch legs naturally curl slightly. If you want straighter legs, use single crochet stitches or gently shape the finished legs by hand.
How do I make a larger spider?
Increase the yarn thickness and hook size while maintaining the same stitch sequence. This enlarges the finished spider proportionally.
Can I sell finished spiders?
Yes. Many crocheters sell handmade spiders at seasonal craft fairs and online marketplaces, provided they respect applicable laws and create original finished products.
Can I customize the colors?
Definitely. Although black is the traditional choice, colorful spiders in orange, purple, pink, blue, or pastel shades create fun decorations throughout the year.
Conclusion
Creating an Eyed spider crochet pattern is an enjoyable crochet project that combines simple techniques with endless creative possibilities. Throughout this guide, you learned how to prepare your materials, understand the essential crochet abbreviations, crochet a perfectly rounded spider body, create expressive oversized eyes, make eight flexible legs, and assemble every piece into an adorable finished spider. Because the project is quick to complete and uses only a small amount of yarn, it is perfect for beginners looking to build confidence as well as experienced crocheters searching for a relaxing weekend project.
One of the greatest strengths of this pattern is its versatility. You can easily customize colors, facial expressions, eye sizes, yarn textures, and decorative accessories to create spiders that match your own personal style or seasonal décor. Whether you use your finished spider as a keychain, ornament, gift topper, party decoration, or collectible amigurumi figure, each version becomes a unique handmade creation that showcases your creativity and crochet skills.
Thank you for following this Eyed spider crochet pattern tutorial. I hope it has inspired you to create your own charming crochet spider while practicing valuable amigurumi techniques. If you enjoyed this guide, please leave your honest opinion, share your experience with the pattern, and send your suggestions for future crochet tutorials. Your feedback helps improve future projects and inspires even more creative crochet ideas.