
Fabric pumpkin coaster pattern projects are a wonderful way to decorate your home with handmade charm while practicing beginner-friendly sewing techniques.
Handmade fabric coasters are among the most satisfying sewing projects because they require only small amounts of material while allowing endless creativity.
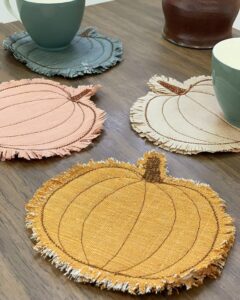
This tutorial explains the complete process needed to recreate the pumpkin coaster shown in the photo, from choosing fabrics to sewing, stuffing, shaping, quilting, and finishing. Every step is designed to be easy to understand while following good sewing practices. Whether you are completely new to sewing or already have experience, you will discover helpful techniques that produce professional-looking results.
Choose Materials and Prepare the Fabric
The first step when making a Fabric pumpkin coaster pattern is selecting suitable fabrics. Cotton quilting fabric is the best choice because it is stable, easy to sew, and available in countless seasonal prints.
For a classic pumpkin appearance, choose orange fabrics in different shades. Prints featuring tiny leaves, dots, gingham, or subtle floral motifs create visual interest without overwhelming the design.
Cut two pumpkin-shaped fabric pieces using a paper template. Both pieces should be identical to ensure even stitching and a balanced final coaster.
Add one layer of cotton batting cut slightly smaller than the fabric pieces. The batting gives the coaster thickness while protecting surfaces from warm cups.
Prepare matching thread, sewing clips or pins, sharp fabric scissors, and a fabric marker for transferring placement marks before stitching.
If desired, prepare green fabric scraps for leaves and brown fabric for the stem to make the finished pumpkin look even more realistic.
Sewing the Pumpkin Shape Step by Step
Place the two pumpkin pieces with the right sides facing together. Position the batting behind one fabric layer if your preferred construction method includes quilting before assembly.
Pin or clip around the edges carefully, making sure every curved section aligns perfectly. Smooth curves produce a much cleaner finished result.
Using a sewing machine, stitch around the perimeter with a consistent seam allowance while leaving a small opening for turning the coaster right side out.
Clip small notches around the curved edges without cutting through the stitching. This simple step helps the coaster keep its rounded pumpkin shape after turning.
Turn the coaster right side out through the opening and gently push every curve into place using a turning tool or a blunt wooden stick.
Press the coaster carefully with an iron according to your fabric’s temperature recommendation. Fold the opening inward before pressing so it becomes almost invisible when closed.
Add Pumpkin Details and Decorative Finishing
Now comes the fun part of transforming the simple shape into a realistic pumpkin. Mark several evenly spaced vertical sections across the coaster using a disappearing fabric marker.
Sew straight quilting lines from the top to the bottom of the pumpkin. These stitched channels create the natural ridges found on real pumpkins.
If you prefer a more dimensional appearance, gently tighten the quilting stitches or lightly stuff the sections before completing the decorative quilting.
Create a small stem using folded brown fabric. Stitch it securely to the top center of the pumpkin using reinforced stitches for durability.
Add one or two green fabric leaves beside the stem. Simple leaf shapes with embroidered veins instantly give the coaster a more finished appearance.
Finish by topstitching around the entire coaster close to the edge. This secures the opening, strengthens the seams, and creates a crisp professional finish.
Tips for Personalizing Your Fabric Pumpkin Coaster Pattern
One of the greatest advantages of a Fabric pumpkin coaster pattern is how easily it can be customized for different decorating styles.
Mix solid fabrics with patterned prints to create pumpkins that look more realistic and visually interesting. Small floral prints often create a charming cottage-style appearance.
Experiment with different pumpkin colors beyond traditional orange. White, cream, sage green, dusty blue, mustard, and even velvet fabrics can create elegant seasonal decorations.
Decorative machine stitches around the border can replace simple straight stitching if you want a more decorative finish while maintaining durability.
Create complete coaster sets by making pumpkins in several coordinating colors. A matching collection looks beautiful on dining tables, coffee tables, or seasonal serving trays.
These handmade coasters also make wonderful gifts for family, teachers, neighbors, or holiday hosts. Pair them with a mug, tea towels, or homemade treats for an especially thoughtful handmade present.
Frequently Asked Questions
Is this Fabric pumpkin coaster pattern suitable for beginners?
Yes. The project uses simple sewing techniques, basic curved seams, and straightforward quilting lines, making it an excellent beginner sewing project.
What fabric works best?
Quilting cotton is the most recommended because it is stable, easy to press, durable, and available in many beautiful prints.
Should I use batting?
Yes. Cotton batting helps the coaster absorb heat, maintain its shape, and provide better protection for tables.
Can I wash the finished coaster?
Absolutely. Wash it gently with mild detergent and reshape it while damp before allowing it to air dry.
Can I sew this project entirely by hand?
Yes. Although a sewing machine makes the project faster, careful hand stitching produces excellent results as well.
Can I make different sizes?
Certainly. Simply enlarge or reduce your paper template while keeping both fabric pieces identical.
Which thread color should I use?
Matching thread creates an invisible finish, while contrasting thread highlights the quilting lines for a decorative effect.
Can I sell finished coasters made from this pattern?
Yes. Handmade coasters are popular at craft fairs, local markets, and online handmade shops, provided your design is your own and complies with applicable laws and marketplace rules.
Conclusion
Creating a Fabric pumpkin coaster pattern is an enjoyable sewing project that combines creativity with practical use. Throughout this tutorial, you learned how to select suitable fabrics, prepare the template, sew the pumpkin shape, quilt realistic sections, attach decorative stems and leaves, and finish the coaster with professional-looking details. Because the project uses small fabric pieces, it is also an excellent way to reduce fabric waste while producing beautiful seasonal home décor.
With practice, you can easily experiment with different colors, quilting styles, embroidery, and decorative embellishments to create unique pumpkin coaster collections for your own home or as thoughtful handmade gifts. Every completed coaster helps improve your sewing accuracy while building confidence with curved seams and quilting techniques.
Thank you for reading this guide. I hope this Fabric pumpkin coaster pattern tutorial inspires you to create your own beautiful autumn coasters. If you make this project, please leave your honest opinion, share your experience, and send your suggestions. Your feedback can inspire new ideas and help make future sewing tutorials even more useful for everyone.