
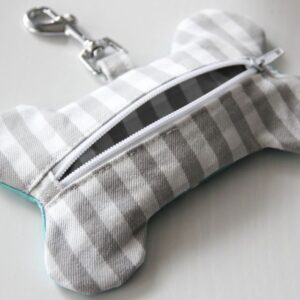
Fabric Bone-Shaped Waste Bag Holder Pattern is a fun and practical sewing project that combines creativity with everyday convenience.
One of the greatest advantages of making your own Fabric Bone-Shaped Waste Bag Holder Pattern is the ability to personalize every detail.
Throughout this guide, you will learn how to prepare the fabric, cut the bone shape accurately, assemble the holder, install an opening for dispensing waste bags, attach a zipper or hook for refilling, and add a clip that allows the finished holder to be attached to a leash, backpack, or belt loop. The finished project is lightweight, durable, washable, and ideal for everyday use. By following this tutorial carefully, you will create a professional-looking accessory that is both decorative and functional.
Choosing Materials and Preparing Your Fabric
Before beginning your Fabric Bone-Shaped Waste Bag Holder Pattern, gather all the necessary materials. Quilting cotton is one of the best fabric choices because it is durable, easy to sew, and available in countless prints. Canvas and lightweight denim are also excellent options if you prefer a sturdier finished holder.
For one holder you will need approximately two pieces of fabric measuring about 8 x 10 inches, one matching lining piece, lightweight fusible interfacing, coordinating sewing thread, fabric scissors or a rotary cutter, sewing pins or clips, a fabric marker, an iron, a small swivel clasp or lobster clip, and either a small zipper or hook-and-loop closure for the refill opening.
Print or draw your bone-shaped template on sturdy paper before cutting the fabric. Fold the template in half to ensure both sides are perfectly symmetrical. A balanced template makes the finished holder look much more professional.
Fuse the interfacing to the wrong side of the outer fabric following the manufacturer’s instructions. This extra layer gives the holder structure while helping it maintain its shape after repeated use.
Place the template onto the prepared fabric and trace around it carefully. Cut two outer fabric pieces and two lining pieces, making sure every piece is identical. Accurate cutting helps the seams align smoothly during assembly.
Before sewing, press all fabric pieces with a warm iron to remove wrinkles. Smooth, flat fabric is much easier to sew accurately and results in cleaner seams and sharper curves around the bone shape.
Step-by-Step Sewing Instructions
Place the two outer fabric pieces right sides together. Repeat the same with the lining pieces. Pin or clip around the edges, keeping everything aligned before sewing.
Using a ¼-inch seam allowance, sew around the outer edges of both sets, leaving the top refill opening unstitched. Sew slowly around the rounded bone ends to maintain smooth curves without puckering.
Trim the seam allowances slightly, especially around the curved sections. Carefully clip small notches into the seam allowance without cutting through the stitches. This allows the curves to turn smoothly once the fabric is flipped.
Turn the outer piece right side out and gently shape the rounded ends using a blunt turning tool. Press the seams carefully with an iron to define the bone shape neatly.
Install the refill closure along the top opening. A small zipper offers a secure finish, while hook-and-loop tape provides a quick and beginner-friendly alternative. Make sure the opening is large enough to insert a standard waste bag roll comfortably.
Create the dispensing opening by stitching a reinforced buttonhole or sewing a small fabric grommet near the center of the holder. Insert the filled waste bag roll through the refill opening and gently pull the first bag through the dispensing hole to confirm smooth operation.
Finishing Details and Creative Customization Ideas
Attach a swivel clasp or lobster clip securely to one end of the holder using a folded fabric tab. Reinforce this area with several rows of stitching since it will experience the most stress during daily use.
Topstitch around the outer edge approximately ⅛ inch from the seam. Besides creating a polished appearance, topstitching strengthens the seams and helps the holder keep its shape over time.
Personalize your Fabric Bone-Shaped Waste Bag Holder Pattern by combining contrasting fabrics for the front and back. Dog paw prints, bones, plaid, florals, and colorful geometric prints all create beautiful finished accessories.
Machine embroidery or simple appliqué can be added before assembling the holder. Consider sewing a dog’s name, a paw print, a heart, or a small bone motif onto the front panel for an extra-special handmade touch.
Small decorative bows, labels, or faux leather tags can also be sewn onto the finished project. Keep embellishments lightweight so they do not interfere with the holder’s functionality.
Once completed, your handmade holder pairs perfectly with matching collars, leashes, treat bags, or pet bandanas. Coordinated accessories create beautiful handmade gift sets for birthdays, holidays, pet adoption celebrations, or craft fairs.
Tips for Professional Sewing Results
Always use a fresh sewing machine needle, especially when sewing through interfacing. A sharp needle produces cleaner stitches and prevents skipped stitches on multiple fabric layers.
Take your time when sewing around the rounded bone ends. Sewing slowly allows you to pivot gradually and maintain smooth, attractive curves without creating unwanted folds.
Press after every major sewing step instead of waiting until the end. Frequent pressing dramatically improves the final appearance and helps every seam lie flat.
Choose thread that closely matches your fabric for an invisible finish, or use contrasting thread intentionally to create decorative topstitching that highlights the playful bone shape.
Test the finished holder with several different waste bag rolls before considering the project complete. Most standard refill rolls fit easily, but checking functionality ensures smooth bag dispensing during daily walks.
If you plan to sell handmade versions of your Fabric Bone-Shaped Waste Bag Holder Pattern, maintain consistent measurements, neat stitching, secure hardware installation, and careful finishing. High-quality craftsmanship creates products that customers appreciate for both their appearance and durability.
FAQ
Is this Fabric Bone-Shaped Waste Bag Holder Pattern suitable for beginners?
Yes. The project uses basic sewing techniques including straight seams, curved stitching, turning fabric, and simple finishing methods, making it accessible for confident beginners.
Which fabric works best?
Quilting cotton is the most popular choice because it is easy to sew, durable, lightweight, and available in many attractive prints. Canvas and lightweight denim are also excellent alternatives.
Do I need interfacing?
Interfacing is highly recommended because it helps the holder maintain its shape and improves durability with repeated everyday use.
What size waste bags fit inside?
Most standard pet waste bag refill rolls fit comfortably inside the holder. You can slightly adjust the dimensions if you use oversized refill rolls.
Can I wash the finished holder?
Yes. Machine washing on a gentle cycle or hand washing works well for most cotton fabrics. Allow the holder to air dry to preserve its shape.
Can I add extra pockets?
Certainly. Small interior or exterior pockets can hold treats, keys, or identification tags if you wish to customize the design further.
Is this project suitable for selling?
Yes. Handmade pet accessories remain popular at local craft fairs, gift shops, and online marketplaces. Always ensure your design is original if selling finished handmade products.
Can I make matching accessories?
Absolutely. This holder coordinates beautifully with matching leash pouches, treat bags, collars, harness accessories, pet bandanas, and zippered storage pouches made from the same fabric collection.
Conclusion
Creating this Fabric Bone-Shaped Waste Bag Holder Pattern is a rewarding sewing project that combines functionality with creativity. Throughout this tutorial, you learned how to select appropriate materials, prepare the fabric, reinforce the outer layer with interfacing, cut symmetrical pattern pieces, assemble the holder, install the refill opening, create a dispensing hole, attach durable hardware, and add decorative finishing touches for a polished result. The finished holder is practical for everyday dog walks while also serving as a charming handmade accessory that reflects your personal style.
Whether you make one for yourself or several as thoughtful handmade gifts, this project offers countless opportunities for customization through different fabrics, colors, embroidery, and embellishments. With careful sewing and attention to detail, your finished holder will be both durable and attractive for years to come.
Thank you for reading this tutorial. I hope this Fabric Bone-Shaped Waste Bag Holder Pattern inspires your next sewing project and encourages you to explore even more creative ideas. If you make this project, I would truly appreciate your honest opinion. Please share your experience, suggestions, and creative variations, as your feedback can help inspire other sewing enthusiasts.