
Fabric kitchen apron pattern is one of the most enjoyable and practical sewing projects for beginners and experienced makers alike.
One of the greatest advantages of sewing your own apron is the freedom to customize every detail. You can select cheerful floral prints, timeless gingham, elegant linen, rustic cotton, or modern geometric fabrics to complement your kitchen décor.
Throughout this detailed guide, you will learn how to choose suitable fabrics, prepare your pattern pieces, cut the fabric accurately, assemble the apron, sew adjustable straps, create practical pockets, and finish every seam professionally. By following each step carefully, you will complete a durable and attractive apron that can be worn daily, given as a thoughtful handmade gift, or even sold at local craft fairs. This Fabric kitchen apron pattern is designed to be versatile, comfortable, and suitable for sewists of every experience level.
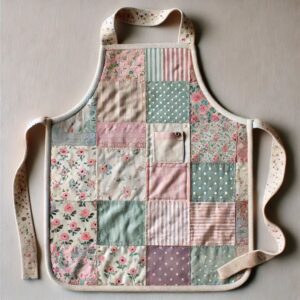
Choosing Materials and Preparing the Pattern
Before starting your Fabric kitchen apron pattern, gather all the required materials. Medium-weight cotton is one of the best fabric choices because it is breathable, durable, washable, and easy to sew. Linen blends also create beautiful aprons with a more natural texture, while canvas offers additional durability for heavy-duty kitchen use.
For an adult-sized apron, you will generally need approximately 1 to 1½ yards of fabric, matching thread, fabric scissors or a rotary cutter, sewing pins or clips, measuring tape, a fabric marker, an iron, and a sewing machine. Optional materials include decorative lace, bias tape, wooden buttons, or contrasting fabric for pockets and straps.
Begin by drawing or printing your apron template. A classic apron consists of one large front panel, one pocket piece or multiple smaller pockets, a neck strap, and two waist ties. Carefully measure the intended wearer to ensure a comfortable fit before cutting any fabric.
Press the fabric thoroughly before cutting. Smooth fabric helps maintain accurate measurements and prevents distortion while tracing the pattern pieces. Fold the fabric with the right sides together so symmetrical pieces can be cut efficiently.
Place the pattern pieces on the fabric while following the grainline whenever possible. Trace around each piece using a washable fabric marker, then cut carefully using sharp scissors or a rotary cutter. Accurate cutting contributes significantly to a polished final result.
Apply lightweight fusible interfacing to pocket pieces if extra stability is desired. Although optional, interfacing helps the pockets maintain their shape through repeated washing and everyday use.
Step-by-Step Sewing Instructions
Start by finishing the top edge of the apron bib. Fold the raw edge inward by ¼ inch, press, fold again, and stitch close to the folded edge to create a clean hem.
Repeat the same double-fold hemming technique along both side edges and the curved lower edge of the apron. Press each fold before sewing to keep the fabric smooth and prevent shifting during stitching.
Prepare the neck strap by folding the long strip lengthwise with right sides together. Stitch along the long edge, turn the tube right side out, press it flat, and topstitch both sides for extra durability.
Create the waist ties using the same method. If preferred, ready-made cotton webbing or bias tape may also be used to simplify construction while maintaining a professional appearance.
Fold and press the pocket edges. Finish the upper edge first with a double-fold hem before attaching the pocket to the apron front. Position the pocket centrally or slightly lower depending on your preferred design, pin securely, then topstitch around the remaining three sides while reinforcing the upper corners with backstitching.
Attach the neck strap and waist ties securely to the apron body using reinforced stitching. Sew multiple rows across each attachment point because these areas receive the greatest amount of stress during regular wear. Give the completed apron a final press to create crisp edges and a beautifully finished appearance.
Creative Ways to Personalize Your Fabric Kitchen Apron Pattern
One of the most enjoyable aspects of making a Fabric kitchen apron pattern is the endless opportunity for customization. Contrasting fabrics for the pocket, straps, or waistband instantly create visual interest while using leftover fabric scraps creatively.
Decorative trims such as lace, ric-rac, pom-pom edging, or piping can be sewn along the pocket or lower hem for additional charm. These details are especially popular on farmhouse, vintage, and cottage-style aprons.
Embroidery is another wonderful way to personalize your project. Adding a name, monogram, floral motif, cooking quote, or seasonal design transforms a simple apron into a cherished keepsake or thoughtful handmade gift.
Functional improvements can also be added. Consider dividing the front pocket into smaller sections for utensils, recipe cards, thermometers, or kitchen towels. This makes the apron even more practical during cooking or baking.
Seasonal fabrics allow one pattern to become many different aprons. Bright florals are ideal for spring, citrus prints suit summer kitchens, pumpkins celebrate autumn, and festive holiday fabrics create beautiful Christmas aprons.
The completed Fabric kitchen apron pattern also makes an excellent gift for birthdays, housewarming celebrations, Mother’s Day, Father’s Day, bridal showers, holiday exchanges, or anyone who enjoys spending time in the kitchen creating delicious meals.
Tips for Professional Sewing Results
Take time to press every seam immediately after sewing. Professional-looking projects are often the result of careful pressing rather than complicated sewing techniques.
Use matching thread whenever possible for invisible seams, or choose contrasting thread intentionally if decorative topstitching is part of your desired design.
Backstitch at the beginning and end of every seam to improve durability, particularly around pockets, straps, and ties where repeated pulling occurs.
Always test your machine tension on a scrap piece of the same fabric before sewing the actual project. Proper tension produces smooth, balanced stitches that enhance the finished appearance.
Wash and press the finished apron before wearing or gifting it. Prewashing softens the fabric, removes any remaining marking lines, and allows the apron to drape naturally.
Practice sewing several versions of your Fabric kitchen apron pattern using different fabrics and embellishments. Each new apron helps improve your sewing accuracy, confidence, and finishing techniques while expanding your handmade collection.
FAQ
Is this Fabric kitchen apron pattern suitable for beginners?
Yes. This project mainly uses straight seams, basic hemming techniques, and simple construction methods, making it an excellent beginner-friendly sewing project.
Which fabric works best for kitchen aprons?
Medium-weight cotton is the most popular choice because it is breathable, durable, washable, and easy to sew. Linen blends and lightweight canvas are also excellent alternatives.
How much fabric do I need?
Most adult aprons require approximately 1 to 1½ yards of fabric depending on the chosen style, pocket size, and strap length.
Can I adjust the size?
Absolutely. Simply increase or decrease the width and length of the apron body and straps to create a custom fit for adults, teenagers, or children.
Should I prewash the fabric?
Yes. Prewashing removes sizing chemicals and minimizes future shrinkage, helping the finished apron maintain its intended size after laundering.
Can I add more pockets?
Certainly. Multiple pockets of various sizes make the apron even more functional for holding cooking utensils, recipe cards, towels, or gardening tools.
Is this apron machine washable?
Yes. Cotton and linen aprons are generally machine washable using a gentle cycle. Always follow the care recommendations for your specific fabric.
Can I sell finished aprons?
Yes. Handmade aprons are popular at craft fairs, gift boutiques, and online marketplaces. Focus on neat stitching, quality materials, and original fabric combinations to create attractive finished products.
Conclusion
Creating this Fabric kitchen apron pattern is a rewarding sewing project that combines creativity, practicality, and timeless style. Throughout this tutorial, you learned how to choose suitable materials, prepare and cut the pattern pieces, sew clean hems, construct durable straps, attach functional pockets, reinforce stress points, and personalize your apron with decorative details that reflect your individual taste. These techniques not only help you complete a beautiful apron but also strengthen your general sewing skills for many future projects.
Whether you sew this apron for your own kitchen, as a thoughtful handmade gift, or as part of a collection for craft fairs, the design offers endless opportunities for creativity through different fabrics, trims, embroidery, and pocket variations. With practice, each new Fabric kitchen apron pattern will become even more polished, comfortable, and professional in appearance.
Thank you for reading this tutorial. I hope this Fabric kitchen apron pattern inspires your next sewing project and encourages you to continue exploring the joy of handmade creations. If you decide to make this apron, I would truly appreciate your honest opinion. Please share your experience, suggestions, and creative ideas, as your feedback can help inspire other sewing enthusiasts and contribute to even better future tutorials.