
The Quilt Heart Pattern is a lovely way to bring warmth, creativity, and a personal touch to any quilting project. Heart-shaped designs have a timeless appeal because they represent affection, kindness, and handmade beauty. Whether you are an experienced quilter or someone discovering patchwork for the first time, creating a heart quilt can be an enjoyable and rewarding experience. With carefully selected fabrics, accurate measurements, and a little patience, you can transform simple fabric pieces into a beautiful decorative project.
One of the most attractive features of the Quilt Heart Pattern is its versatility. You can use different colors, prints, and fabric textures to create a design that matches your personal style. Traditional red and pink fabrics are wonderful choices for romantic projects, while soft neutrals, floral prints, and pastel shades can produce a delicate appearance. You can also experiment with contrasting colors to make the heart stand out against the surrounding background. The finished design can become a decorative wall hanging, a cushion cover, a table decoration, or even part of a larger quilt.
In this tutorial, you will learn how to prepare the materials, organize the fabric pieces, assemble the heart design, and finish your quilt with neat stitching. The instructions explain the essential techniques behind a heart-shaped quilt block, including fabric cutting, seam allowances, piecing, pressing, and quilting. Although individual heart quilt designs can vary in their construction, the method described here provides a practical foundation for creating a balanced and attractive heart motif. Take your time with each stage, enjoy the creative process, and remember that handmade quilting is also about expressing your personality through fabric and color.
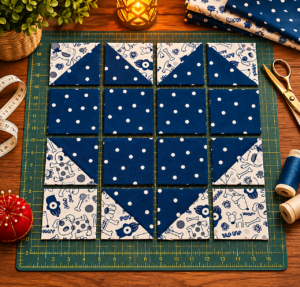
Materials and Preparation for Your Quilt Heart Pattern
Before beginning your Quilt Heart Pattern, gather all the materials you need. Preparing everything in advance makes the process easier and helps you avoid unnecessary interruptions. You will need quilting cotton in your chosen colors, a coordinating background fabric, matching thread, fabric scissors or a rotary cutter, a cutting mat, a quilting ruler, sewing pins or clips, and a sewing machine. An iron and ironing board are also important because pressing the seams correctly helps create a clean and professional finish.
For the heart itself, choose fabrics that contrast nicely with the background. Red, pink, burgundy, and coral are classic options, but you can create a completely different look with blue, green, yellow, or purple. If you prefer a playful appearance, combine small floral prints, polka dots, and geometric patterns. The most important consideration is maintaining enough contrast so that the heart shape remains recognizable after the pieces are sewn together.
Start by deciding how large you want your heart quilt block to be. A small block can be used for a cushion or decorative panel, while a larger block works beautifully as the central feature of a wall hanging. For this tutorial, a finished block measuring approximately 12 inches square is a convenient starting point. Remember that the finished measurement is smaller than the unfinished measurement because the seam allowances are included during assembly.
Wash and dry your cotton fabrics before cutting if you want to minimize shrinkage after the quilt is completed. Press each fabric carefully to remove wrinkles and make the cutting process more accurate. Avoid stretching the fabric while ironing, especially if you are working with lightweight cotton. Smooth, flat fabric pieces are easier to measure and sew, helping your Quilt Heart Pattern maintain its intended proportions.
Next, prepare a simple heart layout on paper. Draw a symmetrical heart with two rounded upper sections and a pointed bottom. Divide the shape into manageable fabric sections that can be assembled using straight seams and small background pieces. A traditional patchwork approach uses squares, rectangles, and half-square triangles to build the curved appearance of the heart. This method makes the project accessible without requiring complicated curved sewing techniques.
Cut your fabric pieces according to your chosen layout. For a beginner-friendly 12-inch block, you can work with approximately 3-inch finished patchwork sections, adjusting the cutting dimensions to include a 1/4-inch seam allowance on every side. Prepare red or pink pieces for the heart and neutral pieces for the background. Keep the pieces organized in separate piles so you can identify each section quickly during assembly.
Before sewing, arrange all the pieces on a flat surface in the shape of the finished design. This is an important step because it allows you to check the color distribution, symmetry, and overall proportions. Move individual pieces until the heart looks balanced from both sides. Taking a photograph of your arrangement can also help you remember the correct placement when you begin sewing the Quilt Heart Pattern.
Step-by-Step Instructions to Assemble the Heart Quilt Block
Begin by assembling the smaller patchwork sections that will form the upper part of the heart. Place the fabric pieces with their right sides facing each other, align the edges, and secure them with pins or clips. Sew using a consistent 1/4-inch seam allowance. Maintaining the same seam width throughout the project is essential because uneven seams can affect the final shape and size of your block.
After sewing the first sections, press the seams carefully with an iron. Depending on the arrangement, you can press the seams toward the darker fabric or alternate their direction to help reduce bulk. Avoid dragging the iron across the fabric because this can distort the patchwork. Instead, lift and lower the iron gently. Accurate pressing gives the Quilt Heart Pattern a flatter surface and makes the following assembly stages easier.
Now construct the left and right upper sections of the heart. Arrange the colored squares and background pieces to create the two rounded lobes. If your design includes half-square triangles, place two contrasting fabric squares together with their right sides facing inward. Draw a diagonal line across the lighter fabric, sew a seam on each side of the line, and cut along the marked line. Open the resulting triangles and press them flat to create two half-square triangle units.
Trim the half-square triangle units to the required dimensions using a quilting ruler. Accurate trimming helps the different sections fit together properly. Check that the diagonal seams are straight and that the corners are square. These units can be incorporated into the upper corners or side sections to create the angled transitions that give the heart its characteristic appearance.
Next, assemble the lower part of the heart. Arrange the colored pieces so they gradually form a downward point. Depending on your layout, you can use squares and half-square triangles to create the tapered shape. Sew each row separately, maintaining the same seam allowance throughout. Once the rows are completed, press them carefully before joining them together.
Join the upper and lower sections of the heart to complete the central motif. Match the seams and corners as accurately as possible, using pins to prevent the fabric from shifting. Sew the sections together with a straight stitch and check the result before continuing. At this stage, the heart should be clearly visible, with two balanced upper lobes and a pointed lower section. If a seam does not align perfectly, small adjustments can still be made before the entire block is assembled.
Finally, attach the remaining background pieces around the heart to create a square block. Sew the side sections first, followed by the top and bottom sections if your layout requires them. Press the completed block gently and place it on a flat surface to inspect its shape. Measure both sides to confirm that the block is square. Your Quilt Heart Pattern should now have a complete heart motif surrounded by a neat fabric background.
Quilting, Finishing, and Creative Ways to Customize Your Design
Once the patchwork block is complete, prepare the three layers needed for quilting: the finished quilt top, batting, and backing fabric. The batting provides softness and volume, while the backing creates the reverse side of the project. Choose a batting thickness that suits the intended use. Lightweight batting is suitable for decorative wall hangings, while a slightly thicker option can add comfort to cushions and small blankets.
Cut the batting and backing fabric slightly larger than the quilt top. Place the backing fabric on a flat surface with its wrong side facing upward. Position the batting on top, followed by the quilt top with its right side facing upward. Smooth all three layers carefully to remove wrinkles and uneven areas. Secure the layers using safety pins, quilting clips, or temporary fabric adhesive designed for quilting.
Now decide how you want to quilt your heart-shaped quilt block. Straight-line quilting is an excellent choice for beginners because it creates a clean appearance and is relatively easy to control. You can sew parallel lines across the background, outline the heart shape, or combine both techniques. Stitching around the heart motif can make its shape more noticeable while adding texture to the finished project.
For a softer and more decorative appearance, consider gentle free-motion quilting if you are comfortable with that technique. Small curves, loops, and flowing lines can complement the heart motif beautifully. If you are new to free-motion quilting, practice on a small fabric sandwich before working on your finished project. This allows you to become familiar with the movement of the fabric and the rhythm of the stitching.
After quilting, trim the excess batting and backing so that all the edges are even. Prepare the binding strips by cutting fabric into strips of approximately 2 1/2 inches wide, adjusting the length according to the perimeter of your project. Join the strips together diagonally when necessary, press them in half lengthwise, and align the raw edges with the edge of the quilt. Sew the binding around the project, fold it over to the back, and finish it with neat stitching.
Your Quilt Heart Pattern can be customized in many different ways. Try combining different heart fabrics to create a scrappy design, or use a single fabric throughout the motif for a more traditional appearance. You can also add embroidery, decorative buttons, or small appliqué details, provided they are securely attached and appropriate for the finished project’s intended use. These details make every handmade quilt unique.
Another creative idea is to combine several heart blocks into a larger quilt. Arrange the blocks in straight rows or alternate them with simple square patchwork sections. A consistent background fabric can help the design look cohesive, while different heart colors can create an interesting visual rhythm. This approach is especially attractive for baby quilts, anniversary gifts, bedroom decorations, and seasonal displays.
Common Questions About the Quilt Heart Pattern (FAQ)
1. Is the Quilt Heart Pattern suitable for beginners?
Yes! The Quilt Heart Pattern can be adapted for beginners by using simple squares, rectangles, and half-square triangles. These basic patchwork techniques are easy to practice and provide a good introduction to fabric piecing. Start with a small block and focus on accurate cutting and consistent seam allowances before attempting more complicated designs.
2. What is the best fabric for making a heart quilt?
Quilting cotton is one of the best choices because it is stable, easy to cut, and comfortable to sew. It is available in many colors and prints, making it ideal for creating a personalized heart-shaped quilt block. Choose fabrics with similar weights to help the finished project maintain an even appearance.
3. How do I make the heart symmetrical?
The easiest way to achieve symmetry is to draw a heart template or prepare a paper layout before cutting the fabric. Arrange the left and right sections as mirror images and compare their measurements before sewing. Consistent seam allowances and careful pressing also help maintain a balanced shape.
4. What seam allowance should I use for this quilt pattern?
A 1/4-inch seam allowance is the standard choice for most traditional patchwork quilting projects. Use a consistent seam width throughout the construction process. Measuring and trimming the units carefully will help prevent the finished block from becoming too large or too small.
5. Can I make a Quilt Heart Pattern without a sewing machine?
Yes. You can assemble a small heart quilt by hand using a needle and thread. Hand piecing takes longer, but it allows you to work at your own pace. Use small, even stitches and mark your seam allowances beforehand to maintain accurate fabric placement.
6. How can I create a larger heart quilt?
To make a larger project, increase the size of the individual patchwork units or combine several completed heart blocks into a larger arrangement. You can also add borders around the central motif. Always plan the finished dimensions before cutting your fabric to avoid unnecessary adjustments.
7. What colors work best for a heart quilt?
Red and pink are traditional choices, but there are no strict color rules. Burgundy, cream, lavender, blue, green, and floral prints can all produce beautiful results. The key is to select colors that provide enough contrast between the heart and its background.
8. How do I prevent my quilt block from becoming uneven?
Accurate cutting, consistent seam allowances, and careful pressing are the most important factors. Use a quilting ruler to check the measurements of each unit before joining the sections. If necessary, trim the completed block to the intended unfinished size before adding the batting and backing.
9. Can I use this pattern to make a cushion cover?
Absolutely! A completed Quilt Heart Pattern block can become the front panel of a decorative cushion. Add a suitable backing, assemble the cushion cover, and insert a cushion form. If the cushion will receive frequent use, choose durable fabric and secure the seams carefully.
10. What is the best way to wash a finished heart quilt?
Follow the care recommendations for the fabrics and batting you have used. In general, gentle washing with mild detergent and cool water is a suitable approach for many cotton quilts. Avoid harsh chemicals and excessive heat. Test colorfastness when using strongly colored fabrics, especially reds and dark prints.
11. Do I need batting for a small heart quilt project?
Batting is recommended if you want a traditional quilted appearance with additional softness and texture. However, a decorative wall hanging or simple fabric panel can be completed without batting. The choice depends on how you intend to use the finished project.
12. Can I combine different heart designs in the same quilt?
Yes. Combining different heart shapes, fabric prints, and color combinations can create an attractive patchwork composition. To maintain visual harmony, consider using the same background fabric or repeating a small selection of colors throughout the quilt.
Conclusion
Creating a Quilt Heart Pattern is a wonderful way to explore patchwork techniques while making something meaningful and beautiful. Throughout this tutorial, you learned how to select suitable fabrics, prepare your materials, cut and organize the individual pieces, assemble the heart-shaped design, and complete the project with batting, backing, quilting stitches, and binding. Each stage contributes to the appearance and durability of the finished quilt.The most important lessons are to measure carefully, maintain consistent seam allowances, press your fabric correctly, and take your time when joining the different sections. These simple habits can make a significant difference in the final result, especially when creating a symmetrical heart motif.
You can also personalize your Quilt Heart Pattern with different colors, floral fabrics, decorative stitching, and additional patchwork blocks. Whether you make a small decorative panel or a larger quilt, the finished project can become a special handmade gift or a charming addition to your home.
Now it is your turn to get creative! Have you tried making a heart-shaped quilt before? Which fabrics and colors would you choose for this project? Leave your honest opinion in the comments and share your suggestions for future quilting tutorials. Your ideas and experiences can inspire other quilting enthusiasts to start their own beautiful handmade projects!