
The Crochet christmas tree pattern is a wonderful way to bring warmth, creativity, and a handmade touch to your holiday decorations. Whether you are an experienced crocheter or someone discovering the joy of crochet for the first time, making a small Christmas tree with yarn can become a relaxing and rewarding seasonal project. These charming decorations are versatile, easy to customize, and suitable for many different spaces around the home. You can place them on a Christmas table, decorate a mantel, create a festive centerpiece, or even use them as thoughtful handmade gifts for family and friends.
One of the most appealing features of a Crochet christmas tree pattern is that it allows you to experiment with different yarn textures, colors, stitches, and decorative details. Traditional green yarn creates a classic Christmas appearance, while white, cream, gold, and silver can produce a more elegant winter-inspired design. You can also add tiny crocheted ornaments, beads, ribbons, and a decorative star to make your finished tree unique. Depending on the size and construction, your project can become a flat Christmas tree applique, a three-dimensional standing decoration, or a small hanging ornament.
This Crochet christmas tree pattern tutorial focuses on creating a simple three-dimensional Christmas tree using basic crochet techniques. The design is built with several circular layers that gradually decrease in size, creating the familiar triangular silhouette of a Christmas tree. Each section is crocheted separately and then assembled to form a decorative layered tree. The instructions are suitable for beginners who already know how to make basic crochet stitches, but more experienced crafters can also use the pattern as a starting point for creative variations. By following the instructions carefully, you will learn how to prepare the materials, crochet the individual sections, assemble the tree, and add beautiful Christmas details.
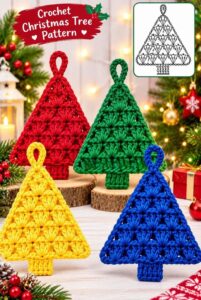
Materials, Crochet Stitches, and Preparation for Your Christmas Tree
Before beginning your Crochet christmas tree pattern, gather all the materials you need. Having everything ready will make the process easier and help you maintain consistent stitches throughout the project. You do not need expensive supplies to create an attractive handmade Christmas decoration.
For this project, choose medium-weight cotton or acrylic yarn in green. Cotton provides a firm texture and helps the tree maintain its shape, while acrylic yarn offers softness and a wide variety of festive colors. You will also need small amounts of brown yarn for the trunk and optional colors for decorative details.
A crochet hook between 3.5 mm and 4.5 mm is a good starting point for medium-weight yarn. The exact size depends on your yarn and personal tension. A slightly smaller hook can create tighter stitches, which is especially helpful when making a stuffed three-dimensional decoration.
Prepare a pair of scissors, a yarn needle, stitch markers, and polyester fiberfill if you want your Christmas tree to have a rounded, padded appearance. Small decorative beads, buttons, ribbons, and a star-shaped ornament can be used to personalize the finished piece.
Understanding the basic crochet terminology is important before starting. This tutorial uses US crochet terms. The chain stitch (ch) creates the foundation for many crochet projects, while the slip stitch (sl st) is useful for joining rounds and finishing sections neatly.
You will also use the single crochet (sc) stitch, which produces a compact and firm fabric. The increase (inc) technique means working two single crochet stitches into the same stitch. The decrease (dec) technique combines two stitches into one, helping you shape the smaller sections of the tree.
Crochet abbreviations used in this pattern:
- MR: Magic ring.
- ch: Chain stitch.
- sc: Single crochet.
- sl st: Slip stitch.
- inc: Two single crochet stitches in the same stitch.
- dec: Single crochet two stitches together.
- BLO: Back loop only.
- FO: Fasten off.
For this project, the main structure consists of three green circular layers in different sizes and one small brown trunk. Each green section is crocheted in rounds, beginning with a magic ring and gradually increasing to create a flat circular base. The sections are then shaped and stacked to resemble a Christmas tree.
Step-by-Step Crochet Christmas Tree Pattern Instructions
Start by making the largest green section. This will become the bottom layer of your Christmas tree. Create a magic ring and work six single crochet stitches into it. Pull the yarn tail gently to close the center. Join the round with a slip stitch if you prefer joined rounds, or continue working in continuous spirals using a stitch marker.
Round 1: Work 6 sc into the magic ring. (6 stitches)
Round 2: Work 1 inc in every stitch around. (12 stitches)
Round 3: Repeat 1 sc, 1 inc around. (18 stitches)
Round 4: Repeat 2 sc, 1 inc around. (24 stitches)
Round 5: Repeat 3 sc, 1 inc around. (30 stitches)
Round 6: Repeat 4 sc, 1 inc around. (36 stitches)
Round 7: Repeat 5 sc, 1 inc around. (42 stitches)
Fasten off, leaving a long yarn tail for sewing. This first piece creates the widest part of the tree. Keep your stitches consistent so the circular shape remains smooth and even.
Next, crochet the middle layer using the same technique, but stop earlier to make a smaller circle. Begin with a magic ring containing six single crochet stitches.
Round 1: Work 6 sc into the magic ring. (6 stitches)
Round 2: Work 1 inc in every stitch around. (12 stitches)
Round 3: Repeat 1 sc, 1 inc around. (18 stitches)
Round 4: Repeat 2 sc, 1 inc around. (24 stitches)
Round 5: Repeat 3 sc, 1 inc around. (30 stitches)
Fasten off, leaving a long tail. This section should be smaller than the bottom layer but large enough to create a visible step when the pieces are stacked.
Now create the smallest green section, which will form the top of the tree. This piece gives the decoration its recognizable Christmas tree silhouette.
Round 1: Work 6 sc into a magic ring. (6 stitches)
Round 2: Work 1 inc in every stitch around. (12 stitches)
Round 3: Repeat 1 sc, 1 inc around. (18 stitches)
Round 4: Repeat 2 sc, 1 inc around. (24 stitches)
Fasten off, leaving a sewing tail. Arrange all three green circles from largest to smallest to check their proportions. If you prefer a taller tree, you can add another smaller section or adjust the number of increase rounds.
To give each layer a more dimensional appearance, gently fold the outer edge of each circle upward. You can use your fingers to create a shallow bowl shape. If you want a firmer structure, crochet a second matching circle for each layer and join the two pieces around the edges, adding a small amount of fiberfill before closing.
For a simple flat-layered design, attach each circle to the next using a yarn needle. Position the middle section in the center of the largest circle and sew it securely. Then place the smallest section on top of the middle layer and attach it in the same way.
To create the trunk, switch to brown yarn. Make a magic ring and crochet six single crochet stitches into it.
Trunk Round 1: Work 6 sc into the magic ring. (6 stitches)
Trunk Round 2: Work 1 sc in each stitch around. (6 stitches)
Trunk Round 3: Repeat 1 sc, 1 inc around. (9 stitches)
Trunk Round 4: Work 1 sc in each stitch around. (9 stitches)
Fasten off, leaving a long tail. Add a little fiberfill if you want a rounded trunk, then sew the brown piece underneath the largest green layer. Make sure it is centered so the tree stands or hangs evenly.
Assembly, Decoration, and Creative Ways to Customize Your Crochet Christmas Tree
Once all the pieces are complete, carefully assemble your Crochet christmas tree pattern. Place the largest section at the bottom, the medium section above it, and the smallest section at the top. Check that the layers are centered before sewing them together.
Use the long yarn tails to attach the pieces securely. Small, discreet stitches around the center of each layer help keep the structure stable without making the seams too noticeable. If you want a fuller appearance, add a little fiberfill between the layers before closing the seams.
The next step is decorating your Christmas tree. A small yellow or gold star at the top is a classic choice. You can crochet a tiny star separately or use a lightweight decorative star that can be attached with sewing thread.
For ornaments, consider using small embroidered French knots, colorful yarn stitches, or tiny crocheted circles. Red, white, gold, and silver are traditional Christmas colors that contrast beautifully with green yarn. Space the decorations evenly to create a balanced appearance.
You can also experiment with different textures. A fluffy yarn can produce a snowy effect, while metallic thread adds a festive sparkle. Another option is to use white yarn along the edges of the layers to imitate snow resting on the branches.
If you prefer a rustic Christmas style, choose natural shades such as forest green, beige, brown, and cream. Small wooden buttons and simple fabric bows can complement this color palette. For a modern decoration, try pastel pink, soft blue, or white with silver accents.
Your finished Crochet christmas tree pattern can be used in several creative ways. A small version makes an attractive hanging ornament when you attach a loop of yarn to the top. A larger version can become a decorative centerpiece for a holiday table or a charming addition to a handmade Christmas display.
Frequently Asked Questions About the Crochet Christmas Tree Pattern
1. Is this Crochet christmas tree pattern suitable for beginners?
Yes. This project is beginner-friendly for anyone who already understands basic crochet stitches, such as chain stitch, single crochet, increases, and slip stitches. The instructions use simple circular construction, so you can practice shaping while creating a festive decoration. Beginners should work slowly and count stitches after every round to maintain the correct size.
2. What type of yarn is best for a crochet Christmas tree?
Cotton and acrylic yarn are both excellent choices. Cotton creates a firm structure and helps the finished decoration maintain its shape. Acrylic yarn is softer, widely available, and comes in many seasonal colors. For a standing decoration, choose a yarn that produces a relatively dense fabric.
3. What crochet hook size should I use?
A hook between 3.5 mm and 4.5 mm is a useful starting point for medium-weight yarn. However, the best hook size depends on the thickness of your yarn and your crochet tension. If your stitches are too loose, try a smaller hook to create a firmer fabric.
4. Can I make the Christmas tree larger or smaller?
Absolutely. To make a larger tree, add more increase rounds to the green sections. To make a smaller tree, stop increasing earlier. You can also use thicker yarn and a larger hook for a bigger decoration or finer yarn for a delicate miniature version.
5. How do I make my crochet Christmas tree stand upright?
A firm trunk and a stable base are important. You can add fiberfill to the trunk and insert a suitable lightweight support inside the finished decoration. Another option is to attach the tree to a small, flat crocheted base. Make sure any support is securely enclosed and suitable for your intended use.
6. Can I make this pattern without stuffing?
Yes. The layered design can be made without fiberfill if you prefer a flatter decoration. Simply crochet the circular sections, shape their edges slightly, and sew them together. This approach is particularly useful for Christmas ornaments, wall decorations, and handmade gift tags.
7. How can I decorate my crochet Christmas tree?
There are many possibilities. You can add crocheted stars, embroidered ornaments, tiny bows, beads, buttons, and colorful yarn details. For a snowy appearance, use white yarn along the edges. If the decoration will be handled by children, embroidered details are generally preferable to small detachable pieces.
8. How long does it take to complete this project?
The time depends on your experience, yarn choice, and the number of decorative details. A simple layered tree may take a few hours, while a more elaborate version can require additional time for assembly and embellishment. Beginners may need longer as they become familiar with the stitches.
9. Can I use this Crochet christmas tree pattern to make handmade gifts?
Definitely. Handmade crochet Christmas trees are thoughtful gifts because they combine creativity and personal effort. You can make several in different colors and sizes to create a coordinated holiday gift set. They are also lovely additions to gift baskets and festive packages.
10. How should I store my crochet Christmas tree after the holidays?
Store your finished decoration in a clean, dry container away from direct sunlight and moisture. Avoid placing heavy objects on top of it, as this may flatten the layers or distort its shape. If necessary, gently reshape the tree with your fingers before storing it.
11. Can I use leftover yarn for this pattern?
Yes. This is an excellent project for using leftover yarn from other crochet creations. Small quantities of green, brown, yellow, red, and white yarn are usually enough for a miniature tree and its decorations. Using leftover materials also makes each finished piece unique.
12. How can I make the layers look fuller and more realistic?
Try shaping the edges upward and slightly overlapping each circular section. You can also use textured stitches, such as front post stitches, to create additional dimension. Another possibility is to add small crocheted details that resemble individual branches. Consistent shaping and careful assembly will make the finished tree look more polished.
Conclusion
Creating a Crochet christmas tree pattern is a lovely way to celebrate the holiday season through handmade creativity. Throughout this tutorial, you learned how to choose suitable yarn and crochet tools, understand the essential stitches, make three circular green layers, crochet a small brown trunk, and assemble the pieces into a decorative Christmas tree.
You also discovered different ways to customize your project using stars, colorful ornaments, ribbons, embroidered details, and textured yarn. Whether you choose a simple design or a more elaborate decoration, the most important part is enjoying the process and making something that reflects your personal style.
This Crochet christmas tree pattern can become a beautiful addition to your holiday decorations, a thoughtful handmade present, or even a fun seasonal project to make with friends and family. Experiment with different sizes and color combinations, practice your stitches, and allow your creativity to guide each new version.If you enjoyed this tutorial, please leave your honest opinion in the comments. I would also love to hear your suggestions, questions, and ideas for future crochet patterns. Have you tried making a handmade Christmas tree before? Share your experience and inspire other crochet enthusiasts to create something special this holiday season!