
A Crochet bell pattern is a beautiful and versatile project that allows you to create delicate handmade decorations using yarn, a crochet hook, and a little creativity. Crochet bells are especially popular during the Christmas season, but their charm makes them suitable for many other occasions throughout the year.
Whether you want to decorate your Christmas tree, create handmade gifts, embellish wreaths, or add a festive touch to your home, a crochet bell is a lovely project that combines simplicity and elegance. With the right materials and a few basic crochet techniques, you can make an attractive bell that looks wonderful in different colors and sizes.
One of the best things about following a Crochet bell pattern is that it can be adapted to different skill levels. Beginners can start with a simple bell shape made using basic stitches, while more experienced crocheters can experiment with decorative borders, textured stitches, small bows, and delicate hanging loops.
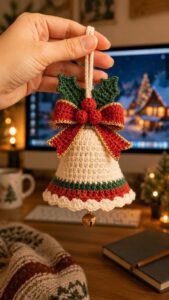
The project does not require a large amount of yarn, making it an excellent way to use leftover materials from previous crochet projects. You can choose traditional Christmas colors such as red, green, white, and gold, or explore softer shades like cream, pastel pink, silver, and light blue to create a more personalized decoration.
In this tutorial, you will learn how to make a charming crochet bell step by step, from choosing the appropriate materials to shaping the bell and adding its final decorative details. The instructions are written using standard US crochet terminology, making the pattern easier to follow for readers familiar with common crochet abbreviations.
You will also discover how to adjust the size, maintain an attractive shape, and create a neat finish. By the end of this Crochet bell pattern, you will have the knowledge needed to make a handmade bell that can become part of your seasonal decorations, handmade gift collection, or creative craft projects.
Materials, Crochet Stitches, and Preparation for Your Crochet Bell Pattern
Before beginning your Crochet bell pattern, gather all the necessary materials. Having everything ready will make the process more enjoyable and help you work without unnecessary interruptions. You will need medium-weight cotton or acrylic yarn, a crochet hook appropriate for your yarn, scissors, a yarn needle, and a stitch marker. You may also use a small amount of contrasting yarn for decorative details.
Cotton yarn is an excellent choice because it provides good stitch definition and helps the finished bell maintain its shape. Acrylic yarn is another practical option, especially if you prefer a softer texture and a wider selection of colors. For a traditional Christmas appearance, gold, white, red, and green are beautiful choices. Metallic yarn can also be used for decorative accents, although it may require a little more patience when working the stitches.
The crochet hook size should follow the recommendation on your yarn label, but you can choose a slightly smaller hook if you want a tighter fabric. A firm stitch structure is important because the bell should look neat and hold its shape. Avoid crocheting too tightly, however, because extremely tight stitches can make it difficult to insert the hook into the previous round.
This Crochet bell pattern uses several basic stitches that are commonly found in beginner-friendly crochet projects. The main stitches include the magic ring (MR), single crochet (sc), half double crochet (hdc), double crochet (dc), and slip stitch (sl st). You will also use increases (inc) to expand the upper section and create the characteristic bell shape.
Here are the abbreviations used throughout the tutorial: MR means magic ring, ch means chain, sc means single crochet, hdc means half double crochet, dc means double crochet, sl st means slip stitch, and inc means two stitches worked into the same stitch. These instructions use US crochet terminology, so it is helpful to remember that US single crochet corresponds to UK double crochet.
Before starting, decide whether you want a small decorative bell or a slightly larger ornament. The size will depend on your yarn weight, hook size, and stitch tension. You can also prepare two complementary colors if you want to add a contrasting border or decorative hanging loop. Choosing your colors in advance helps create a coordinated finished decoration.
Step-by-Step Instructions for Making the Crochet Bell Pattern
To begin your Crochet bell pattern, create a magic ring. If you are unfamiliar with this technique, you can start with a chain of two stitches and work the first round into the second chain from the hook. The magic ring is particularly useful because it creates a closed center without leaving a visible hole. Once the ring is ready, crochet six single crochet stitches into it and gently pull the yarn tail to close the opening.
Round 1: Work 6 sc into the magic ring. Place a stitch marker in the first stitch so you can easily identify the beginning of each round. Continue working in a spiral unless you prefer to join each round with a slip stitch. At the end of this round, you should have six stitches.
Round 2: Work 2 sc into every stitch around. This means you will make one increase in each stitch, giving you a total of 12 stitches. These increases gradually expand the center and form the upper portion of the bell. Keep your tension consistent to avoid creating an uneven surface.
Round 3: Repeat the sequence of 1 sc in the next stitch and 1 inc in the following stitch around. You should finish with 18 stitches. Count your stitches before moving forward, especially if you are new to working in continuous rounds. Maintaining the correct stitch count will help the bell develop evenly.
Round 4: Work 1 sc in each stitch around, without increasing. You will still have 18 stitches. This round creates a small section of straight fabric and begins to establish the shape of the decoration. Make sure your stitches are not too loose, as this can affect the final appearance.
Round 5: Repeat the following sequence around: 1 sc in the next two stitches, followed by 1 increase in the next stitch. You should now have 24 stitches. The additional stitches create a wider section that will help form the flared shape of the bell.
Round 6: Work 1 sc in each stitch around, maintaining 24 stitches. This round adds height without making the bell wider. If you want a slightly taller ornament, you can add another round of single crochet before beginning the decorative lower edge.
Round 7: To create the bell’s flared bottom, work 1 hdc in each stitch around. You will maintain 24 stitches. Half double crochet stitches are slightly taller than single crochet stitches, helping create a gentle outward shape. Avoid pulling the yarn too tightly during this round.
Round 8: Work 1 dc in each stitch around. This round adds more height to the lower edge and creates a soft bell-like silhouette. If you prefer a shorter decoration, you can replace this round with half double crochet stitches.
Round 9: Work 1 sc in each stitch around to create a neat transition. Join with a slip stitch if you are working joined rounds, or finish your spiral round according to your preferred method. Fasten off, leaving enough yarn to weave in the end securely.
To make the bell’s decorative edge, attach a contrasting yarn color to any stitch along the bottom. You can work a simple scalloped border by repeating the following sequence: skip one stitch, work 5 dc into the next stitch, skip one stitch, and sl st into the following stitch. Repeat this sequence around the entire opening. This creates small rounded details that give the bell a delicate handmade finish.
For the hanging loop, attach yarn to the top center of the bell and chain approximately 15 stitches. Slip stitch into the same area to form a small loop. Adjust the chain length according to how you intend to display the ornament. Weave in the loose ends carefully using a yarn needle.
The final step is adding the bell’s clapper. You can make a small crochet ball using a magic ring and six single crochet stitches, then fasten off and attach it inside the lower opening with a length of yarn. Alternatively, you can use a small decorative yarn tassel. Make sure every component is securely attached, especially if the decoration will be handled frequently.
Creative Ways to Decorate, Customize, and Use Your Crochet Bell Pattern
One of the most enjoyable aspects of this Crochet bell pattern is the opportunity to customize the finished piece. Although a traditional bell is often made in gold or white, there are countless color combinations to explore. A red bell with a white scalloped border creates a classic Christmas appearance, while a cream bell with a gold hanging loop offers a more elegant decorative style.
You can also create several bells in different sizes and arrange them together. Small bells look beautiful when attached to a Christmas garland, while medium-sized bells can be used as individual tree ornaments. Making a collection in coordinated colors gives your decorations a consistent appearance and allows you to use the same basic pattern for multiple projects.
Another creative option is adding small crochet leaves, flowers, or bows. A tiny red bow attached to the top of a white bell can create a festive appearance without requiring complicated techniques. You can also sew a small crocheted star onto the front or add a contrasting decorative stripe around the lower section.
For a more sophisticated finish, consider using a slightly shiny yarn or metallic thread. Gold and silver details can make the bell look especially attractive when displayed alongside other handmade Christmas ornaments. If you decide to use metallic materials, test a small section first to make sure the yarn works comfortably with your crochet hook.
Your finished Crochet bell pattern can also become a thoughtful handmade gift. Handmade ornaments are meaningful because they show the time and attention invested in creating something special. You can place a finished bell inside a small gift box, attach it to a wrapped present, or combine several bells into a handmade seasonal decoration.
If you want to use the bell outside the Christmas season, simply change the colors and decorative details. Pastel shades can work beautifully for spring decorations, while white and silver combinations are suitable for winter-themed displays. You can even make miniature bells for party decorations, handmade keychains, or decorative accessories, provided the size and attachment method are appropriate for the intended use.
Troubleshooting, Finishing Techniques, and Frequently Asked Questions About Crochet Bell Pattern
When following a Crochet bell pattern, beginners sometimes notice that their finished project does not have the expected shape. One common reason is inconsistent stitch tension. If some stitches are much tighter than others, the bell may become uneven or curl in unexpected directions. Try to maintain a relaxed and consistent rhythm throughout the project, checking the shape after every few rounds.
Another common problem is an incorrect stitch count. Missing an increase or accidentally working two stitches into one can change the overall dimensions of the bell. Using a stitch marker and counting the stitches at the end of each round will help prevent this issue. If you notice a mistake early, it is usually easier to undo a few stitches and correct it rather than continue with an uneven shape.
If your bell looks too flat, you may need to add another round of stitches to the lower section. If it looks too narrow, consider adding an increase round before beginning the flared edge. Remember that changing the number of stitches will also affect the finished dimensions, so make small adjustments and observe the shape as you work.
A bell that curls inward at the bottom may have been crocheted with stitches that are too tight or with insufficient increases. Try using a slightly larger hook or relaxing your tension. You can also gently shape the finished piece with your hands. If you use cotton yarn, light blocking may help improve the appearance, provided the yarn care instructions allow it.
To keep your crochet bell looking beautiful, store it in a clean, dry place when it is not being displayed. Avoid placing heavy objects on top of it, as this may flatten the decorative edge. If necessary, gently reshape the bell by hand before displaying it again. Keeping handmade ornaments away from excessive moisture and direct heat can also help preserve their appearance.
Frequently Asked Questions (FAQ)
1. Is the Crochet bell pattern suitable for beginners?
Yes! This Crochet bell pattern is suitable for beginners who already know how to make basic stitches such as single crochet, half double crochet, and double crochet. The project uses simple increases and straightforward rounds. Beginners can take their time counting stitches and checking the shape as they work.
2. How much yarn do I need to make a crochet bell?
A small crochet bell generally requires only a small amount of yarn. The exact quantity depends on the yarn weight, hook size, and finished dimensions. Leftover yarn from previous projects is often sufficient for making several small ornaments.
3. Which crochet hook is best for this pattern?
The best crochet hook depends on the yarn you choose. Follow the yarn manufacturer’s recommended hook size and make a small sample if necessary. A slightly smaller hook can help produce firmer stitches, which is useful when creating a decorative bell that needs to maintain its shape.
4. Can I make the crochet bell in different sizes?
Absolutely! You can make larger or smaller versions by changing the yarn weight, hook size, and number of increase rounds. For a miniature bell, use thinner yarn and a smaller hook. For a larger decoration, choose thicker yarn and adjust the number of rounds gradually.
5. How can I make my crochet bell hold its shape?
Use consistent tension and avoid excessively loose stitches. Cotton yarn is a good option because it generally provides excellent stitch definition. If your bell needs additional support, you can use an appropriate fabric-safe stiffening method, following the manufacturer’s instructions and testing it on a small sample first.
6. Can I use acrylic yarn instead of cotton?
Yes. Acrylic yarn works well for this project and is available in many colors. It creates a softer finish and can be a convenient choice for Christmas decorations. Keep in mind that different fibers behave differently, so the finished bell may have a slightly different texture and structure.
7. How do I attach the hanging loop securely?
The easiest method is to chain several stitches using the same yarn and attach the chain securely to the top of the bell with a slip stitch. Weave in the yarn ends carefully. If the bell will be used as a frequently handled ornament, reinforce the attachment point with additional stitching.
8. Can I make a crochet bell without a magic ring?
Yes. If you find the magic ring difficult, chain two and work the required stitches into the second chain from the hook. This alternative is easy for beginners, although the center may be slightly less adjustable than a magic ring.
9. What can I use instead of a crocheted clapper?
You can use a small yarn tassel or a simple crocheted ball. These options maintain the handmade appearance of the decoration. If the bell is intended for young children, avoid small detachable components and choose securely attached, age-appropriate decorative details.
10. How long does it take to complete a crochet bell?
A simple crochet bell may take approximately 30 minutes to an hour, depending on your experience, yarn choice, and decorative details. Beginners may need more time, particularly when learning to work in rounds and maintain an even stitch count.
11. Can I sell crochet bells made using this pattern?
You can generally sell finished handmade items that you personally create, subject to any applicable pattern licensing terms and local rules. If you plan to sell your decorations, make sure your product descriptions accurately explain the materials, dimensions, and handmade nature of each item.
12. How should I clean and store crochet bells?
Cleaning depends on the fiber used. Check the yarn label before washing. When appropriate, gently hand-wash the decoration and allow it to dry completely in its natural shape. Store it in a clean container away from moisture, dust, and excessive pressure.
Conclusion
This Crochet bell pattern demonstrates how a few basic crochet techniques can be transformed into a beautiful handmade decoration. Throughout the tutorial, you learned how to choose the right materials, understand the essential crochet abbreviations, work the bell step by step, create a decorative scalloped edge, and add a hanging loop and clapper. You also discovered several ways to customize your project with different colors, textures, and embellishments.
Whether you are a beginner learning to crochet or an experienced crafter looking for a quick seasonal project, handmade crochet bells are a wonderful way to express your creativity. They can decorate Christmas trees, embellish wreaths, become thoughtful gifts, or add a personal touch to your home. The best part is that every finished bell can be slightly different, making each creation unique.
Now that you have learned how to make your own crochet bell, why not experiment with different yarn colors and decorative details? Leave your honest opinion in the comments and share your suggestions! We would love to know how your project turned out, which colors you chose, and what other crochet decorations you would like to learn how to make.