
The Quilt Hunter’s Star Pattern is a beautiful quilting design that combines geometric shapes, contrasting fabrics, and carefully arranged points to create an eye-catching star motif. This traditional-inspired quilt pattern is an excellent choice for anyone who enjoys working with fabric, exploring geometric designs, and creating handmade projects with a timeless appearance.
Whether you are an experienced quilter or someone learning new patchwork techniques, the Hunter’s Star design offers an enjoyable opportunity to develop precision and creativity.
One of the most appealing features of the Quilt Hunter’s Star Pattern is the way its fabric pieces come together to create the illusion of interlocking stars. Through the thoughtful placement of light, medium, and dark fabrics, simple geometric shapes transform into a striking design.
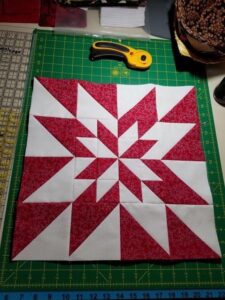
The arrangement creates movement and depth, making the finished quilt look more intricate than the individual pieces might suggest. This visual effect makes the pattern especially attractive for bed quilts, decorative throws, wall hangings, and handmade gifts.
Creating a Hunter’s Star quilt also provides an excellent opportunity to experiment with different fabric combinations. Traditional versions often use two contrasting colors, but modern interpretations can include several shades, floral prints, small geometric patterns, or seasonal fabrics.
The key is maintaining enough contrast between the fabric sections so that the star shapes remain easy to recognize. With careful cutting, accurate sewing, and thoughtful fabric selection, you can create a beautiful quilt that reflects your personal style while following the recognizable structure of the classic Hunter’s Star design.
Understanding the Quilt Hunter’s Star Pattern and Preparing Your Materials
The first step in making a Quilt Hunter’s Star Pattern is understanding how its geometric construction works. The design is formed by arranging fabric units into pointed star shapes that appear to connect with one another. These shapes are generally created from triangles and other angled fabric sections. When assembled correctly, the contrasting pieces produce a visually interesting pattern with a strong geometric appearance.
A traditional Hunter’s Star quilt block relies heavily on contrast. For example, you can combine white and navy blue fabrics, cream and burgundy, gray and mustard yellow, or any other combination that creates a clear difference between the sections. Light fabrics help certain areas stand out, while darker fabrics create depth and emphasize the star points. Before cutting anything, arrange your selected fabrics side by side to see whether the contrast is strong enough.
To prepare your materials, gather quilting cotton, a rotary cutter, a self-healing cutting mat, a quilting ruler, sewing machine, coordinating thread, pins or fabric clips, an iron, and an ironing board. You will also need batting and backing fabric if you plan to turn your finished quilt top into a complete quilt. Using suitable quilting cotton helps maintain consistent fabric behavior during cutting, sewing, and pressing.
For a beginner-friendly project, consider choosing two main fabrics. One can serve as the background, while the second creates the star sections. If you prefer a more colorful result, introduce additional prints while keeping the same general contrast between the main design areas. Avoid selecting fabrics that are too similar in value because the star points may become difficult to distinguish once the quilt is assembled.
Before beginning the Quilt Hunter’s Star Pattern, decide how large you want the finished project to be. You can create a small wall hanging, a decorative cushion cover, a lap quilt, or a larger bed quilt. Your chosen dimensions will determine how many blocks you need and how much fabric to purchase. It is always helpful to prepare a simple layout plan before cutting, especially when working with several repeating blocks.
Finally, wash and dry your fabrics if that is part of your usual quilting preparation routine. Press them carefully to remove wrinkles and ensure that they lie flat on your cutting surface. Accurate preparation makes it easier to measure the angled pieces required for this design. Taking time at this stage can prevent unnecessary mistakes and help your Hunter’s Star quilt pattern develop a neat, professional-looking finish.
Step-by-Step Instructions for Making the Quilt Hunter’s Star Pattern
Begin by preparing a cutting plan for your chosen quilt dimensions. A Hunter’s Star block can be constructed using different templates and cutting methods, so the exact measurements depend on the particular block size you want to achieve. For this guide, use a consistent block plan and follow the measurements of your selected template. Include seam allowances in your calculations, typically 1/4 inch for standard quilting seams.
Next, cut your background and star fabrics into the required geometric pieces. Depending on the construction method, these may include squares, rectangles, and triangles. If you are following a template-based method, place the template carefully over the fabric and mark or cut the pieces according to its instructions. Keep similar pieces grouped together so that you can easily identify which sections belong to each block.
After cutting, organize the pieces into individual Hunter’s Star units. Lay them on a flat surface and follow your chosen block layout. Pay close attention to the direction of the angled edges because reversing a piece can change the appearance of the star. Before sewing, check that the contrasting fabrics create the intended pattern and that all the pieces are positioned correctly.
Start assembling the smaller units by joining the appropriate angled fabric sections. Place the fabrics with their right sides facing each other, align the edges, and pin or clip them in place. Sew using a consistent 1/4-inch seam allowance. When working with angled seams, guide the fabric carefully under the presser foot without stretching the edges. Accurate stitching is especially important because several seams will meet when the larger block is assembled.
Once the smaller sections are sewn, press the seams according to your preferred quilting method. Some quilters prefer pressing seams open to reduce bulk, while others press them toward the darker fabric. Either method can work, depending on the construction and how the seams intersect. Avoid pulling the iron across the fabric, as this may distort the angled pieces and affect the final block dimensions.
Continue joining the sections until the complete Quilt Hunter’s Star Pattern block takes shape. At this point, the contrasting areas should form recognizable star points and create the characteristic geometric arrangement. Place the completed block on your work surface and check its overall dimensions. If you notice uneven edges, small alignment problems, or inconsistent seam allowances, make adjustments before joining it to other blocks.
Assembling, Quilting, and Finishing Your Hunter’s Star Quilt
Once you have completed the individual blocks, the next step is arranging them into the final quilt layout. Place all the blocks on a large flat surface or design wall so that you can see how the patterns interact. The Hunter’s Star design is especially attractive when repeated blocks create a continuous geometric effect. Experiment with the direction of the blocks until you find an arrangement that looks balanced and visually pleasing.
Before joining the blocks, check that the star points are aligned as closely as possible. Matching the important intersections helps create a clean and organized appearance. Pin the blocks together where the seams meet, then sew the rows using a consistent seam allowance. Press the seams carefully after each row is completed to keep the quilt top flat.
When all the rows are ready, join them to form the complete quilt top. Work slowly and avoid stretching the fabric while sewing. If the blocks were cut and assembled accurately, the finished top should have a balanced appearance with clearly defined geometric stars. Press the entire quilt top gently and inspect it for loose threads or small areas that may need correction.
The next stage is preparing the quilt sandwich. Lay the backing fabric on a clean surface with the wrong side facing upward. Place the batting over it, smoothing out wrinkles and ensuring that the layers are flat. Position the completed Hunter’s Star quilt top on the batting with the right side facing upward. The three layers should be aligned as evenly as possible before basting.
Secure the layers using your preferred basting method, such as safety pins, temporary fabric adhesive, or hand-basting stitches. Begin near the center and work outward to reduce wrinkles and shifting. Once the layers are secured, choose a quilting design that complements the geometric appearance of the Quilt Hunter’s Star Pattern. Straight-line quilting, diagonal lines, and simple geometric stitching are all suitable possibilities.
After quilting, trim the excess batting and backing fabric, leaving enough material to prepare the binding. Create or prepare your binding strips, attach them around the edges of the quilt, and fold them over to cover the raw edges. Sew the binding securely, then inspect the corners and edges to make sure everything is neat. Finish by removing any remaining loose threads and giving the quilt a final gentle press.
Design Ideas, Common Mistakes, and Frequently Asked Questions About the Quilt Hunter’s Star Pattern
One of the best things about the Quilt Hunter’s Star Pattern is its versatility. Although the traditional design often uses two contrasting fabrics, you can adapt the color arrangement to suit different decorating styles. A combination of soft beige and white can produce an elegant, understated quilt, while navy and gold create a more dramatic appearance. Pastel colors are also lovely for nursery projects, decorative throws, and handmade gifts.
Another interesting option is using printed fabrics. Small floral designs, subtle polka dots, and delicate geometric prints can add personality without overwhelming the star shapes. If you choose several prints, try to maintain a consistent color palette. This helps the different pieces work together while allowing the geometric design to remain the main focus.
You can also experiment with different quilt sizes. A single Hunter’s Star block can become a decorative cushion cover or a small wall hanging. Several blocks can be joined to create a table runner, lap quilt, or bedspread. Adjusting the block dimensions and the number of repetitions allows you to explore many possibilities without changing the fundamental design.
One common mistake when making a Hunter’s Star quilt is inaccurate cutting. Because the design uses angled sections, even small measurement differences can affect the alignment of the star points. To avoid this problem, use a reliable quilting ruler, check your measurements before cutting, and make sure your fabric is completely flat. Accurate cutting is one of the most important factors in achieving a professional-looking result.
Another challenge is choosing fabrics without enough contrast. When two fabrics have similar lightness or darkness, their shapes may blend together, making the stars less noticeable. A helpful technique is to take a black-and-white photograph of your fabric choices. This makes it easier to compare their values and determine whether the differences are strong enough to define the design.
Frequently Asked Questions (FAQ)
1. What is a Quilt Hunter’s Star Pattern?
The Quilt Hunter’s Star Pattern is a geometric quilting design made from contrasting fabric sections arranged to create pointed star shapes. Its distinctive appearance comes from the way the individual pieces connect to form an interlocking visual pattern. It is commonly used for quilts, wall hangings, table runners, and decorative home projects.
2. Is the Hunter’s Star quilt pattern suitable for beginners?
Yes, beginners can learn this pattern with patience and careful preparation. The angled seams and geometric arrangement may require additional attention, but starting with a small block is a practical way to develop the necessary skills. Using a template and checking each section before sewing can make the process easier.
3. What fabrics are best for a Hunter’s Star quilt?
Quilting cotton is a popular choice because it is relatively easy to cut, sew, and press. You can use solid colors, small prints, or a combination of both. The most important consideration is choosing fabrics with enough contrast to make the star shapes clearly visible.
4. How many fabrics do I need for the Quilt Hunter’s Star Pattern?
A traditional version can be made with two contrasting fabrics, such as a light background and a dark star fabric. However, you can introduce additional colors and prints to create a more elaborate appearance. The quantity depends on your block dimensions, quilt size, and chosen construction method.
5. What size should a Hunter’s Star quilt block be?
There is no single required size. Hunter’s Star blocks can be made in several dimensions depending on the project. Smaller blocks are useful for decorative projects, while larger blocks can be suitable for lap quilts and bed quilts. Always follow a consistent template and cutting plan.
6. How do I keep the star points aligned?
Accurate cutting, consistent seam allowances, and careful pinning are essential. Match the important seam intersections before sewing and avoid stretching the fabric. Pressing the seams carefully also helps keep the blocks flat and makes alignment easier.
7. Can I make a Hunter’s Star quilt using different colors?
Absolutely! The pattern works beautifully with many color combinations. You can use seasonal colors, traditional combinations, modern neutrals, or bright contrasting shades. Just make sure that the main fabric sections remain visually distinct so the star design does not disappear.
8. What quilting designs work best with the Hunter’s Star pattern?
Straight-line quilting, diagonal stitching, and simple geometric quilting designs are excellent choices. You can also use gentle curves or free-motion quilting if you want a more decorative finish. Choose a quilting design that complements the star arrangement rather than making the finished surface look overly busy.
9. Can I use the Hunter’s Star block for projects other than quilts?
Yes. Individual blocks can be adapted into cushion covers, table toppers, wall decorations, and other fabric projects. The geometric design makes a striking decorative element even when used on a smaller scale.
10. How can I make my Hunter’s Star quilt look more professional?
Focus on accurate measurements, consistent seam allowances, careful pressing, and precise block alignment. Select fabrics that work well together, secure the quilt layers properly, and use even quilting stitches. Taking your time with each stage will make a noticeable difference in the finished project.
Conclusion
The Quilt Hunter’s Star Pattern is a wonderful project for anyone who appreciates geometric quilting, traditional patchwork techniques, and creative fabric combinations. Throughout this guide, we explored the materials needed, fabric selection, cutting preparation, block construction, row assembly, and the finishing process. Each stage contributes to creating a quilt with well-defined star shapes and a beautiful overall appearance.
By paying attention to fabric contrast, accurate cutting, consistent seam allowances, and careful pressing, you can achieve a result that looks polished and reflects your personal creativity. Whether you decide to make a small decorative project or a larger quilt for everyday use, the Hunter’s Star design offers plenty of opportunities to experiment and develop your quilting skills.
Now it is your turn to share your experience! Have you ever made a Hunter’s Star quilt, or are you planning to try this pattern for the first time? Leave your honest opinion in the comments and share any suggestions, favorite color combinations, or useful quilting tips. Your feedback and ideas can inspire other quilting enthusiasts to create their own beautiful projects!