
One of the most enjoyable aspects of the Quilt strawberry block pattern is the opportunity to work with different fabrics and color combinations. Traditional strawberry designs usually feature red or pink fabric for the fruit, green pieces for the leaves, and neutral backgrounds that help the main shape stand out.
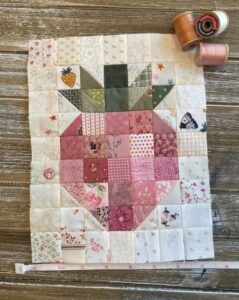
You can choose small floral prints, polka dots, gingham, or solid cotton fabrics to create a personalized appearance. These simple choices can completely change the personality of the finished block, making every version feel special and handmade.
A strawberry quilt block can be used in several creative ways, from individual decorative pieces to larger patchwork projects. You can combine multiple blocks to create a seasonal quilt, a table runner, a wall hanging, a cushion cover, or a decorative panel for your home.
The project also provides an excellent opportunity to improve your fabric cutting, seam accuracy, piecing, and pressing skills. In this tutorial, you will learn how to organize your materials, prepare the fabric pieces, assemble the strawberry design, and finish your block neatly. The instructions are designed to help you understand the construction process and adapt the pattern to your preferred measurements.
Materials and Preparation for the Quilt Strawberry Block Pattern
Before starting your Quilt strawberry block pattern, prepare all the materials you will need. Having everything organized makes the sewing process easier and helps prevent unnecessary interruptions. For this project, quilting cotton is an excellent choice because it is easy to cut, handle, and sew. Select red or pink fabric for the strawberry, green fabric for the leaves, and a background fabric in white, cream, beige, or another color that complements your design.
You will also need a rotary cutter, cutting mat, quilting ruler, fabric scissors, sewing machine, matching thread, pins or sewing clips, and an iron. A fabric marking pen can help you identify cutting lines and sewing guides when working with smaller pieces. If you prefer sewing by hand, you can complete the block with a needle and strong cotton thread, although a sewing machine will make the process faster and more consistent.
For the strawberry body, choose a fabric with a noticeable color that contrasts with the background. Deep red creates a traditional appearance, while pink, coral, or burgundy can produce a softer and more contemporary result. The green fabric will represent the strawberry leaves, so a medium or dark green works particularly well. You may also combine two shades of green to give the leaves more visual depth.
The background fabric is equally important because it creates the space surrounding the strawberry shape. A light background helps the fruit become the focal point of the block. Small prints can add personality without overwhelming the design, while solid fabrics produce a clean and classic patchwork appearance. If you are making several blocks, consider using the same background fabric throughout the project to maintain visual consistency.
Before cutting, wash and dry your cotton fabrics if necessary, following the manufacturer’s care instructions. This step helps minimize unexpected shrinkage after the quilt is assembled. Press the fabrics carefully to remove wrinkles, making sure the material lies flat on your cutting mat. Accurate cutting is essential because uneven fabric pieces can make the seams difficult to align.
For a beginner-friendly project, start with a finished block measuring approximately 8 inches square. Remember to include a 1/4-inch seam allowance around each piece when calculating your cutting dimensions. You can increase or decrease the measurements depending on your intended project. Creating a paper template before cutting the fabric is also helpful, especially when shaping the strawberry body and its leafy top.
Step-by-Step Instructions to Sew Your Strawberry Quilt Block
The first step in creating your Quilt strawberry block pattern is planning the strawberry shape. A traditional strawberry silhouette can be made using a wide upper section that gradually narrows toward a rounded or slightly pointed bottom. You can create this appearance with simple geometric fabric pieces rather than complicated curved seams. Draw the desired shape on paper and divide it into sections that can be assembled using straight stitching.
Next, cut the red or pink fabric pieces that will form the main strawberry body. One beginner-friendly approach is to use several rectangles and triangles arranged to create a tapered silhouette. For an 8-inch finished block, you can begin with a central red section approximately 4 inches wide and 5 inches tall, adjusting the surrounding pieces to create the desired shape. These measurements are suggestions, so use your paper template to guide the final arrangement.
Now prepare the green fabric for the leaves. Cut several small triangles or leaf-shaped pieces and arrange them along the upper edge of the strawberry. The leaves should spread outward from the center, creating the familiar leafy crown associated with fresh strawberries. You can use different shades of green to make the design more interesting, but keep the pieces similar in size so the top remains balanced.
Arrange the background pieces around the strawberry body. These pieces will help define the silhouette and create a square block that can easily be joined to other quilt blocks. Place the red fabric in the center, the green pieces above it, and the background fabric around the remaining edges. Take a moment to inspect the arrangement before sewing. This simple planning stage can prevent mistakes and reduce the need to unpick seams later.
Begin sewing the smaller sections together using a consistent 1/4-inch seam allowance. If you are using triangular pieces, place them right sides together and align their edges carefully. Sew slowly, especially around the pointed sections where several seams meet. After stitching each section, press the seam allowances according to your preferred quilting method. Alternating the direction of the seams can help reduce bulk where multiple pieces connect.
Once the smaller sections are assembled, join them to create the complete strawberry design. Attach the green leafy section to the upper part of the red fruit and then sew the surrounding background pieces into place. Check that the strawberry remains centered within the block. If necessary, trim small uneven areas using your quilting ruler, making sure you do not cut into the seam allowances.
Finishing, Pressing, and Creative Ways to Use Your Quilt Strawberry Block
After assembling the main pieces, carefully inspect your Quilt strawberry block pattern to ensure that all seams are secure. Look for loose threads, uneven stitching, or areas where the fabric edges may have shifted during sewing. Small corrections at this stage can make a noticeable difference in the finished appearance. If you find a seam that does not align correctly, carefully remove the stitches and sew it again.
Pressing is an important part of the quilting process. Use an iron at a temperature suitable for your fabric and press the seams gently. Avoid dragging the iron across the fabric because this can distort the shape of the block. Instead, lift and place the iron over each section. A well-pressed block will lie flatter and will be easier to join with other patchwork pieces.
Next, measure the completed block. For an 8-inch finished design, the unfinished block should measure approximately 8 1/2 inches square, allowing for a 1/4-inch seam allowance on each side. If the block is slightly larger, trim the excess fabric carefully. Keeping all blocks the same size is particularly important when creating a quilt made from multiple strawberry designs.
You can also add decorative details to make your strawberry quilt block more recognizable. Small embroidered stitches in yellow, cream, or white can represent strawberry seeds. Use simple straight stitches or tiny French knots to create these details. Another option is to add a few decorative quilting lines that follow the shape of the fruit. These embellishments are optional, but they can give the finished block additional texture and personality.
Once the block is complete, consider how you would like to use it. Several strawberry blocks arranged in rows can become a beautiful seasonal quilt. A single block can be incorporated into a cushion cover, a fabric wall decoration, a kitchen table runner, or a handmade tote bag. You can also combine strawberry blocks with simple floral or geometric blocks to create a more varied patchwork composition.
For a polished result, choose a quilting layout that allows the strawberry designs to remain visible. If you are making a larger quilt, use a consistent background color and distribute the strawberry blocks evenly. You can add borders in coordinating red, green, or cream fabrics to frame the design. Before joining all the blocks, arrange them on a flat surface and experiment with different layouts until you find one that looks balanced and attractive.
Tips, Variations, and Frequently Asked Questions About the Quilt Strawberry Block Pattern
One helpful tip for sewing a successful Quilt strawberry block pattern is to maintain accurate seam allowances throughout the project. Even small differences can affect the final measurements, especially when several fabric pieces are joined together. A 1/4-inch quilting foot can help you maintain consistent seams. If you are new to patchwork, practice on fabric scraps before assembling the actual strawberry design.
Another useful technique is labeling your fabric pieces before sewing. When a block contains several small triangles and background sections, it is easy to confuse their positions. Place the pieces in the correct arrangement and take a photograph or use small labels to remember where each section belongs. This simple habit can make the assembly process much easier, particularly when creating multiple blocks.
Fabric selection also influences the finished appearance. Traditional red and green fabrics create a classic strawberry theme, but there is no reason to limit yourself to these colors. Pink strawberries with sage-green leaves can produce a delicate design, while burgundy fruit and dark green leaves create a richer appearance. Small floral prints can add a charming vintage feeling, especially when combined with cream-colored backgrounds.
If you want to create a more detailed design, consider adding embroidered strawberry seeds after the main block has been assembled. This allows you to position the details naturally without worrying about matching them during the piecing process. Use embroidery floss in a contrasting color and keep the stitches small and evenly spaced. Remember that decorative details should complement the patchwork rather than make the block unnecessarily complicated.
Beginners should not worry if their first block is not perfectly symmetrical. Quilting is a craft that improves with practice, and small variations are part of the handmade character of patchwork. Focus on accurate cutting, careful alignment, and secure stitching. As you become more comfortable with the techniques, you can experiment with more detailed strawberry shapes, different fabric combinations, and larger quilt layouts.
Frequently Asked Questions
1. What is a Quilt strawberry block pattern?
A Quilt strawberry block pattern is a patchwork design that uses fabric pieces to create the recognizable shape of a strawberry. It generally includes a red or pink fruit section, green leaves, and a contrasting background. The finished block can be used individually or combined with other blocks to create larger quilting projects.
2. Is the strawberry quilt block suitable for beginners?
Yes! This project can be suitable for beginners because it can be constructed with basic geometric shapes and straight seams. Starting with a simple template and larger fabric pieces makes the process easier. As your confidence grows, you can experiment with smaller details and more elaborate designs.
3. What fabric is best for making a strawberry quilt block?
Quilting cotton is one of the best choices because it is stable, easy to cut, and convenient to sew. Choose red or pink cotton for the strawberry, green cotton for the leaves, and a coordinating background fabric. Prewashing the material can help reduce shrinkage later.
4. How do I make the strawberry shape using patchwork?
You can create the strawberry silhouette by arranging fabric rectangles and triangles to form a wider upper section and a narrower lower section. Add green triangles or leaf-shaped pieces along the top to represent the leaves. A paper template can help you plan the arrangement before cutting your fabric.
5. How large should a strawberry quilt block be?
There is no single required size. An 8-inch finished block is a practical starting point, but you can make smaller or larger versions depending on your project. Always remember to include seam allowances when calculating the unfinished dimensions.
6. Can I use different colors instead of traditional red and green?
Absolutely! You can use pink, coral, burgundy, or even patterned fabric for the strawberry. Different shades of green can be used for the leaves, while cream, white, or pastel fabrics work beautifully as backgrounds. Creative color combinations make each block unique.
7. How can I add strawberry seeds to the design?
Small embroidered stitches are an easy way to represent strawberry seeds. Use yellow, cream, or white embroidery floss and create tiny straight stitches or French knots across the fruit section. Add the details after assembling the patchwork block for easier placement.
8. What can I make with several strawberry quilt blocks?
Multiple blocks can be combined to create a seasonal quilt, table runner, cushion cover, wall hanging, placemat, or decorative kitchen panel. You can also alternate strawberry blocks with plain squares or floral patchwork designs to create a more varied composition.
9. Why is my quilt block becoming uneven?
Uneven blocks are often caused by inconsistent seam allowances, inaccurate cutting, or stretching the fabric while sewing. Measure each piece carefully, use a quilting ruler, and maintain a consistent 1/4-inch seam allowance. Pressing the seams carefully can also help the block maintain its intended shape.
10. Should I wash the fabric before starting the project?
Prewashing quilting cotton is generally recommended because it helps remove manufacturing finishes and reduces the possibility of shrinkage after the project is completed. However, follow the fabric manufacturer’s care instructions and dry the material appropriately before cutting.
Conclusion
The Quilt strawberry block pattern is a delightful quilting project that combines simple patchwork techniques with a beautiful fruit-inspired design. Throughout this tutorial, we explored how to choose suitable fabrics, prepare the materials, plan the strawberry silhouette, cut the fabric pieces, assemble the leaves and fruit, and finish the block with careful pressing and trimming. We also discussed decorative embroidery, color variations, and creative ways to incorporate strawberry blocks into larger handmade projects.
Whether you are making your first patchwork block or adding another design to your quilting collection, this project offers plenty of opportunities to express your creativity. Remember that accurate cutting, consistent seams, and careful fabric placement are the foundations of a beautiful result. You can follow the suggested colors or experiment with your own combinations to create a strawberry design that reflects your personal style.
Have you tried making a Quilt strawberry block pattern? We would love to hear your honest opinion! Leave a comment sharing your experience, favorite fabric combinations, questions, or suggestions for improving this project. Your ideas can inspire other quilting enthusiasts and help everyone discover new ways to enjoy the wonderful art of patchwork. Happy quilting!